Nitro Photo User Manual
Overview
Note: This user manual is best used as a reference in conjunction with the many videos I have created on YouTube (see Video Tutorials below).
Nitro is an advanced photo library manager and editor. It is able to browse and edit images in both the Apple Photo Library and the File System (i.e., Finder folders on Mac and Files.app folders on iPads and iPhones). All edits are non-destructive. That means that the original image is never modified. Instead, edits are stored as metadata along with the image, and the edited image is reconstructed using the original image as needed. Nitro uses (and extends) Apple’s RAW engine to decode RAW images. Apple's RAW engine supports hundreds of RAW camera formats, as well as DNGs and iPhone ProRAW images. However, there are many cameras that Apple does not support fully. For most of those, Nitro adds additional camera support. These include Compressed Fujifilm images, Nikon HE* format, GoPro RAW and many more. This is one of Nitro’s key advantages over other apps that use Apple's RAW engine. Please note: when this manual refers to iOS, it is referring to both iOS (iPhones) and iPadOS (iPads).
Table of Contents
Video Tutorials
You can watch video tutorials of Nitro on YouTube at:
Apple Photos and the File System
Nitro can work with both the Apple Photo Library and files stored in the File System (the Files.app on iOS and the Finder on macOS). When using the Photo Library, any changes you make using Nitro will be stored directly into your photo library. If you are using iCloud Photos, those changes will also be synchronized automatically to your other devices by iCloud. You can continue to edit non-destructively on your other devices and return back again if you like. iCloud Photos is not a requirement for using Nitro. When using the File System, edits, ratings, and other metadata are stored in XMP sidecars next to the original files.
Browsing Options
You can choose whether to browse the file system or the photo library, and switch between them seamlessly. The way you switch depends on the platform. On macOS, you make a window to browse either the photo library or Finder folders. You can make as many windows as you like and the app remembers the window type and position. You make new windows in the File menu.
Files.app and Finder folders
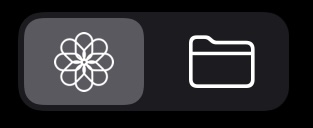
On iOS, there is a special control at the bottom of the screen that switches between Files.app and the Photos. It looks like this:
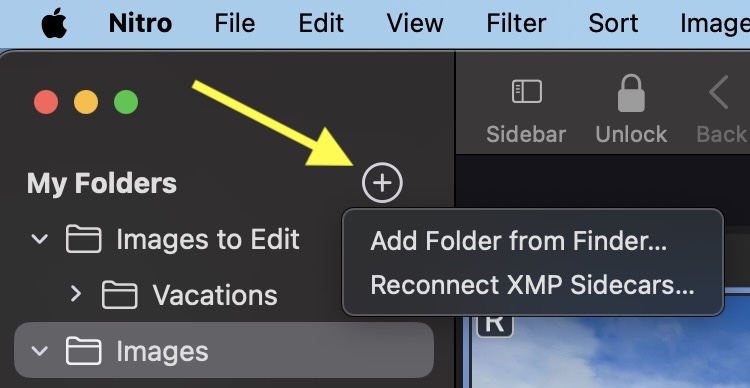
On macOS, to make a new window, go to the File menu. You can also drag folders into the library area from the Finder. Initially, the File Browser will have no folders in it. Because the app is sandboxed, it does not have any access to your disk unless you grant it. You do that by using the File menu and adding a folder, or by pressing the Plus button at the top of the library list as shown here:
Selecting a folder will show the contents and expanding the outline will show you subfolders. Nitro by default does not show the contents of subfolders. To do that, choose the button to the right of the Edit button at the bottom of the window.
![]()
You can remove folders by right-clicking or by swiping to the left and picking Remove. When you do that, you have the option of removing the folder from the app, or actually moving the folder into the Finder’s trash. The contextual menu has other commands as well, including the ability to make new folders.
A word about permissions. Because Nitro stores ratings and edits in XMP sidecars, it requires the ability to make changes to any folder you add to it. Nitro can browse read-only folders but it will not be able rate, flag, or edit images in those folders. If you add a read only folder, Nitro will display an error message if you try to do any of those things, but you can still view your images.
Photo Library Browsing
In Nitro, the Photo Library is separated into sections. The first section has All Photos and Favorites. Changes you make in Nitro are automatically applied to the Photo Library. For example, if you Favorite an image in Nitro, it will appear as a favorite in Photos or any other app that can view the Photo Library.
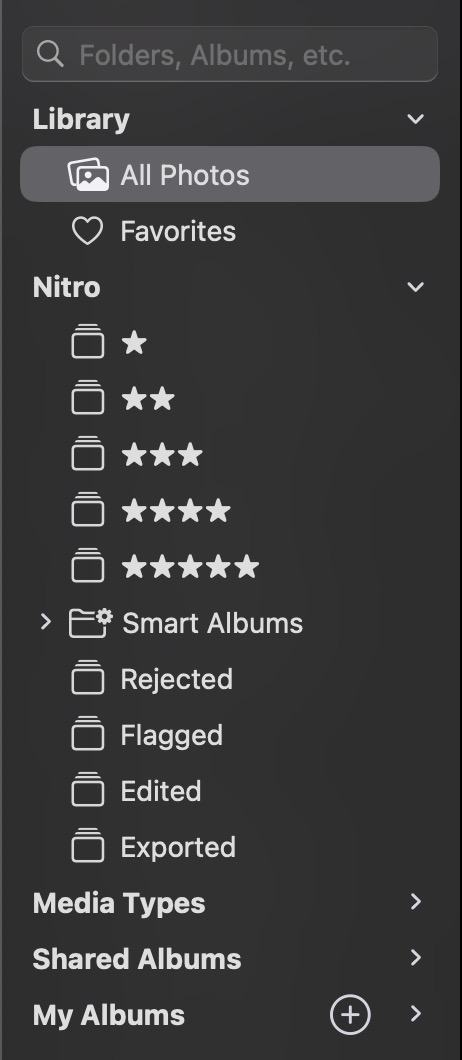
The next section is a special section created by Nitro itself. Here are rating albums, as well as albums that Nitro maintains for rejected images, flagged images, as well as images you have edited and exported. Because these are regular albums, they also appear in Photos. Just look for the Nitro folder in Photos. There is also a folder for Smart Albums, which will be discussed shortly. The albums in the Nitro section are managed by Nitro itself. As you rate, flag, edit or do other things in the app, Nitro will add and remove images from those albums automatically. You can see any changes to those albums in Photos as well. While you can also manipulate the albums in Photos, please avoid doing that because there is a chance you will confuse Nitro, especially if it’s running at the same time.
After that are Media Types, such as RAW images and videos. Shared Albums follow. You can view items in Shared Albums, but you cannot edit or change them. This is a restriction imposed by Apple. The last section contains albums that you have created.
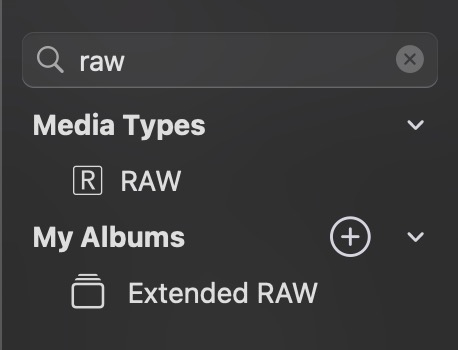
At the top of the library is a search field. You can use that to quickly filter your library by album name. In the image below, the library is filtered by "raw" which shows all matches including the enclosing folders.
Sorting and Filtering
When you click or tap on a library item on the left, the contents are displayed on the right in a grid. Images have badges to indicate status such as file type, flag, rating, and edit state. At the bottom of the grid is a status bar as shown below.
![]()
The first two buttons let you jump to the beginning and end of the grid list. Following that is a "share" button that lets you export images with control over format and destination. Next is the number of items and sort order, along with a "move to trash" button.
You can sort the contents of the grid by choosing the "Sort" button at the top. On iPhones, the Sort command is in the "..." menu in the upper right.

You can also filter images by tapping the Filter button, or by using the Quick Filter. On iPhones, the Filter interface is in the same “…” menu. The Quick Filter lets you quickly set a filter by rating and flag state. Tap the setting again to clear it.
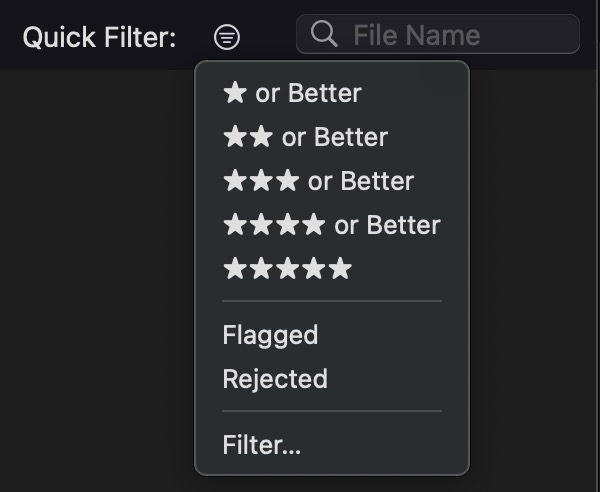
Once a filter has been applied, the status bar will update to show the filter and display a blue filter button. That tells you there is a filter applied. If you tap the blue button, the filter UI appears. You can get the same thing by tapping the Filter button at the top of the screen.
![]()
The filter interface contains a large number of possible choices. If there is an X in a filter row, then that means it's applied. You can click the X to remove the filter. On iOS, the "X" appears to the right of the title.
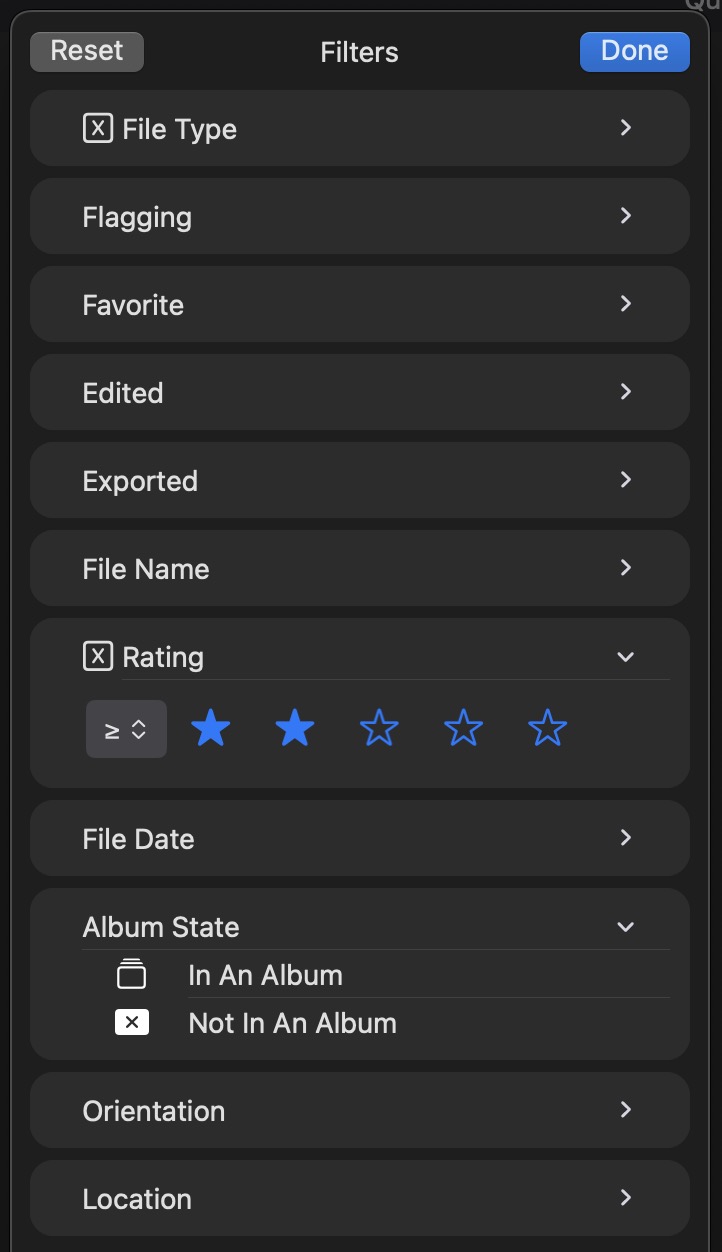
When filtering the file system, the list of filters is slightly different. For example, there is no concept of albums, so that row is absent. However, there are rows for things like Camera Model which can be filtered for when using the file system, but cannot be done efficiently in the Photo Library. Filters are "AND" operations, which means that if you filter by "Movies" and "2 stars", you will get 2 star movies, not "2 star" OR "movies".
There are two ways to filter by file name. One way is by using the filter UI and expanding the File Name section. The other way is to type into the field next to the Quick Filter popup. The one in the Filter UI has more options for filtering by name, such as "contains" or "does not contain", while the one in the Quick Filter is simply a "contains" search. For example, if you type "arw", it will look for any file containing the sequence of characters "arw" anywhere in the name. This filter is case-insensitive. This is a quick way to search file extension ("ARW" is the file extension for Sony RAW images).
Smart Albums in the Photo Library
When using the Photo Library, you can also create a smart album by clicking a button at the bottom of the filtering interface.
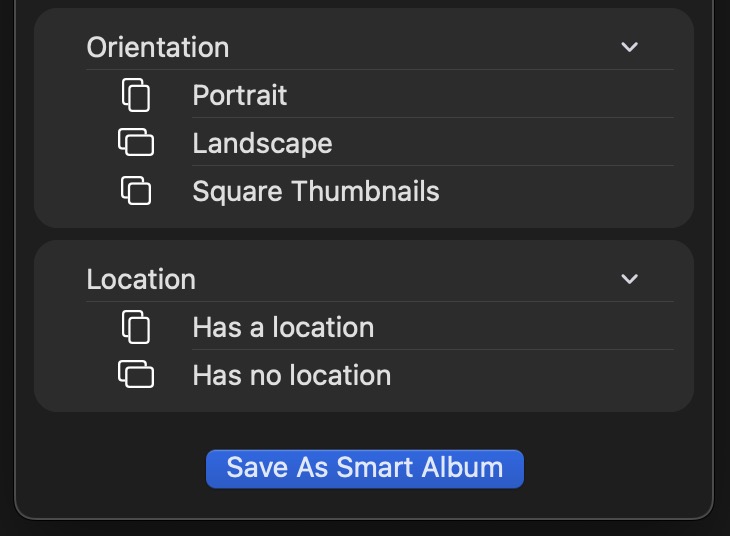
When you save a smart album, you can set the name, and it will appear in the Smart Albums folder in the Nitro section on the left. You can see these albums in Photos, but if you look at them, you will notice two things. First, they have funny names and second, they are empty. Because they are smart albums, they only show images in Nitro. Also, please do not change the names of these albums or move them elsewhere in the library. That will cause the Smart Album to stop working. To revise the smart album's query, click on the smart album to display it, and then click the Filter button. Then change the filter settings and click the Save button in the upper right.
Because these are photo library albums, they will synchronize across your devices if you use iCloud Photos, so you can make a smart album on one device and view the smart album on another device running Nitro.
Note: Albums are features of the Photo Library, so none of the Nitro albums for rating, edit, or smart albums appear if you use the file system to manage images. You can still filter by rating, edit and such in the file system, but you cannot save any queries as smart albums. Also, unless you make a smart album, filters are not saved, so if you quit and reopen Nitro, any filters you have applied will be gone.
Photo Library Limitations
Nitro is able to read and update the Photo Library by using services provided by Apple (known as APIs). By using these APIs, Nitro can safely make changes and follow Apple's requirements for library access. That is good in general, but Apple has also placed a number of restrictions on apps as well. In fact, Apple prohibits App Store apps from many actions that the Photos app itself can take. This leads to a lot of confusion and frustration. Here are some things that Apple prohibits App Store apps from doing:
- Reading or writing titles and descriptions
- Reading or writing keywords
- Reading or creating Photo library Smart Albums
- Accessing any photo library other than the System Photo Library
- Access to Faces, Places, or other special albums
In addition, there are some features in Photos that are not made available to 3rd party apps:
- Accessing EXIF data efficiently (especially for iCloud-based images)
- Control over shared libraries
- Importing images by reference (images can only be copied into the library).
- Efficiently search for images based on metadata other than an extremely limited set.
If Apple chooses to remove these restrictions, I would make every attempt to support these features in Nitro.
Rating and Flagging
Nitro uses a five star rating system. Images initially have a rating of zero (or “unrated”). There is also a flag feature which can be used to flag or reject images. Nowadays, people tend to use the reject flag for a quick, initial review to discard obviously bad images. After images have been rejected, there is often a second pass where images are rated. Depending on the platform, you can rate or flag images in multiple ways.
On the Mac and on iPads with keyboards, the flagging keyboard shortcuts are as follows:
| Reject | X | (the ‘x’ key) |
| Flag | \ | (the ‘backslash’ key) |
| Not Flagged | ] | (the ‘right bracket’ key) |
The Image menu has submenus for Rating and Flag, where you can view the shortcut keys. You can rate images using the number keys from 0 through 5. Those are single keystrokes for ratings. If you want to use the Command key, you can switch that in the app’s Settings panel. Flagging does not have a command key option, since the command key versions would conflict with other standard operations (like Cut, which is Command-X). If you want to change the shortcut keys for rating or flagging, you can do that by going to the Apple menu and picking System Settings. Then pick Keyboard and configure the keyboard shortcuts there. Instructions can be found here.
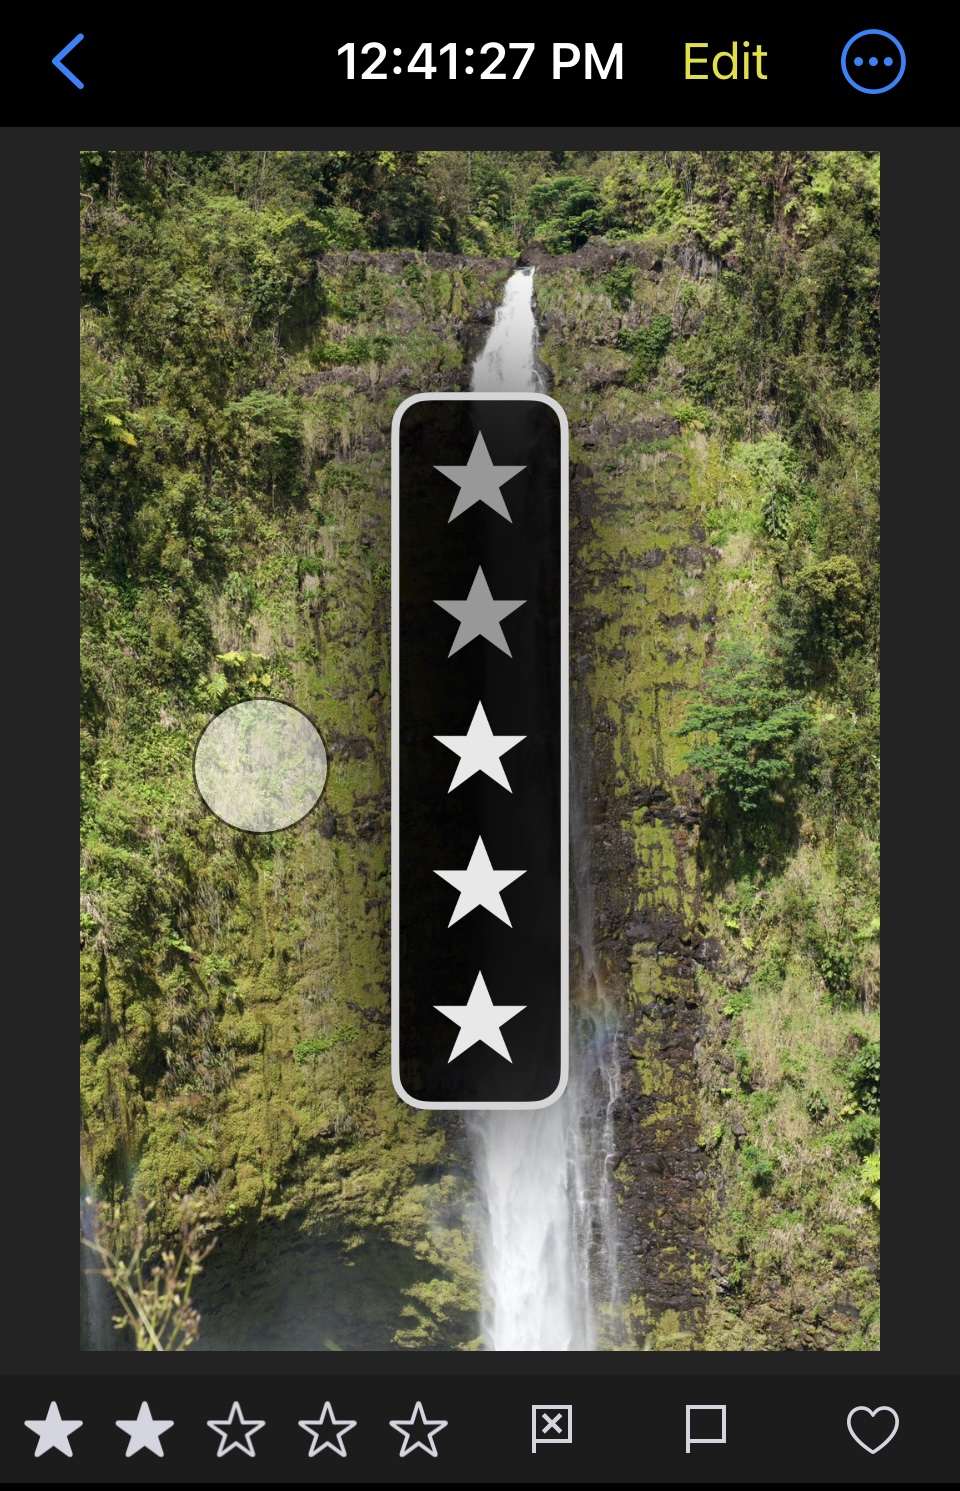
When you are displaying images in the viewer on iPads and Macs, there is a narrow panel on the left with rating and flag controls. They show the current rating and flag status for the selected image and you can click or tap them as well. On iPhones, the rating and flag controls appear underneath the image.
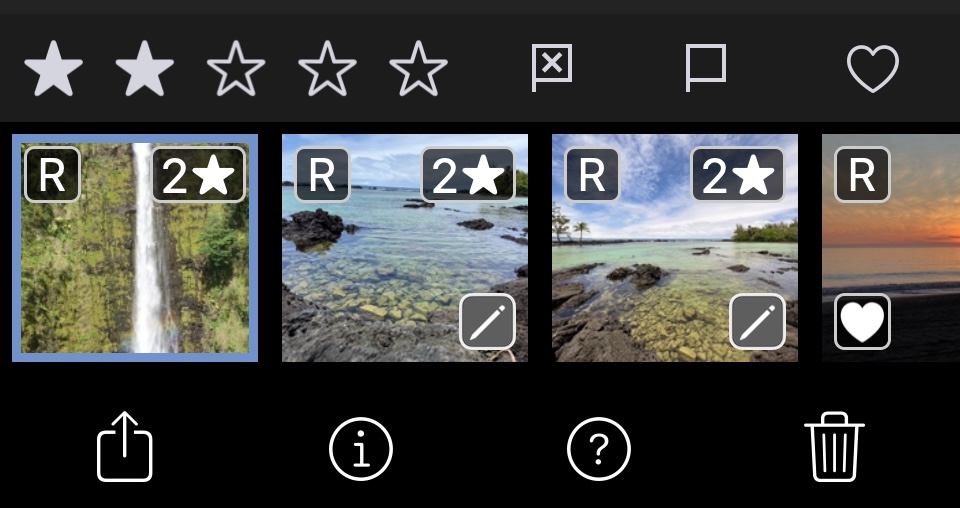
On iPhones and iPads, you can use gestures to rate and flag. To rate, drag your finger up and down on the left half of the image. The flag, drag your finger up and down on the right half of the image.
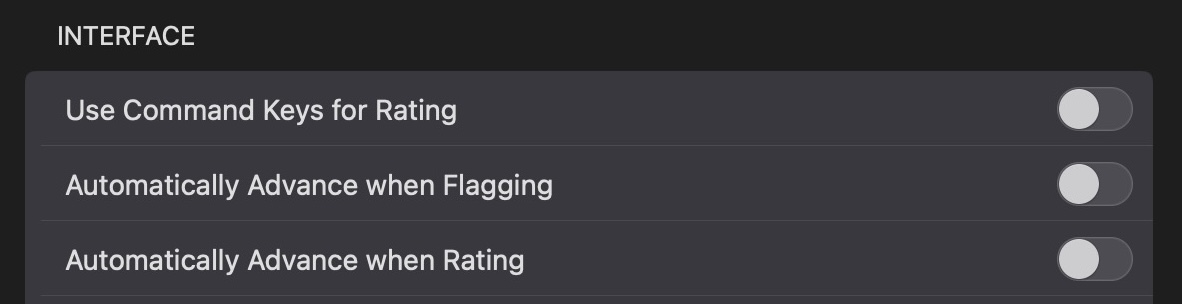
In addition, there are settings in the app that will automatically advance to the next image when you apply a rating or flag, as shown below.
This approach to rating and flagging works well with the filter options, where you can filter by rating or flag state. For example, after rejecting images, you can filter by Rejected images and then delete those all together. In the Photo Library, you also can view images by rating and flag by using the smart albums in the Nitro section, as described above.
Finder / Files.app Tagging
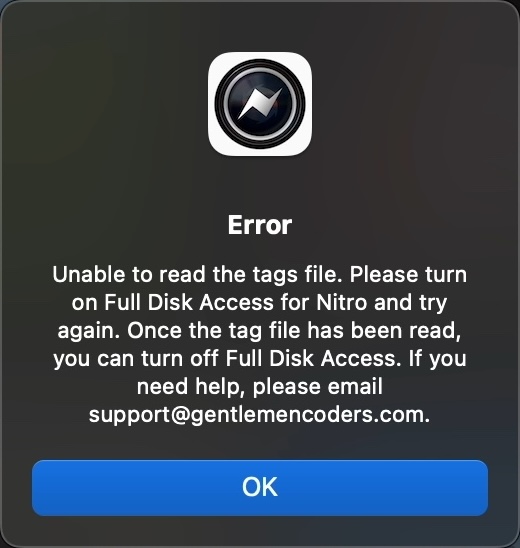
Nitro on the Mac is able to read and write Finder tags to your files, and it also displays all of the tags that are set up in the Finder. While it’s straightforward for an app to read the tags on a file, it’s not simple to get the list of all tags that are set up on a computer. That’s because Apple does not provide a straightforward way for apps to get that list. Instead, Nitro has to locate and open a hidden file that contains that information (and the file moves to a new location in almost every OS version). To start with tags, go to the Image menu and pick Set Up Tags…. The app will display a dialog and you should pick your Home directory, because that is where Apple has hidden the file with the list of all tags. In many cases, however, this will fail, because the file is still not readable. You may see this error message:
Unfortunately, the only solution at this point is for you to give Nitro temporary disk access using the System Settings app. Here are the steps to do that.
- Open the System Settings app
- Select Privacy and Security
- Locate Nitro in the list
- Turn on Full Disk Access
- If Nitro is running, click the button to Quit and Reopen the app. Otherwise open Nitro yourself.
- Select Image > Set Up Tags… and select your home directory again.
Once it works, you can go back to System Settings and revoke disk access. Nitro will continue to be able to read that file, but won’t have access to anything else. The Set Up Tags… menu item will be replaced with the list of tags and colors on your machine.
Unfortunately, on iOS, the story is worse. That magic hidden list of tags is not available at all on iOS, so while Nitro can read and display tags, it does not have the ability to set them (since it does not have access to the list of all tags). So, you can view tags in Nitro for iOS, but you cannot set them.
XMP File Overview
Nitro stores ratings, edits, and flags in XMP files. XMP is an Adobe-created standard for storing metadata. XMP is a text file format based on XML. There are public areas (called namespaces) that apps can read and write to, which enables sharing of data between apps. There are also private namespaces that apps use to write data that they don’t expect other companies to read or write. Of course, since XMP is just text, other apps could read them, but generally it’s not done.
Here is an example of an XMP file with the namespaces, public and private areas delineated.
<?xpacket begin="" id="W5M0MpCehiHzreSzNTczkc9d"?>
<x:xmpmeta xmlns:x="adobe:ns:meta/" x:xmptk="XMP Core 5.5.0">
   <rdf:RDF xmlns:rdf="http://www.w3.org/1999/02/22-rdf-syntax-ns#">
      <rdf:Description rdf:about=""

—— NAMESPACES:
            xmlns:xmp="http://ns.adobe.com/xap/1.0/"
            xmlns:nitro="http://com.gentlemencoders/xmp/nitro/1.0/">

—— PUBLIC DATA:
         <xmp:CreatorTool>Nitro</xmp:CreatorTool>
         <xmp:Rating>1</xmp:Rating>
         <xmp:MetadataDate>2024-06-14T10:55:54-07:00</xmp:MetadataDate>

—— PRIVATE DATA:
         <nitro:Flag>1</nitro:Flag>
         <nitro:EditedPixelSize>{5078, 3072}</nitro:EditedPixelSize>
         <nitro:OriginalPixelSize>{7952, 5304}</nitro:OriginalPixelSize>

      </rdf:Description>
   </rdf:RDF>
</x:xmpmeta>
Ratings: Nitro will read and write ratings to the public namespace, which means that ratings you set in Lightroom, or other apps that use XMP, will show up in Nitro (and vice-versa, with some exceptions).
Keywords: Nitro will read keywords from the public area. The current version of Nitro does not write keywords, but when it does it will write them to the same public area. Lightroom also has areas for hierarchical keywords, which Nitro may support in the future.
Flags: There is no public area for flags, so Nitro reads and writes flags to its private namespace.
Edits: There is no public definition of editing parameters, so Nitro also stores its editing information in a private namespace. For brevity, the above XMP file does not show Nitro’s full editing data, but you can open an XMP file to see what that looks like.
XMP File Names and File Extensions
This would seem to be a simple topic, but nothing is ever truly simple. There are two parts to a file name - the name itself and the file extension. There are two ways of storing XMP data: in a sidecar and inside the original file itself. Adobe writes XMP to a sidecar for proprietary RAW images - that is, anything but DNGs. For DNGs, and non-RAW files like TIFFs, JPEGs, etc. Adobe writes the XMP directly to the original file. This is handy because the metadata is carried along with the pixel data, but it’s a bit dangerous because of the non-zero risk of file corruption. It also doesn’t work if the image is locked or read-only, or if it’s a movie or other format that does not store XMP.
In contrast, Nitro always makes a sidecar file. An option to write to the original file is planned for the future. For proprietary RAW files, the sidecar filename is the same as the original with the file extension changed to “.xmp”. So for DSC0012.ARW, the sidecar will be called DSC0012.xmp. Sidecars are always located next to the original files.
However, for other file types, that naming convention is not guaranteed to work because there could be multiple files with the same root file name. The most obvious case is RAW+JPEG, where there is a JPEG original next to the RAW original. Since it’s possible to work with both files independently, if Nitro used the same naming convention, the XMP files would collide. For example, imagine there is a RAW+JPEG pair called DSC1234.NEF and a DSC1234.JPG. Nitro would name the XMP file for both DSC1234.xmp, which would mean changes to the RAW would overwrite the JPEG’s XMP data or vice-versa. To avoid that problem, Nitro adds the suffix to the XMP file name. In this case, the RAW would get DSC1234.xmp, and the JPEG would get DSC1234_jpg.xmp. The same is true of DNG and other formats. The downside is that other apps may be unable to read these files because they are not expecting that file name convention.
XMP File extension: The other half of the name problem is the file extension. The file extension Nitro uses for XMP is always lower case, even if the original file name is all upper case. That is done to work better with case-sensitive file systems and Adobe apps. iPhone and iPads always use a case-sensitive file system, which means that DSC1234.xmp and DSC1234.XMP are different files. The Mac usually is case-insensitive, so those two names would be the same file on a Mac (unless you deliberately make a case-sensitive file system in Disk Utility). Windows is also case-insensitive.
Adobe apps always use a lower case file extension, so to avoid issues reading and writing data with Adobe apps, Nitro uses the same convention. If it did not do that, then on iOS, you could easily have two XMP files that only differ in the case of their file extensions. However, this is not a perfect solution because not all apps use a lower case extension. Some use uppercase file extensions, and some web services will change the file extension of an XMP file from uppercase to lowercase and vice-versa. It’s something to be aware of on any case-insensitive file system.
The important things to know are 1) the XMP file must have a lower case extension for Nitro to read it and if you somehow get an XMP file that is upper case, you will need to rename it to lowercase, which is covered in the next section.
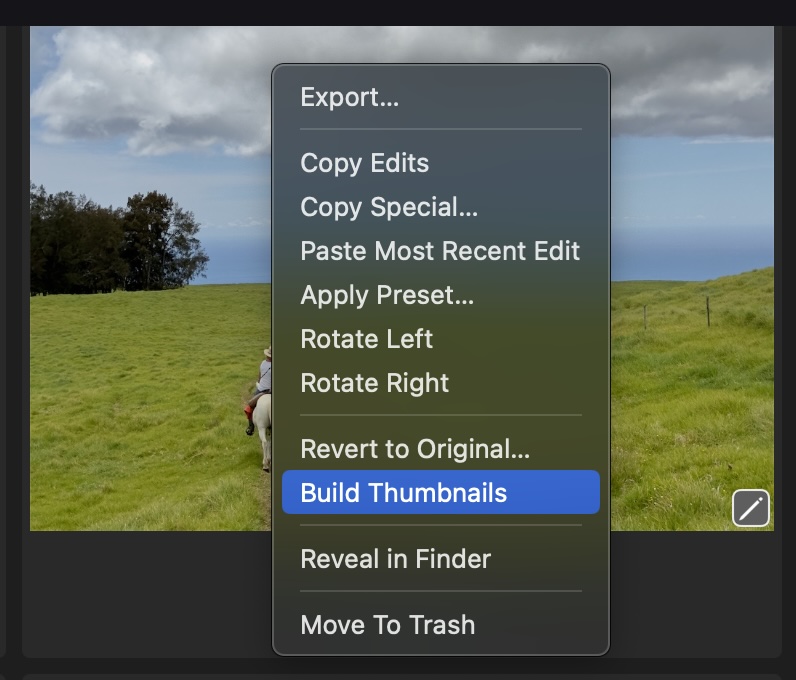
Reconnect Sidecars: There is a menu item in Nitro for Mac and iOS which lets you rename sidecar file extensions. It’s called Reconnect Sidecars. The easiest way to get to it is by bringing up the contextual menu in the sidebar as shown here.
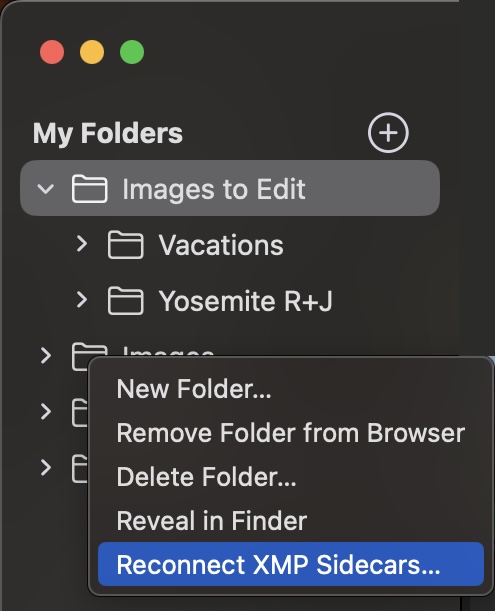
If you pick it, the app will look for all the sidecars and rename them to have a lower-case extension. This is a rarely used feature, but if you find that the app is unexpectedly not processing your sidecars, check the file extension and use this feature to fix them.
Cross-Machine Workflows: Editing and Rating
As mentioned earlier, Nitro writes edits to XMP files that reside next to the original files.This way, if you need to copy or move the files, the sidecar is easy to include in the operation.
What happens if you make rating or editing changes on an external disk and then move it to another computer? What if you edit or rate images stored on a file server or NAS (Network-Attached Storage)? The short answer is that all the data will appear and be usable on the other machine. There are a few details that are worth discussing, though.
Here are some steps you can try: Using an external hard disk or file server, add a folder to Nitro on device 1 Apply a rating and edit the image (with a preset or whatever you like) If you are in Edit, exit from that mode. If you are using an external disk, then eject the disk. Go to Device 2 and add the same folder. You will see the rating and the edit badge appear (it may take a while depending on the speed of the connection and the size of the folder). The thumbnail and preview, however, will not be correct. That’s because Nitro does not store the thumbnail or preview JPEG in the XMP file (per convention).
To update the thumbnail, do one of the following: On Macs, select the images that need updated thumbnails. Then in the Image menu (or the contextual menu), select Build Thumbnails. On iOS, use the Select button first and then tap the Batch button. Pick Build Thumbnails. Or, go into Edit for these images - Nitro will build the thumbnail when it loads the original image and the editing information from the XMP file.
If you eject an external drive and open Nitro, then it will alert you about directories that are missing. It is safe to select Remove from App. You will not lose any data.
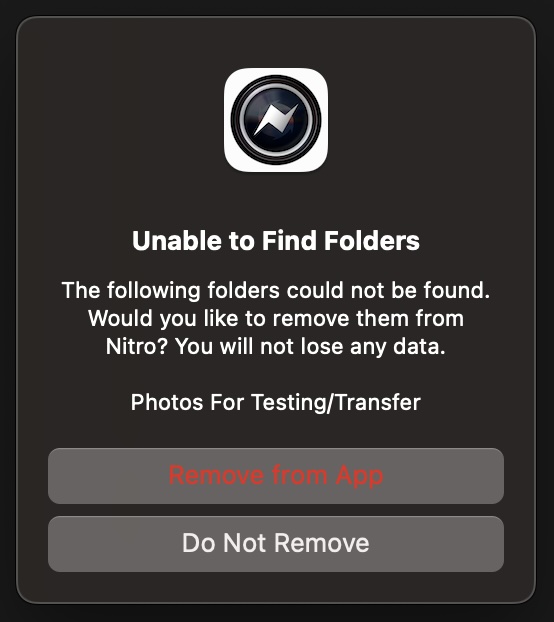
This may happen more frequently on iOS because Apple changes the path to the disk each time it is ejected and reconnected.
Non-Destructive Editing
This section is taken from the TidBITs article I wrote titled, "The Ins and Outs of Non-destructive Editing in Photos for Mac and iOS". You can find it here.
One of the near-magical features of Photos, and iPhoto before it, is the way it allows you to edit a photo with the assurance that those edits are non-destructive—you can always revert to the original version. That said, non-destructive editing brings with it some confusion, particularly for those working with RAW images or using Photos extensions to do the editing. Both Photos and Nitro work in similar ways.
Most applications directly modify your documents. For example, when you choose Save in Microsoft Word, it saves your changes directly to the document’s file, replacing the previous version of the file in the process. Some image-editing applications also modify image files directly, notably Adobe Photoshop and Apple’s Preview.
In contrast, most photo-editing applications work non-destructively and never modify the original photo. The application applies edits to an in-memory copy of the original to produce a real-time preview of the adjusted image.
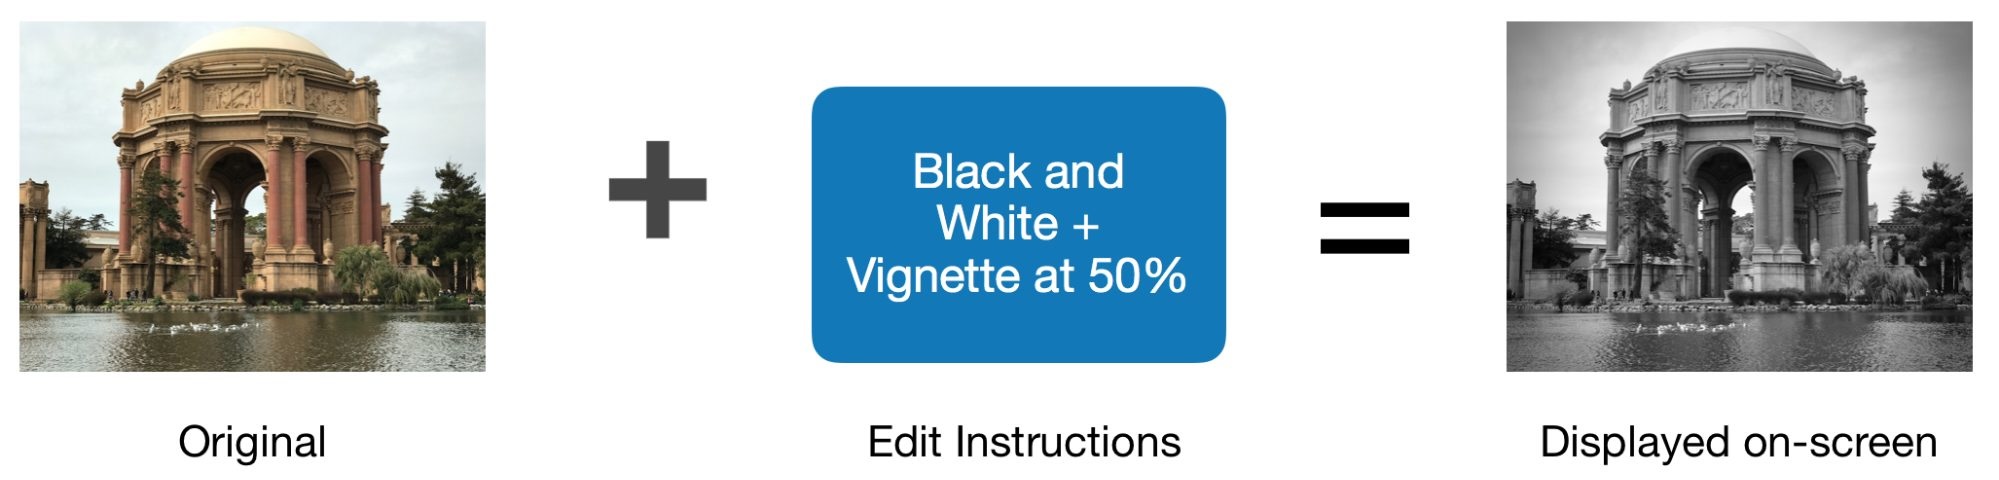
The application may automatically save the edit instructions, or it may wait for you to hit Done or choose Save. From your standpoint, the image appears to be modified, but the original file remains untouched. While extremely useful, this non-destructive model can be confusing to users because it clashes with their expectations based on other applications.
Photos saves the edit instructions in a location separate from the original file and generates a full-size JPEG (and smaller thumbnail images) that contain the results of the edits. (Photos makes JPEGs for all file types, including RAWs and Apple’s new HEIC files. You cannot rely on the Info pane in the Mac version of Photos to tell you the file type you are editing because it always shows you the file type of the original.) After the edit is completed, this is what is stored on disk:
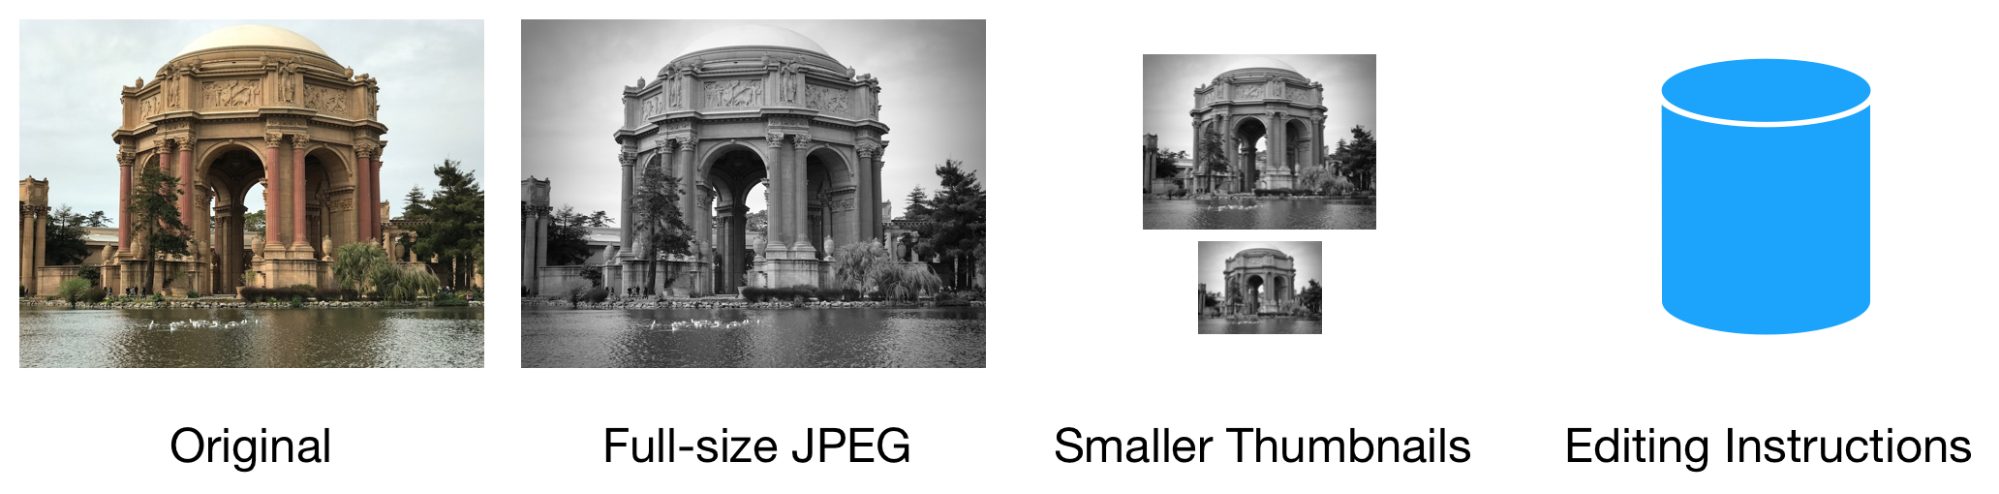
The full-size JPEG is an individual file on disk. The smaller thumbnails are stored in “container” files that hold multiple thumbnails at once. The edit instructions are stored in the photo library’s database, along with other information about the image.
If you want to continue editing the image at a later date, Photos and Nitro reload both the original and the edit instructions and then combine them to display the adjusted image.
Outside of editing mode, Photos and Nitro hide the original photo from view, instead showing the full-size JPEG or smaller thumbnails at every point in the application. While this is clearly correct, hiding the original reinforces the perception that the original has been modified. This is the main point of confusion for people. This can lead to users wanting to copy or duplicate images before they edit them — so convinced by this sleight of hand, they believe they need to preserve their original before making any adjustments. (Some people duplicate images because they want to have both unadjusted and adjusted copies visible in the grid, or to have two different edited versions, but this is less common.)
When working with the File System, Nitro will save edits into an XMP file. When working with the Photo Library, Nitro saves edits and a full size JPEG (or HEIF) into the Photo Library.
A key question becomes, what happens if you edit an image in the Photo Library with two editors (for example, both Photos and Nitro)? This is a bit of a problem, because Photos can store the adjustment information for only one editor for any given image. As soon as the changes from a second editor are saved, the edit instructions from the first editor are discarded and cannot be recovered! The original image and the JPEG generated by the first editor are preserved, but the option to make changes with the first editor is lost. This is another key point of confusion for customers.
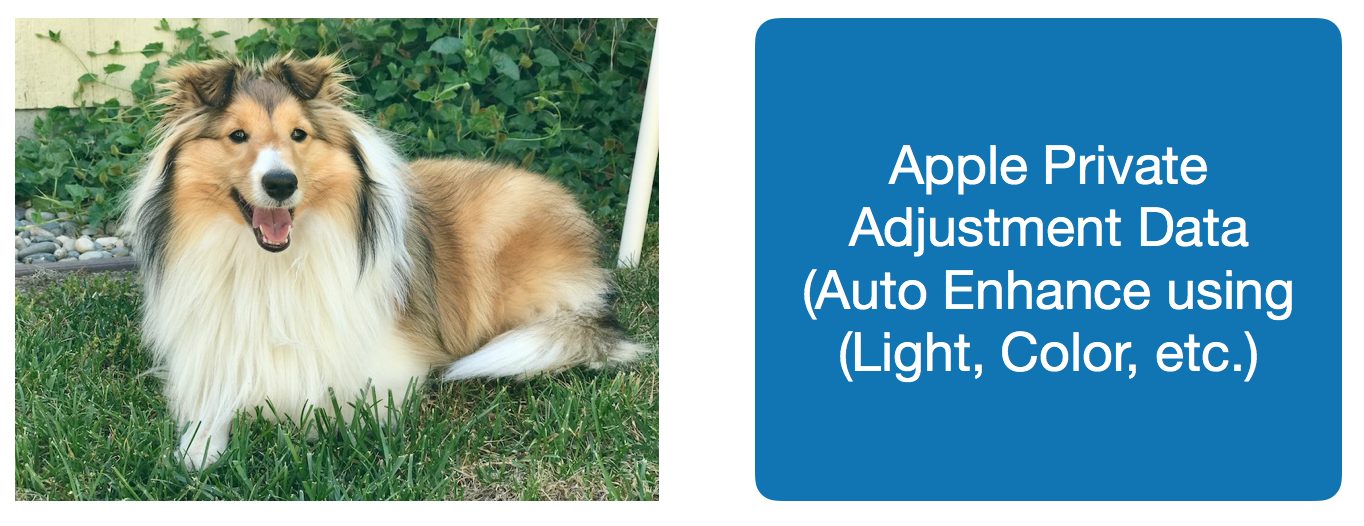
To illustrate this problem, imagine that a user decides to use the Photos Auto Enhance feature on a RAW image and then use the Nitro Photo extension to apply a crop and vignette. This can make sense, because Photos has a good auto enhance and, unlike the Photos Vignette tool, the Nitro Vignette lets you pick the center of the vignette.
Step 1: The user clicks the Auto Enhance button and clicks Done. As described earlier, Photos stores a full-size JPEG and the adjustment parameters in the library (the original is present, but hidden):
Step 2: The user selects Nitro from the Photos extensions menu (or edits using the Nitro standalone app). Here’s where we run into the first difference from the previous example: Photos sends the full-size JPEG (not the original RAW image) to the Photos extension. Photos sends a JPEG rather than the original because the user expects to see the auto-enhanced image in the Photos extension, not the unadjusted original. Since Apple does not publish its internal format for adjustments, nor does it provide access to the code for its adjustments, there is no way for a Photos extension to apply the auto enhance made in Photos. This is also true in reverse—if a user edits an image with a Photos extension (or standalone app), and then edits further in Photos, they are working in Photos with a rendered JPEG—Photos has no way to apply edits made by other companies’ extensions to the original file. Step 3: The user applies Crop and Vignette in Nitro and clicks Save Changes. This is what gets stored in the Photos library:
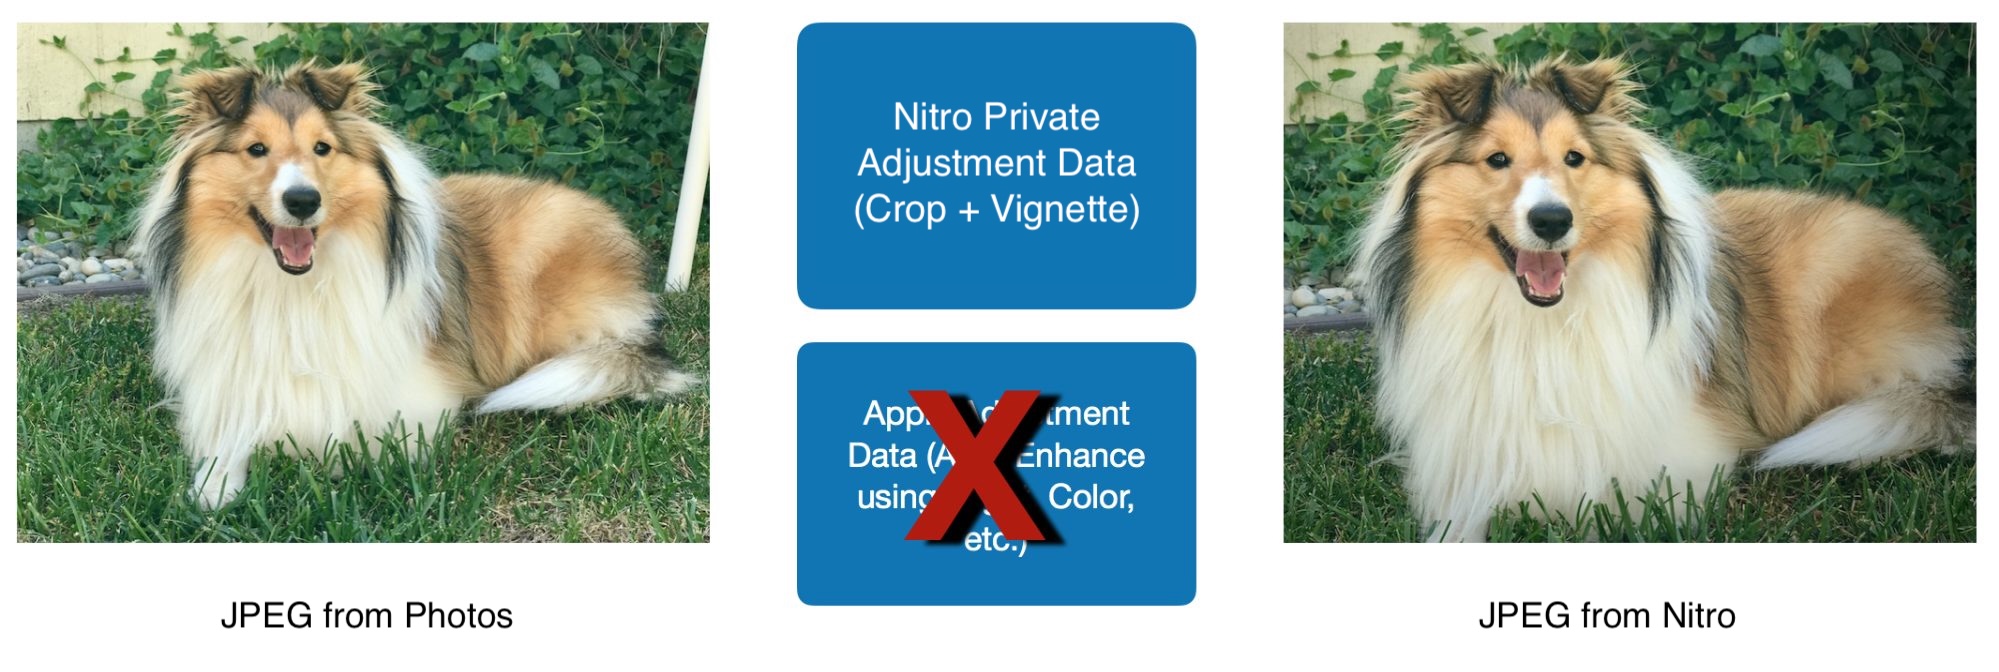
Notice that Photos has just discarded its own adjustment data! While everything may look fine, the Photos editing information has been lost, and the user is never informed of this. While the user can go back into the Photos extension and adjust the crop or vignette (or any other adjustment in the extension), they cannot go back a step and fine-tune the sliders in Photos. Further, the user cannot undo the step before they invoked the Photos extension—the only option available is Revert to Original because there is no Apple adjustment data left to revert to. Note that there are also now two JPEGs stored in the library, one from Photos and one from the Nitro Photos extension / Nitro standalone app. This is necessary to maintain some semblance of non-destructive editing. The first JPEG is the one created by Photos as a result of the Auto Enhance step and handed off to the other editor. Remember that for the user to re-edit an image with the same editor, the editor must receive the “starting image” along with its editing instructions. In this case, the “starting image” is the JPEG made after Auto Enhance was applied. Though there are two JPEGs, only the final JPEG is visible in the user interface. The auto-enhanced JPEG is hidden; it’s only stored in the library to enable re-editing with the Photos extension. “But,” you may say, “I can edit in Photos, and then use a Photos extension, and go back to Photos and continue editing.” True, but you are adjusting the JPEG sent back from the Photos extension, not the original adjustments you made in Photos to the RAW file. Imagine that you make the edited image black-and-white. This is what is stored:
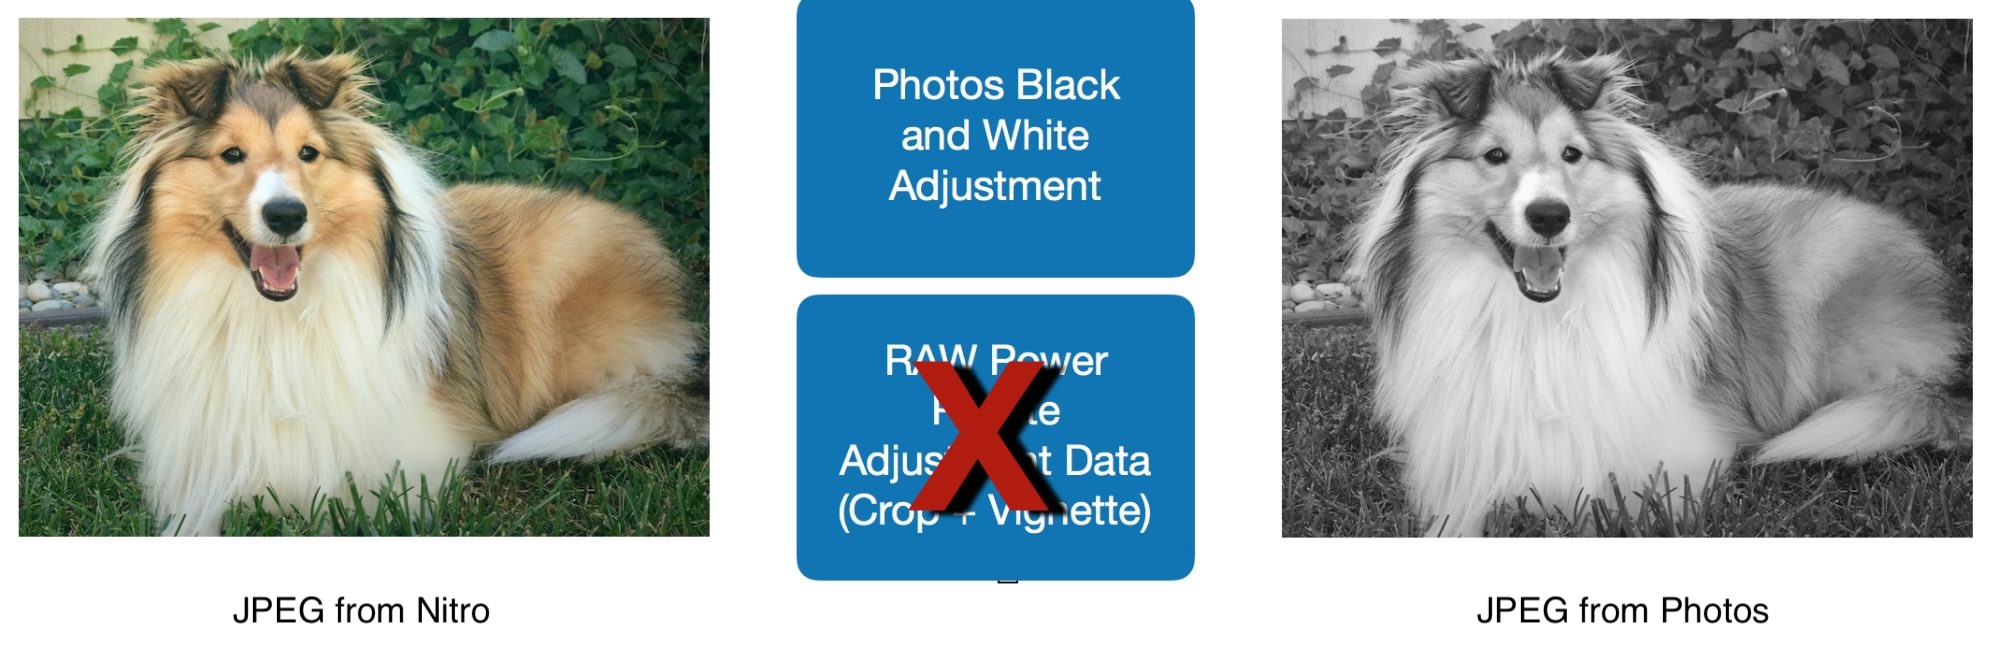
In other words, you are stacking Photos adjustments on top of the Nitro adjustments (and losing the Nitro adjustment data in the process). Also note that this loss of adjustment data will occur if you edit in the Photos extension first and then edit in Photos, or if you don’t edit in Photos at all, but instead do all your editing with two Photos extensions. The order doesn’t matter—just the use of two or more editors on the same image. A RAW-specific note: If you first edit a RAW in Photos and then send the image to Nitro or another RAW-friendly Photos extension like DxO OpticsPro, not only are you working in the Photos extension with an 8-bit JPEG, rather than a 12- or 14-bit RAW, you lose access to the RAW processing features that Nitro or DxO provide. This severe loss of quality happens for any edit done in Photos, even a simple rotate or flip.
There is a lot more to discuss in this area, but I will refer you again to the TidBITs article. In more recent versions of macOS and iOS, Nitro is able to write 8 or 10-bit HEIF images, though Photos continues to only store 8-bit JPEGs.
One Up (The Viewer)
From the grid, you can tap (iOS) or double-click (Mac) to enter the Viewer. When in Viewer mode, the grid is replaced by a filmstrip and there is a large set of controls on the left and right sides of a large image view, as shown below:
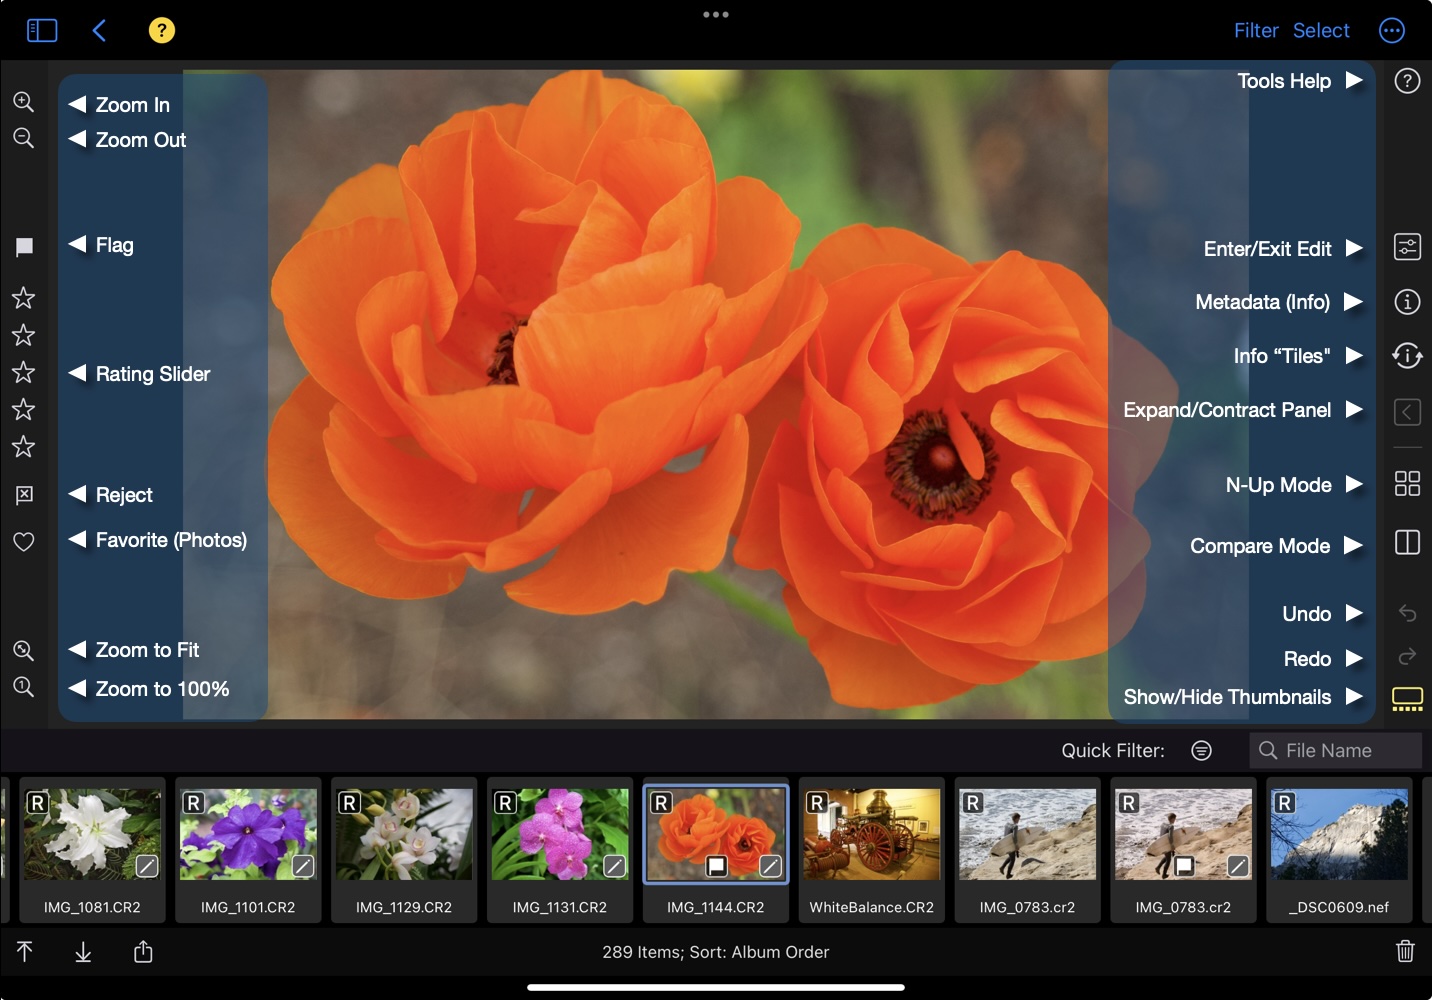
In this view, you can easily view and change ratings or flags. You can also view metadata and enter other modes like Edit, N-Up, and Compare. These modes are described below.
Zoom
Nitro has a number of ways to zoom into images. The first way is by using the controls to the left of the image. Those will increase or decrease the zoom level, or jump between 100% and zoom to fit. You can also pinch (on a trackpad or iOS screen). When using a keyboard, then you can use the following shortcuts:
| Zoom to Fit | Cmd-Shift-minus |
| Zoom In | Cmd-plus |
| Zoom Out | Cmd-minus |
| Zoom to Actual Size (100%) | Z |
| Zoom to 200% | Option-Z |
| Zoom to 300$ | Control-Z |
| Zoom to 400% | Shift-Z |
The Editing Panel
Enter edit by picking the first button on the right side panel (see above image).
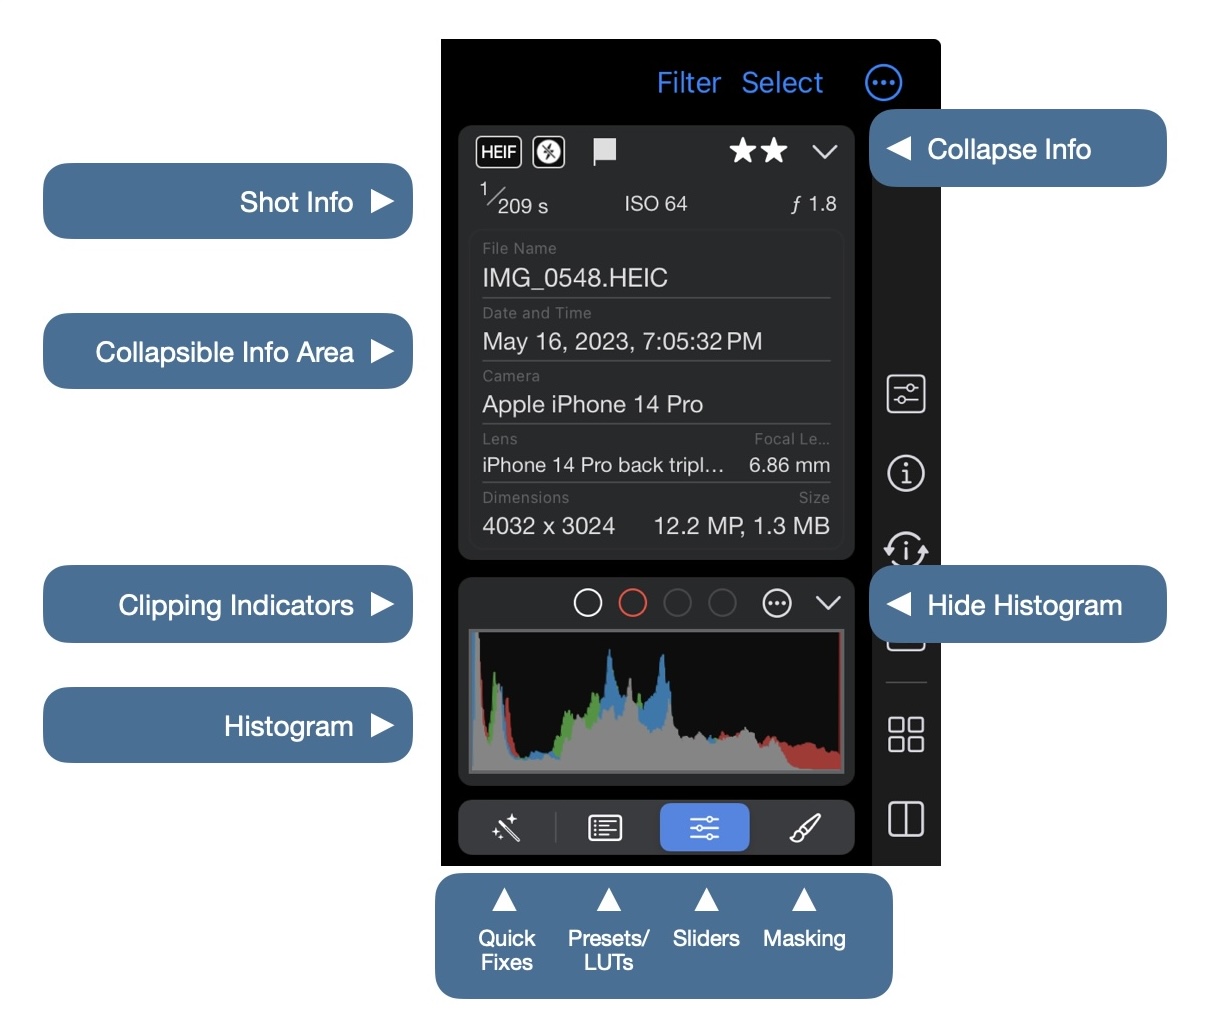
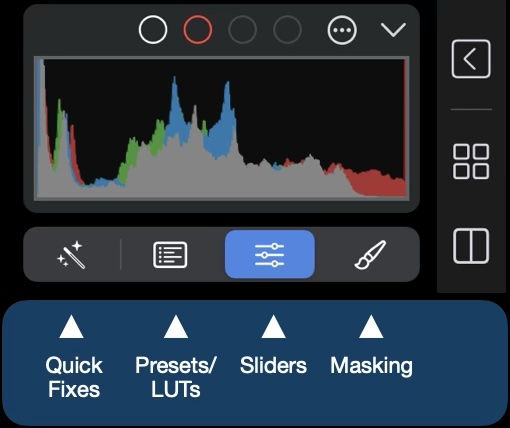
At the top is shot information including shutter speed ISO and camera. You can collapse it or expand it to get more information. Next is the histogram which includes clipping indicators, which are discussed below. Histograms visually describe the distribution of color or tone in an image; the leftmost column represents black and the rightmost column represents white. The height of the histogram tells you how much of the image (relatively) contains that pixel value. You can also hide the histogram if you like, which both gives more screen real estate, and also improves performance some, because the histogram won't be updated when it's closed.
The next section shows the main editing panels. The segmented control is known as the "4 way control." The first has quick fixes like Auto Enhance, Spot Removal, and Clone. There are some additional ones that will appear based on the image you have. For example, the Highlight Recovery Quick Fix will appear for certain types of RAW images. The next panel contains presets and LUTs. The third has sliders which is the primary topic for this section. The last is masking, which will be covered in a later section.
Undo, Redo, and Show Original
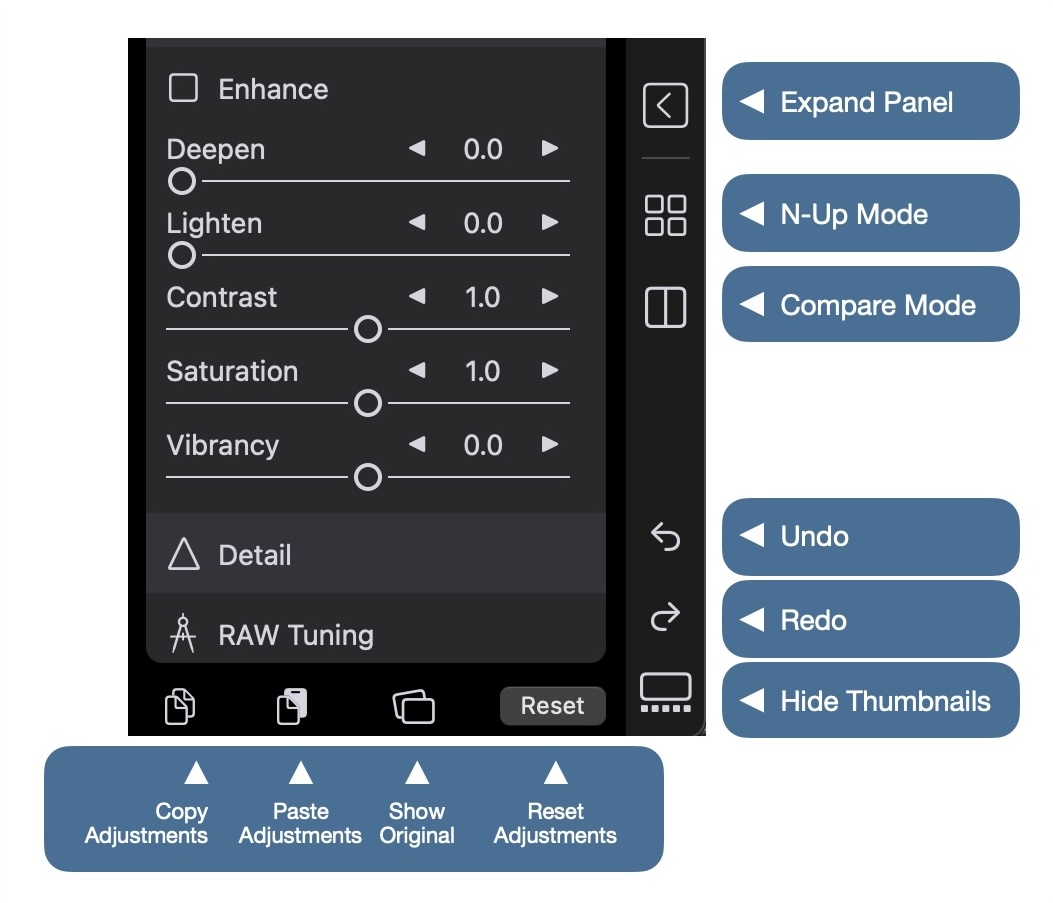
Editing in Nitro is undoable and non-destructive. At the bottom of the right side toolbar are the undo and redo controls. At the bottom of the editing panel is another bar with four controls: Copy Adjustments, Paste Adjustments, Show Original, and Reset Adjustments.
It's best to turn off the clipping overlay when using Show Original to make it easier to see what has changed. The histogram also will update when you use Show Original.
Copy Adjustments will display a dialog that lets you choose which adjustments to copy. Paste Adjustments works the same way, so you can decide what to paste. Reset Adjustments will remove all the adjustments that have been applied. However, if the image has been edited in the Photo Library by another app, the Reset will only remove the Nitro adjustments. To fully revert the image, leave Edit and use Revert to Original.
Quick Fixes
Auto Enhance
Highlight Recovery
Spot/Line Removal
Clone
Quick Fixes is Nitro's term for editing actions that are task-oriented, and modal in nature. In other words, you use a Quick Fix to make a specific type of change, complete it and then move on to something else. This is different from sliders or other types of editing, which tend to interact with each other. Quick Fixes include Auto Enhance, Highlight Recovery, Spot / Line Removal, and Cloning. You access Quick Fixes from the first icon in the 4-way control. Note that the Highlight Recovery Quick Fix only appears for certain types of RAW images.
Auto Enhance
To quickly improve your photos or to get a good starting point for further editing, use Auto Enhance. Auto Enhance has been tuned to improve a wide range of photos and can address the following issues: • Overexposure and Underexposure • White Balance • Poor contrast • Dullness of colors
The Nitro Auto Enhance is unique in its ability to handle overexposed images. It also includes a special white balancer which uses face detection. All of the changes made to your image by Auto Enhance are visible in the slider interface, and you can adjust or turn off any or all of them. You can also configure Auto Enhance:
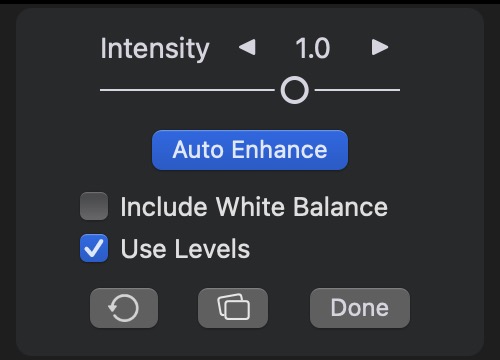
The Intensity slider is the most important one - you can increase or decrease the overall effect of Auto Enhance this way. This slider value is remembered from image to image, so you can specify your preference for the amount of enhancement. If you check the Include Auto White Balance, then Auto Enhance will add automatic white balancing, including the face-based white balance. You can also specify whether to use Levels or Curves for Auto Enhance. This is primarily there to help people who want to adjust the Auto Enhance afterward and are more comfortable with Levels than Curves.
The buttons at the bottom are, left to right: Reset Auto Enhance, Show Original, and Exit Auto Enhance.
In addition, you can apply Auto Enhance to many images at the same time. To do this, exit Edit and select the images you want to enhance. On iOS, use the Batch menu. On Mac, you can right-click or use the Image menu.
Highlight Recovery
If you have a true RAW image, the Recover Highlights Quick Fix will appear. It does not appear for ProRAWs or linearized DNGs, because those are not truly RAW images. Highlight recovery is not really valid, because the images have already been balanced.
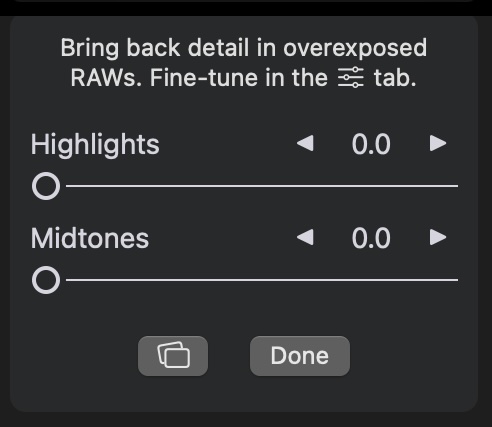
For the best results, start by turning on the first clipping overlay in the histogram. Then drag the first slider (Highlights) and watch the clipping overlay. As you recover highlights, the overlay will shrink in size and detail will appear in the overexposed areas. If you look at the histogram, it will also shift, and data from the right edge will start to shift to the left, which is an indication that detail is being restored. You can then bring up the midtones by moving the second slider, which will brighten the image some. While it’s fine to remove every last clipped pixel, it’s often not necessary, or even preferable. It can be appealing to have some bright areas in an image, especially if there is no detail in those areas anyway. Otherwise, you can lose some contrast and end up with gray instead of white. In other words, it’s possible to overdo highlight recovery. If you want to see the image before and after, you can click the button that looks like two overlapping squares. That is the Nitro icon for Show Original (or Show Unedited Image). Press "Done" to leave the recover highlights tool. You don’t have to use the Recover Highlights to accomplish this task - it is moving four different sliders in the Tone Adjustment: Boost, Highlights, Midtones, and Recovery, but it's a lot easier and it moves the sliders very precisely.
Spot/Line Removal
Spot/Line Removal is a simple tool for removing small dust spots and lines (like power lines or wires). It can also be used sometimes for wrinkles. While it is limited in its sophistication, it can still be useful in some settings.
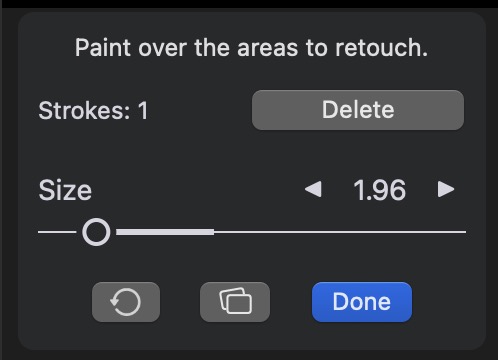
This tool is very simple to use. Select a brush size and drag on the image. The app will compute and apply a fix. You can use the Delete button to remove strokes; use the slider to adjust the brush size. The bottom buttons are the same as for other Quick Fixes: Delete the Adjustment, Show Original, and Exit.
Clone
Clone is an alternative to Spot/Line Removal. The clone tool copies pixels from one part of the image to another. This can be a more effective way to clean up artifacts because it is a strict copy - there is nothing fancy being done.
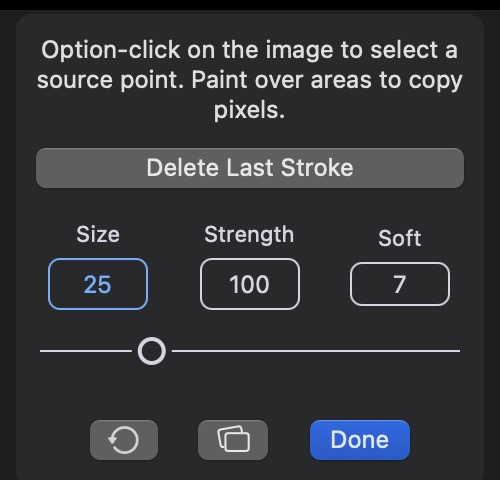
Another important difference between Clone and Spot, is that Clone lets you choose the source point for the copy. Start by clicking / tapping on the image where you want the pixels to come from. Then brush on the image and Nitro will copy the pixels from the source location. Nitro will show an overlay (see below) so you can see where the clone is coming from. At any time, you can pick a new source point.
Clone has a few more controls than Spot removal. You can adjust the size, strength, and softness of the brush in order to optimize the blend.
Presets and LUTs
Nitro has a powerful Preset system, paired with LUTs, to give your image a sophisticated look with just a click. Presets and LUTs are similar in that they both make a significant change to an image, usually to apply a "look" of some kind. The main difference is that a LUT is a type of adjustment, while a preset is a collection of adjustments (specifically, slider adjustments and masks). An image can have only one LUT, but it can have multiple presets. Images can have both a LUT and presets. Nitro ships with a collection of presets and LUTs. You can easily make your own presets in Nitro. LUTs cannot be made in Nitro (yet), but you can download LUTs, often for free from the Internet.
Presets
Presets allow you to apply a collection of adjustments in a single operation. You can use the built-in presets, or create your own. The interface for Presets on macOS differs from the interface on iPads (iPhones have yet a third interface, described in its own section).
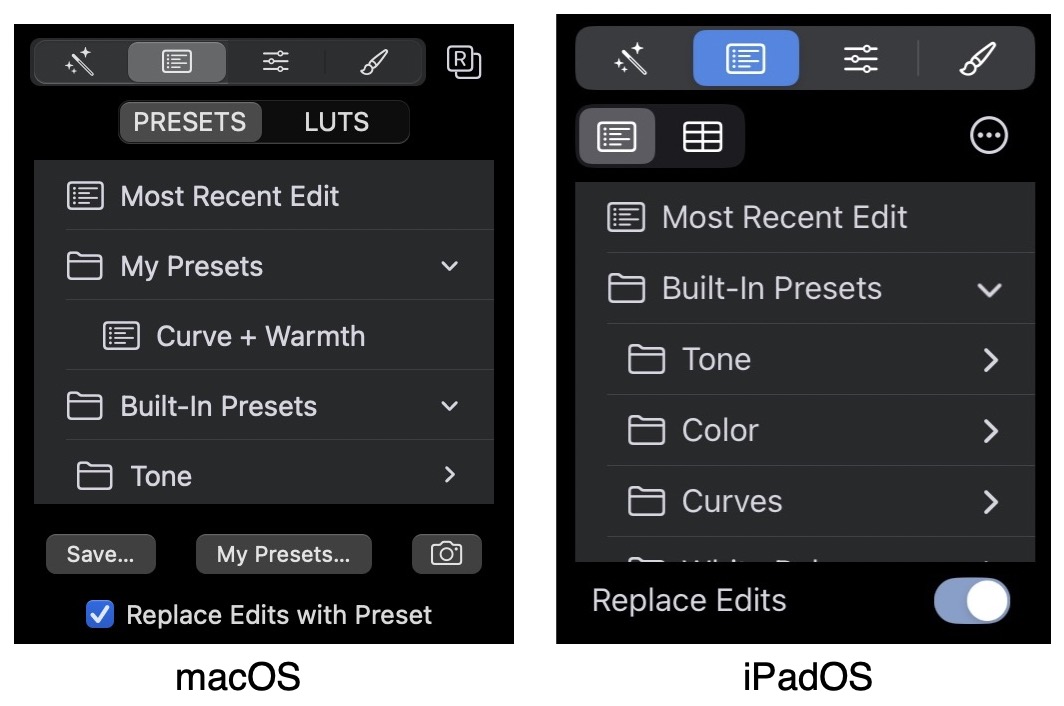
To use a preset, select it from the list. Because presets are simply collections of adjustments, you have the choice of replacing the adjustments on already on your image, or adding them on top of any adjustments present. If you choose to add the adjustments to your image, the app will merge them at the adjustment level. For example, if the Tone adjustment is on your image and the preset also has Tone, the preset's Tone will be used. The app does not attempt to take, say, some of the Tone sliders from the preset and some from the image's adjustments.
Saving Presets
To save a preset, click the Save button on the Mac (use the "..." menu on iPads).

In this dialog, you can select which adjustments to include in your preset. You will also be asked to name the preset. At the bottom is an advanced feature called a Camera Preset. This is a unique feature of Nitro that allows you to automatically apply presets to your images on a per-camera basis. You can assign any preset as a Camera Preset (one preset per camera model). Once you do that, any unedited image you open in Edit from that camera will be automatically adjusted with that preset. This is extremely useful if you want a specific look for all your images automatically. It's also useful for configuring Apple's RAW decoder (the RAW Processing adjustment) to your needs. For example, if you want to adjust the black point for a particular camera, you can do that by making a camera preset.
Note: Nitro also automatically creates (and updates) a preset called "Most Recent Edit", which you can use to quickly apply the same edits to a sequence of images in a row.
Managing Presets
To view your presets on disk, click the My Preset button (on iPads, this is in the "..." menu). This will open a Finder folder or the Files.app on iOS. You can add, rename, or delete presets in that view. You can also organize them into folders. However, Nitro will not see those changes until you restart the app, so it's best to quit the app, arrange the presets, and then reopen the app (see the instructions below for LUTs).
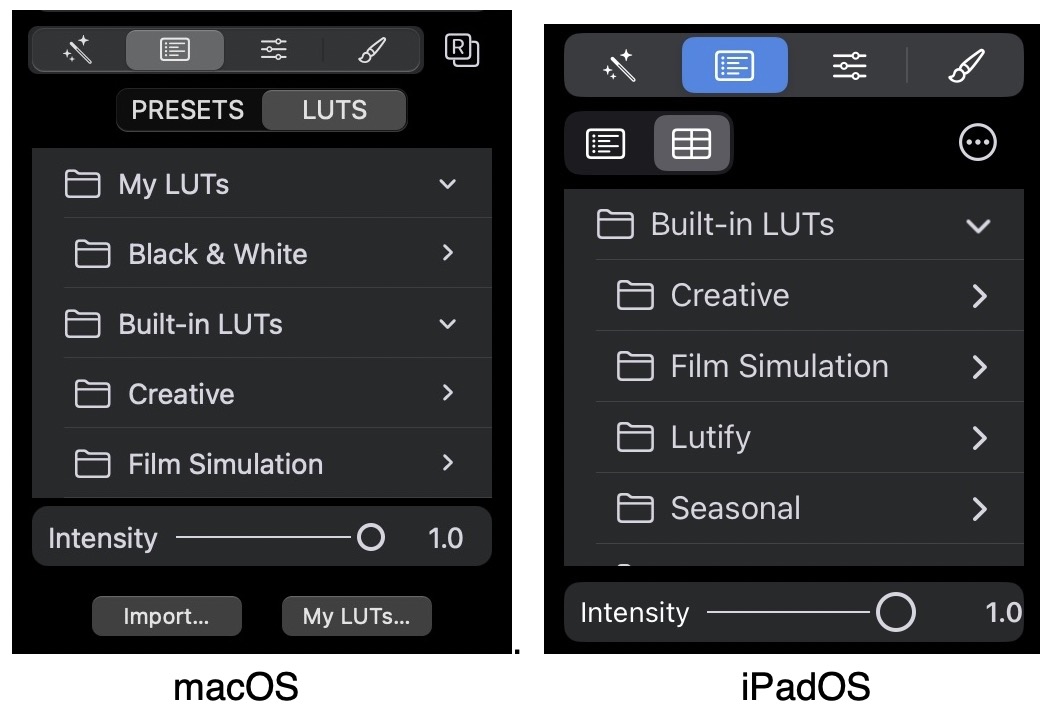
LUTs
A great way to get a distinctive look for your photos in a single click or tap is through LUTs. "LUT" is an acronym for Look Up Table. A look up table is a three dimensional "cube" which converts RGB values into different RGB values. Cubes are generally built using mathematical formulas to create a specific result. For example, a LUT might create an aged look, simulate a film stock, or a specific black and white treatment. They can also brighten or darken images. LUTs cannot sharpen, reduce noise, or perform similar operations. They are only for adjusting color. Like presets, LUTs also have a different interface on Macs, iPads, and iPhones.
Nitro includes film simulations that are designed to mimic ones available in Fujifilm cameras. These are not identical to the ones from Fujifilm, but they are similar. One advantage of the Nitro simulations is that they can be applied to images from any camera.
The intensity slider controls the amount of the LUT applied, so you can dial the effect down if it is too intense. The intensity of a LUT cannot be increased above 1.0. At the bottom of the interface are two buttons: Import and My LUTs. Import lets you add LUTs and My LUTs lets you delete and organize your LUTs.
Nitro can import LUTs with file extension "cube" which is a format from Adobe. The app can handle LUTs up to 33 on a side. To import, pick the Import button (or use the menu as described below for iOS).
Managing LUTs
Nitro lets you store your LUTs in subfolders, but you have to do that management yourself. Here are the steps:
- Once you have imported LUTs, then tap the button in the LUT interface called My LUTs.
- That will open a folder in Files.
- Then, quit Nitro (on iOS, swipe up to exit the program).
- Back in the Finder or Files.app, you can rearrange as you want, making folders.
- You can also delete LUTs at that point - make sure to delete both the .cube and the .rawpowerCubeData file.
- Then reopen Nitro and your folders will appear.
Editing Sliders
Reordering Adjustments
The adjustments are listed in a common workflow order. For example, many people crop early in the process to make sure that they are only concerning themselves with the part of the image they're interested in. However, other people like to crop at the end, or perhaps they apply white balance correction first. Nitro lets you reorder the adjustments in the UI. To do that, go to Settings and pick Configure.
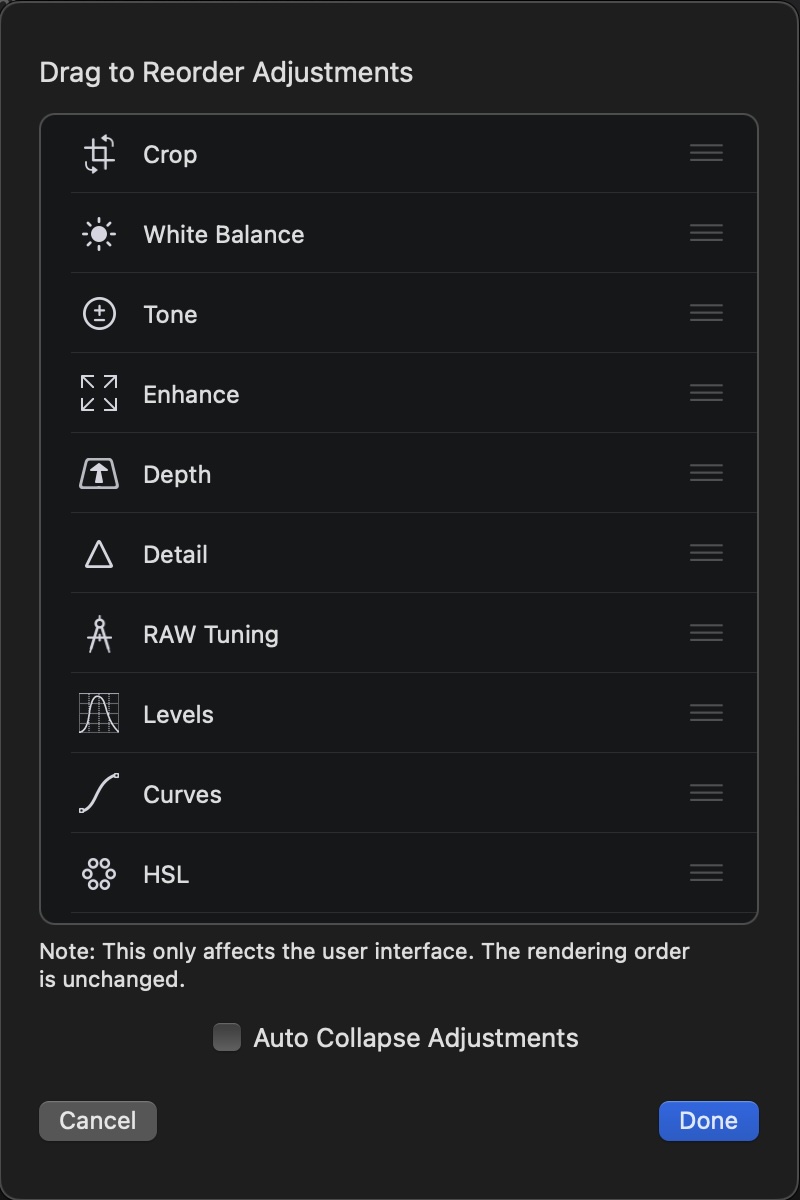
You can drag adjustments up and down. You can also change the auto-collapse adjustment setting. If it's on, then adjustment sections will open and close automatically as you use them to save space. Note that reordering adjustments only changes the appearance in the UI; it does not change the order that the adjustments are processed to make an image.
Slider Basics
Editing sliders in Nitro have a number of additional features to make it easier to set values.
- Reset: Double-click the slider to reset the value (you can also double-click the title of the slider)
- Fine-tuning Mode: Drag the slider vertically about 1 inch (2.5 cm) until the slider ball turns green. Then drag horizontally as then the values will update more slowly.
- Nudge (Mac only): you can click the arrows next to the slider value to nudge the values up or down. Hold the option key while clicking to move them a smaller amount.
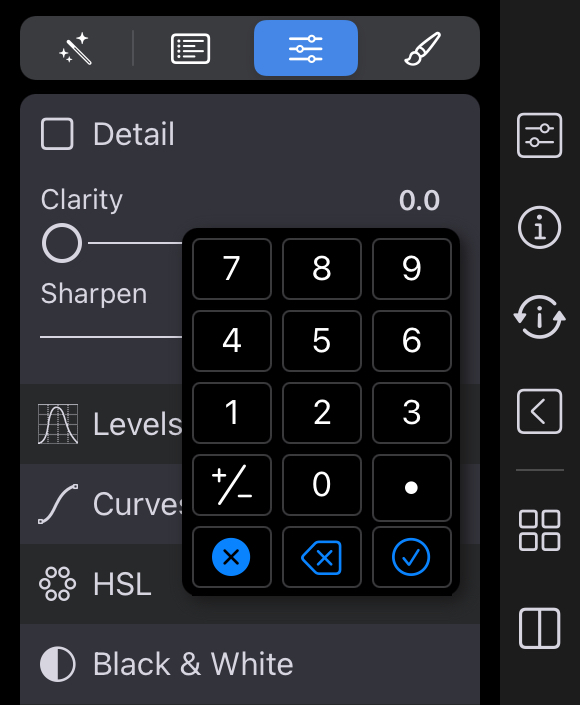
- Manual Entry:
- Mac: click on the numeric field to type in a new value
- iPad and iPhone: tap on the numeric field to get an onscreen mini-keyboard to enter numbers (see below image).
Crop
Let's start with Crop. For most adjustments, you do not need to click the checkbox before working. The checkbox will automatically enable as soon as you start dragging sliders or otherwise working with the adjustment. A reset button will appear as well. You can click the checkbox to turn the adjustment off, or you can clear the adjustment by clicking the reset button.
Crop initially shows a simple view with tools and a straighten slider.
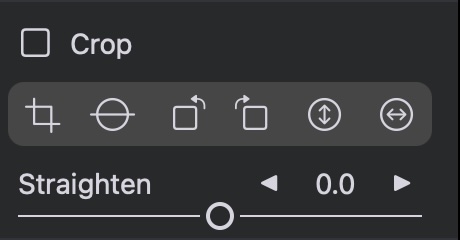
From left to right the tools are:
- Crop tool
- Straighten tool
- Rotate left
- Rotate right
- Flip vertical
- Flip horizontal
The crop tool is mostly self-explanatory; however, an important control appears when you turn it on. In the image below, you can see a number sign button. This controls a rule of thirds guide. Next to it is a megapixel reading that tells you the size of the image after the crop has been applied.
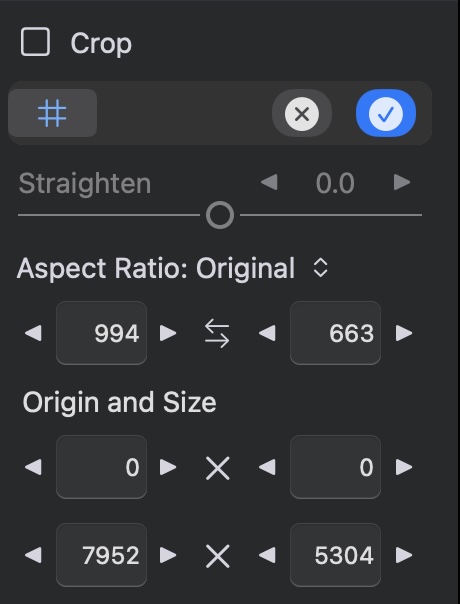
The tool also has a popup menu to set the aspect ratio (or have freeform crop), text fields to set a custom aspect ratio, and text fields to enter a precise crop size and position. Press the "checkmark" button to exit the crop tool. There are two preferences to control how the crop tool works. The first one defaults the crop tool to the original aspect ratio each time. If you turn that off, then the app will use the last aspect ratio (including freeform) for the next image. The second preference will auto-rotate the crop box to match the image's aspect ratio.
You can straighten in a few different ways. First, you can drag the straighten slider, which will display a grid as you do that. Second, you can use the straighten tool. When you engage this tool, you can simply drag on a line in the image that should be level, but isn’t (either a vertical or horizontal line - it doesn’t matter). You may find it is easier to drag just above or to the side of the line in question. That will compute the angle and straighten the image.
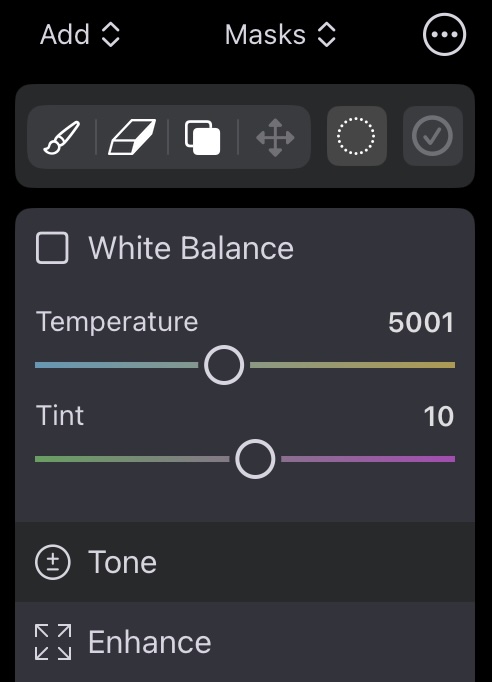
White Balance
The white balance adjustment shows the color temperature and tint of the image, and you can adjust them if the image has a tint you want to neutralize (or add). Color temperature is expressed in degrees Kelvin, where lower temperatures result in a bluer image and higher temperatures result in a redder image.
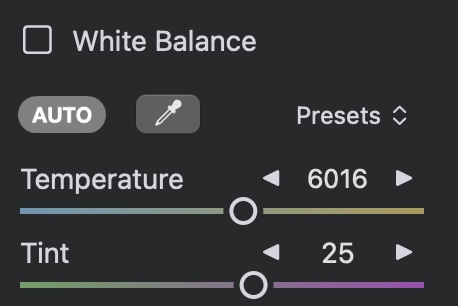
There are also presets for common scenes, such as daylight or fluorescent lighting. One way to adjust white balance is to use the auto white balance control. It looks for an area that it thinks should be a gray value and then changes the temperature and tint so that it matches. Alternatively, you can use an eyedropper. When you use the eyedropper, do something similar to what the auto white balance is doing: look for an area that should be gray. You don't want to choose a white pixel or a very bright one; you don't want something too close to black. Look for a uniform midtone - a patch of color that should be gray, but isn’t -- that gives the white balance algorithm the most latitude. You can also drag the eyedropper to get a white balance change in real-time.
Tone
Next is the Tone adjustment. The tone adjustment is important for controlling brightness in the image. Tone has a large number of sliders.
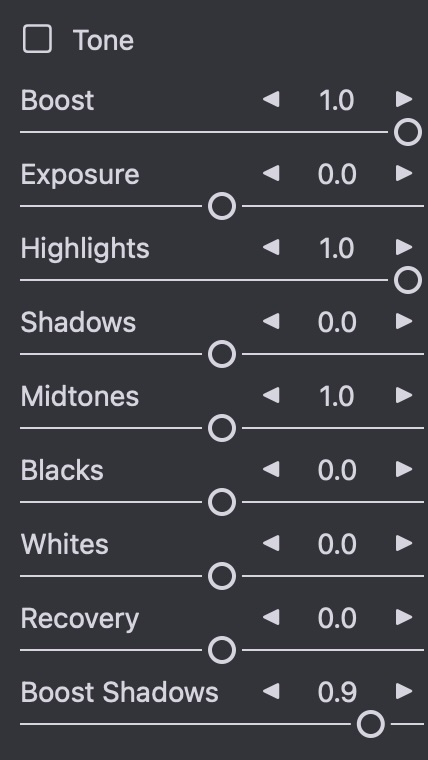
The first slider is Boost. By default, RAW images can look very flat and lack contrast or “punch.” Boost provides that contrast and punch. Boost is also very important for recovering highlights, and it’s not present in apps from other companies. It controls a key part of Apple's RAW decoder and without control over Boost, highlight recovery is substandard. Boost controls the “look” of the image. The “look” is the mix of contrast, saturation and other sweetening that is applied to a RAW image by default to make it look more appealing. However, in its attempt to make the image look nice, the Boost slider also interferes with highlight recovery, fighting with your attempts to bring down blown-out highlights. You can move the slider yourself, but in Nitro, there's a better way to deal with this problem: use the Recover Highlights Quick Fix (described in detail below). That'll move the Boost slider and other important sliders for you. Note: Boost does not appear for ProRAW images, or non-RAWs like JPEGs and HEIF images, as those file formats do not have the image data necessary to recover highlights. Also, if you want the most control over your RAW images, decrease Boost to 0.5 or shut it off entirely by setting it to 0.0. But if you do that, you will need to do more editing of the image on your own in Nitro.
Exposure is a simple slider for adjusting the entire image's brightness. Setting the value to 1.0 makes every pixel twice as bright. At 2.0, every pixel is four times as bright. Moving the slider to -1.0 makes every pixel half as bright. Highlights just work on the brighter pixels, and shadows are for the darker areas. Midtones are right in the center.
Blacks, Whites, and Boost Shadows are only available for raw images because they control special settings in Apple's decoder. Boost Shadows adjusts the bottom or “black” end of the RAW boost curve, allowing you to manipulate the darker parts of the image. The Blacks slider, in particular, is key for dealing with extremely underexposed areas. It sets the "black point" of the image, which is the value below which all pixels are black (that is, 0.0). Pixels that are black are not affected by Exposure, so if you have a very dark image, you may want to move the Blacks slider in order to "lift" some of the pixels above 0.0, where exposure and other sliders can affect them. The Whites slider works primarily with the brighter parts of the image by modifying the baseline exposure of an image.
Recovery: this slider works like a “selective exposure”. Only the brightest pixels are affected, but unlike highlights, it adjusts the brightness just like exposure. Sometimes you will get better results with Recovery and other times Highlights will work better (or a combination).
Clipping Indicators
As mentioned above, the histogram includes clipping indicator circles at the top. These circles at the top of the histogram clipping indicators are used to identify very bright and very dark parts of the image.
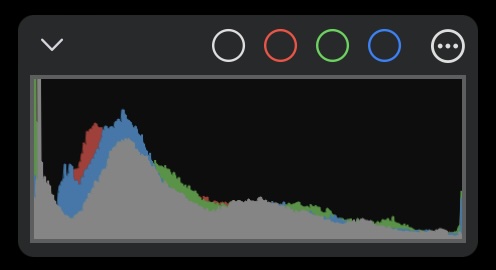
If an image has extremely bright pixels, the circles will light up. If you click on the circles, you get an overlay that shows which pixels are too bright or too dark. Another term for this is clipping because the pixel value is too large to be represented on screen and therefore is clipped to the maximum value of white or black. In other words, the pixel is brighter than the brightest value that can be shown on screen. The first circle is the one you will use most often. It'll show you any pixels that are clipped because they're too bright or are black. In this case, a pixel is considered clipped if any of the components (red, green, or blue) are above 1.0, which is the highest value that is normally seen on a screen. Another word for a clipped pixel is a hot pixel, and a black pixel is sometimes called a cold pixel. If you click on the first circle, you see red for pixels that are too bright and blue for pixels that are black. This is also called a hot and cold pixel overlay. An example appears below.
![]()
The other circles are channel-specific clipping indicators, so you can see clipping in just the red, green, or blue channels. There are two histogram-specific preferences. One lets you control how clipping is calculated (all channels or any channel). You can also choose whether histograms are computed in the sRGB or the Display P3 color space. See the Settings interface.
Enhance
The Enhance adjustment contains basic tools like contrast, saturation, and vibrancy.
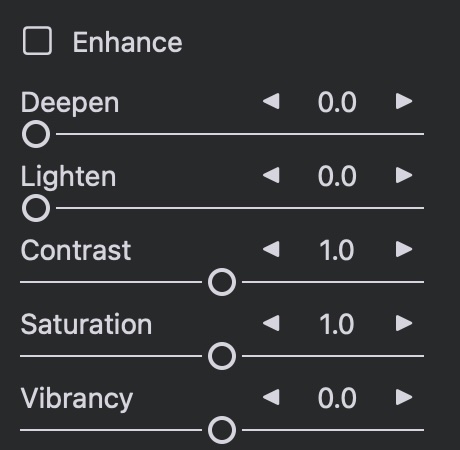
Vibrancy is like saturation, but it doesn't affect skin tones or orange hues. Deepen and Lighten are smarter versions of Highlights and Shadows. This pair of sliders is similar to Highlights and Shadows but produce better results in general. Deepen operates on the brighter parts of the image, while Lighten operates on the darker parts of the image. The sliders are better than Highlights and Shadows because they do not affect overall image contrast.
Detail
Detail has two basic types of sliders: one for sharpening and one for noise reduction.
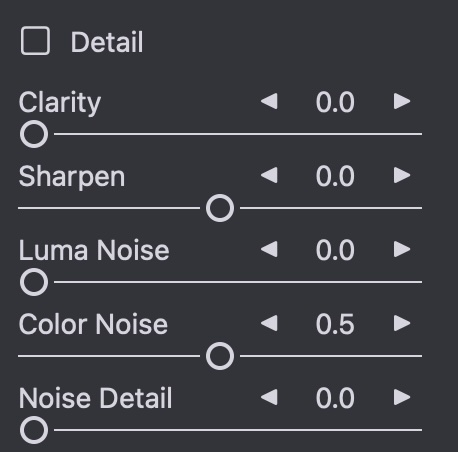
Clarity and Sharpen are two types of sharpening sliders. It's best to look at the detail sliders when zoomed in. You can move Sharpen to the left to blur an image. Clarity provides a sharpening effect using a technique called Local Contrast. It is similar, but not identical to the Definition slider found in Photos for Mac and Aperture.
The noise reduction sliders only appear for RAW images. They can be used to increase or decrease the amount of default noise reduction on an image. The Luminance Noise slider affects black and white noise, while the Color Noise controls noise that looks like colored speckles. Sometimes applying strong noise reduction can cause the image to look flat or “plasticky.” If that happens, consider increasing the value of the Detail slider. It restores some “grain” to the image to make it look more natural.
Curves
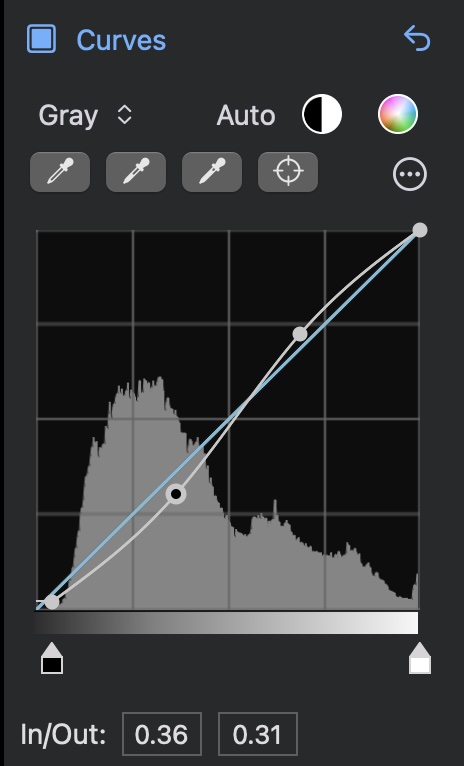
Curves is a very powerful adjustment that allows precise manipulation of pixel data. Curves can be thought of as a custom adjustment where you precisely describe the effect on each channel of each pixel. Each curve represents a mathematical equation. The X coordinate is the input value, and the Y coordinate is the output value. In other words, y = f(x). By default, the input and output is the same, resulting in no change to pixels. This is expressed as a 45 degree line, because at every point on such a line, y = x, and therefore no change occurs. Black (0.0) is on the left, and white (1.0) is on the right. The histogram shows the image before the Curves adjustment. As a result, the histogram does not move as you manipulate the curves.
The Curves adjustment consists of four separate curves, one for “Red,” “Green,” and “Blue” and a “Combined” curve. The red, green, and blue curves only affect one channel of each pixel, while the combined curve affects all three channels.
You can tap on a curve to add a point, which you can then drag to the position of your choosing. The image updates in real-time to account for the change in the curve. There are limitations on how close points can be to each other, so sometimes the Nitro will prevent you from adding or moving curve points.
People often use Curves to adjust contrast. To do that, make an S-shaped curve in the Combined channel as shown in the above image. The more it looks like an “S,” the greater the contrast.
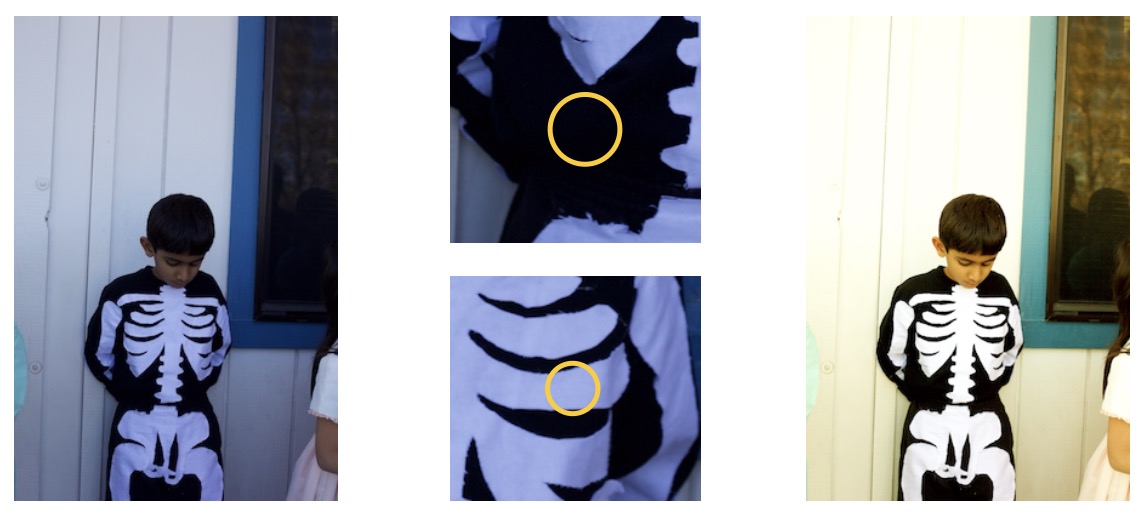
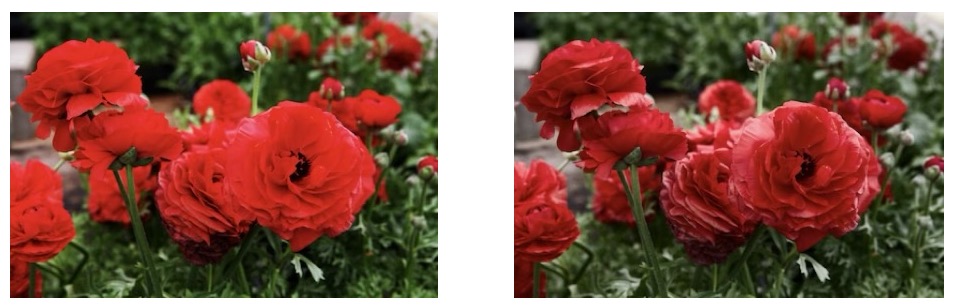
At the top of the Curves adjustment are two automatic buttons: Auto Black and White and Auto RGB. Auto Black and White is a good way to make sure your image has good contrast and it inserts multiple points on the gray curve to accomplish that. Auto RGB sets just the black and white points on the red, green, and blue curves, which improves contrast and also corrects color casts in the image. Here is an example image using the Auto RGB control to eliminate the color cast in the image:

Below the Auto controls are color samplers and a menu with more options. The samplers let you place points on the curve by clicking on portions of the image. The first control sets the black point for the image; the second sets the 50% gray point, and the third control sets the white point. Each of these can cause the image to change appearance. The last sampler is the “target” sampler. It places a point on all of the curves at the color value of the pixel you tap on. Except in extreme cases, the target sampler does not affect the image.
Like the White Balance sampler, the curves samplers update continuously if you drag on the image while using them. In the following example, a color cast is removed using the black and white samplers. The sampled points are circled.
Once any point is placed on the curve, you can move it around to adjust the colors similar to the one you sampled.
Right below the curve is the black and white point control (see below). This is the simplest way to set the darkest and lightest colors for a given curve.
![]()
You can also add a point manually by clicking on the curve and dragging the point. On the Mac, right-click to get a menu to remove points and make other changes to the curve. On iOS, press and hold on a point to display the menu.
In the "..." menu are some modes. One mode is Gamma vs. Linear. By default, Curves is in gamma mode. When in Gamma mode, Curves gamma-corrects the data before applying the curve data and then reverses the correction before sending the image data to the next adjustment. Gamma is generally a good default, but if you want maximum control over the bright areas of the image, Linear can be a better bet.
The other mode is Equal RGB vs. Luminance. This mode controls the way Curves processes the Combined channel. If it’s set to Equal RGB, then red, green, and blue are affected equally. However, if it is set to Luminance, then the combined curve affects the red, green and blue curves according to the luminance equation, which weights green more heavily, and blue the least. This approach avoids enhancing color casts and is much easier than converting the image to the “Lab” color space in Photoshop and manipulating it that way.
Here is an example using an image with an S-shaped contrast curve. On the left is the image in Equal RGB mode and on the right, in Luminance mode:
A unique feature of Nitro's Curves adjustment is an Extended Range Curve. This is enabled for RAW images only. You can engage it by clicking on the "2" button at the bottom of the interface, as shown below.

When you view the extended range curve, you are seeing a histogram that ranges from 0.0 to 2.0, rather than the standard 0.0 to 1.0. This allows you to manipulate the extremely bright parts of an image precisely, which is impossible with a regular "0 to 1" curve.
Levels
Levels lets you quickly work with the color range of an image. Most people find Levels to be easier to understand than Curves, but it is less powerful than Curves.
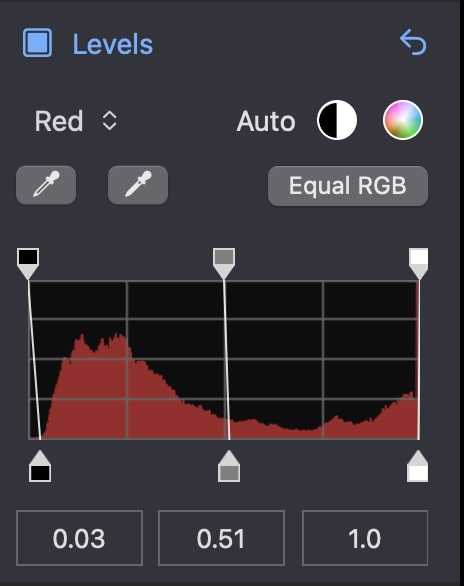
Start by either checking the box to enable the Levels controls, or by clicking one of the Auto buttons. Levels defaults to working with the gray channel. Gray and RGB refer to the same channel but show the information differently. RGB shows each channel overlaid, while Gray just shows luminance. The Equal RGB button controls the way Levels processes the Gray channel. If it’s set to Equal RGB, then red, green, and blue are affected equally. However, if it is set to Luminance, then the gray curve affects the red, green and blue curves according to the luminance equation, which weights green more heavily, and blue the least. This approach avoids enhancing color casts and is much easier than converting the image to the “Lab” color space in Photoshop and manipulating it that way.
Like Curves, Levels also includes an Auto Black and Auto RGB feature. Auto Black sets the black and white points on the Gray / RGB channel and will also move the midpoint to add contrast. You can choose the amount of black and white data to be clipped in Preferences. Auto RGB sets the black and white points for the Red, Green, and Blue channels but does not add a contrast point. Auto RGB can correct color casts, when Auto Black is better for general look and contrast issues. In addition, Levels has eye droppers to manually set the black and white points, and you can enter values for the black, mid, and white points. The histogram shows the image before the Levels adjustment. As a result, the histogram does not move as you move the controls in Levels.
Perspective
Perspective corrects images that are shot off-angle, typically off to the side or up from ground level. The filter works by rotating the image three-dimensionally so that the image data looks like it was shot at the proper angle. By default, the perspective adjustment will attempt to fill the image frame, but that may not be desirable in some situations because it can cut off important parts of the image. In that event, use the Zoom Factor slider to expose the full image without cropping. Once you have done that, you can manually crop the image as you like. When you drag the Vertical or Horizontal sliders, a grid appears to make it easier to line up the image to make it straight. Be careful not to over rotate the image — if you do, the image may become warped.
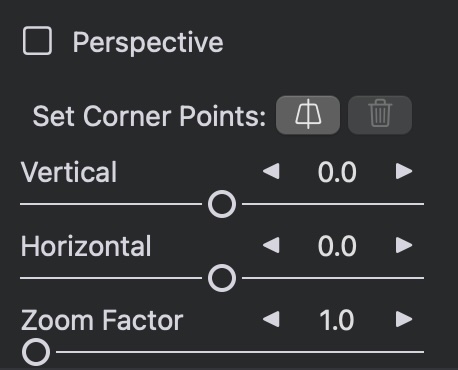
Instead of the sliders, you can select four corners in the image and Nitro will warp the image so that those become the four outermost points on the image. Perspective automatically crops the image. You can decrease that crop by moving the zoom slider, but if you move it too far, you'll get some black areas. You can use the crop tool to remove them.
RAW Tuning
The RAW Tuning adjustment is at the heart of Nitro, providing unique control over Apple’s RAW Engine. All of the sliders are GPU accelerated and real-time, so adjustments appear as soon as you move a slider. There are a few older cameras that don’t have access to all of the below controls, but most do. Note: The RAW Processing adjustment only appears if you are adjusting a RAW image.
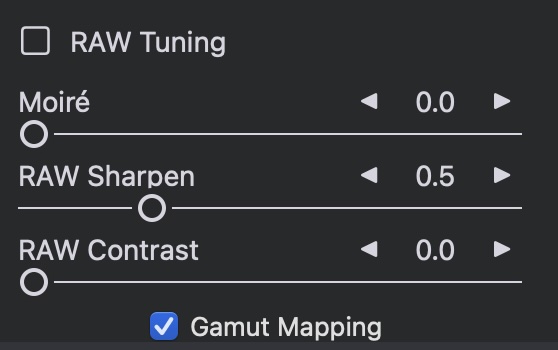
Moiré: This slider reduces the effect of moiré. Moiré is an artifact of digital sensors which can cause colored stripes to appear in finely detailed areas. Cameras with an anti-aliasing filter tend to have less moiré, but they also sometimes capture less detail as a result.
RAW Sharpen and RAW Contrast: RAW Sharpen is a subtle form of capture sharpening which works at the Bayer mosaic level. RAW Contrast is a type of local contrast (which can look like sharpening). RAW Contrast generally has a much stronger effect than RAW Sharpen. Both are image-dependent — the characteristics of the image greatly affect how these sliders operate and affect the default values of those sliders. Sony cameras, in particular, are mostly unaffected by the RAW Sharpen slider.
Gamut Mapping: In its final processing step, Apple’s RAW engine ensures colors do not exceed the range of the working color space (Adobe RGB or P3). This is called Gamut Mapping. Colors that are near or outside the limit of that color space are changed to fit within the gamut. Without gamut mapping, colors that exceed the limit of the gamut will be clipped. Gamut Mapping usually provides good results but having control over gamut mapping is helpful in some situations. For example, sometimes you may want the colors to be clipped rather than mapped because you prefer the appearance. Or, you may want to use other filters in Nitro to bring the colors back into gamut.
Depth
The Depth Effect adjustment is available for images shot with the iOS camera in portrait mode. The adjustment allows you to adjust the background and foreground of the image independently. It also provides control over the definition of foreground and background by manipulating the depth mask captured by the camera.
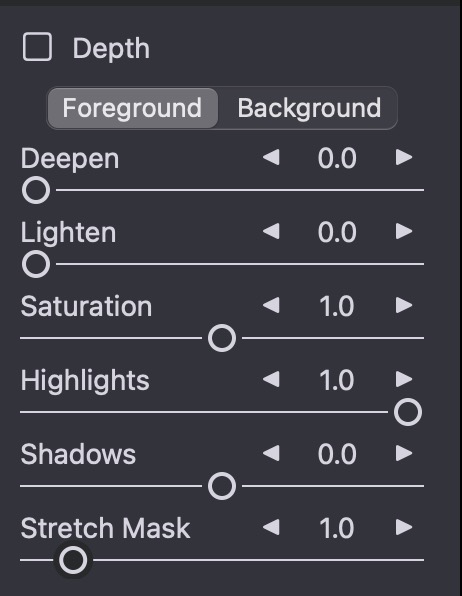
Deepen darkens the brighter pixels but adds richness to the image. Lighten brightens the shadow areas while maintaining contrast. Highlights darkens the brightest pixels in the foreground. Stretch Mask controls what the other sliders consider foreground and background. Sliding it to the left makes more of the image “foreground” and sliding to the right makes more of the image “background”. So, if you move the slider all the way to the left, the entire image is considered “foreground” and the background sliders have no effect. If you move the slider all the way to the right, then very little of the image will be affected by the foreground sliders, while most will be affected by the background sliders. As you change the mask, the image will change to an overlay showing the mask. Lighter shades of gray denote foreground and darker shades denote background.
Black and White
Black and White is a monochrome “mixer” which allows you to make black and white images by controlling the percentages of red, green, and blue that contribute to the grayscale image. Different percentages of these color channels will accentuate different parts of the image and are better for some scenes than others. The Black & White adjustment comes with some presets that simulate the effect of a color filter placed over a camera lens.
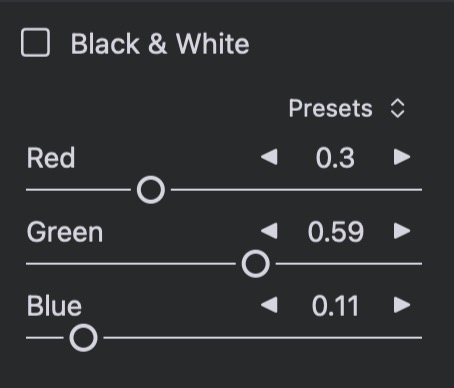
If you check the box next to “Black & White,” the adjustment will produce a black and white image using a “luminance” weighting of red, green, and blue. This is generally more pleasing than an equal weighting of the channels, though equal channels is also a preset. A Red filter is good for landscapes and deepens a blue sky. An Orange filter is good for street photography and images with tiles and bricks. A Yellow filter darkens the sky and is generally a good “middle ground” choice. Green is also an interesting choice for landscapes and nature photography. The Blue filter can create a moody shot.
HSL (Hue, Saturation, and Luminance)
The HSL Color adjustment lets you work with individual hues without affecting other hues in your image. To use this adjustment, pick the hue you are interested in, from the nine pre-set hues. Then, adjust the hue, saturation, or luminance of that hue. Similar hues will also be affected, but to a lesser extent. The range slider determines the range of hues affected. If you decrease the range, fewer hues will be changed.
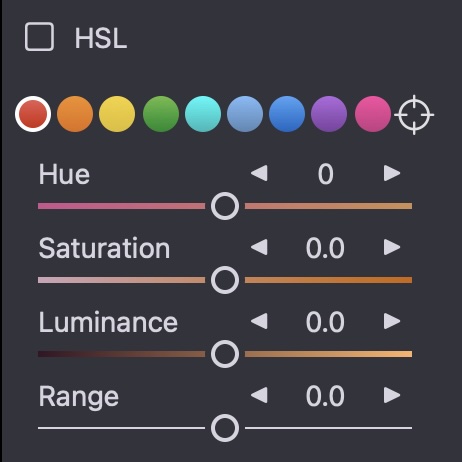
If you increase the range, more hues will be affected. There is an additional choice at the end of the list of preset hues. This is called the “target hue.” The target hue is a custom hue that you choose by clicking and dragging on the image. It works by finding the two preset hues nearest to the one you have chosen and adjusting those proportionally. As with the preset hues, you can choose whether to adjust the hue, saturation or luminance of the target hue. You can choose as many target hues as you like.
Split Toning
Split Toning is an advanced way to adjust images by tinting the highlights or the shadows independently.
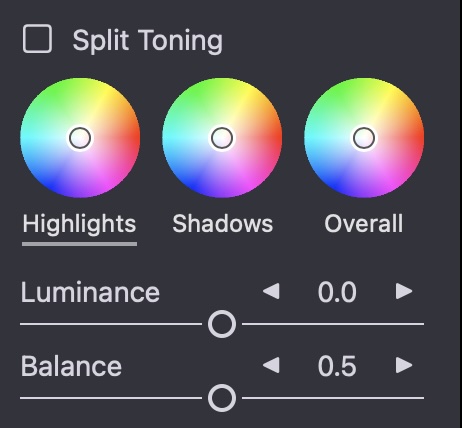
There are three tint wheels; the third is an overall tint for the image. In addition, you can adjust the luminance of the highlights, shadows or overall image. The Balance slider controls the dividing line between highlights and shadows. Move it to the right and the range of pixels values considered highlights increases; move it left and the highlight range is reduced. The Balance slider does not affect the Overall tint wheel.
Chromatic Aberration
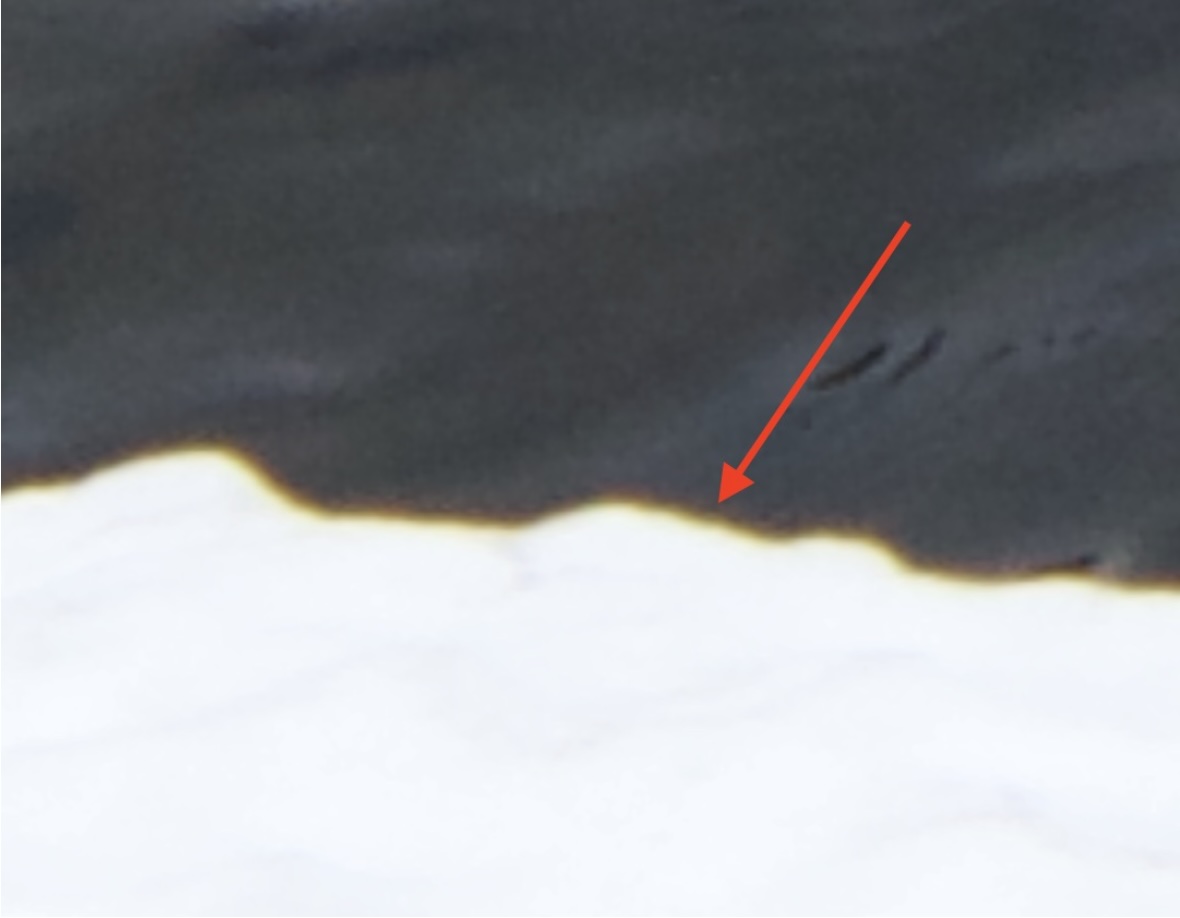
Chromatic Aberration corrects color shifts that occur when light hits the sensor at an angle, causing the constituent colors to split apart (as in a prism). The signature of an image with chromatic aberration is a colored line (red, yellow, etc.) that appears next to a sharp edge. When that happens, you can use this adjustment to realign the colors and correct the image.
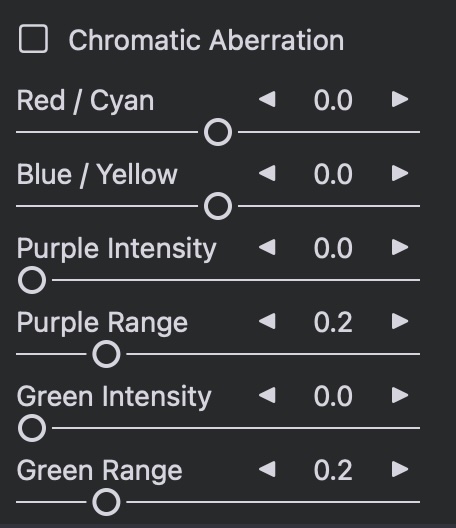
The two sliders control different types of aberration. You will usually see aberration near edges / high contrast areas. If you have red or cyan aberration, use that slider. Otherwise, use the second slider to control blue / yellow aberration. Here is an example of chromatic aberration:
This adjustment can also be used to reduce color fringing. Purple or green fringing can also appear in high contrast areas, such as between tree branches in the winter.
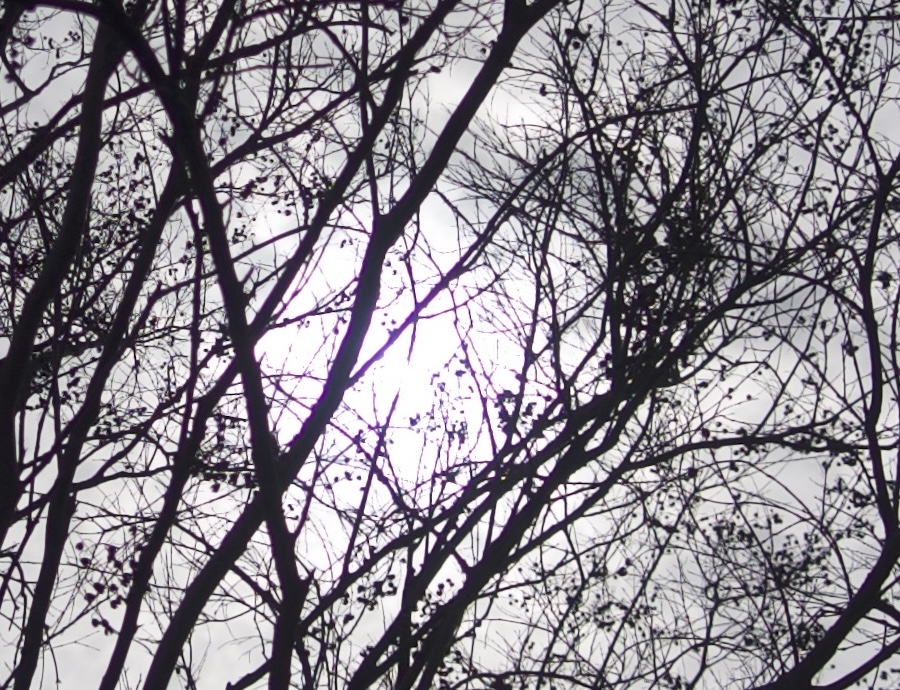
You can reduce this effect with the purple (or green) intensity slider. The range of purple or green hue that is affected can be controlled with the range sliders. Take care with the range slider as it can affect other parts of the image with nearby hues.
Lens Correction
Nitro includes two types of lens correction to handle artifacts in lenses such as distortion and shading (also called vignetting). There are two types of lens correction in the app: automatic and manual. The automatic lens correction is provided by Apple's RAW decoder, but is only available for some camera and lens combinations. Apple's system works by reading lens metadata written into the image file. In general, they can correct newer cameras and lenses, rather than older ones. When Apple's decoder can correct a lens, Nitro defaults to turning that correction on. You can add further devignetting to Apple's correction, though this is not usually necessary. When the decoder cannot correct a lens automatically, the full suite of manual tools is enabled.
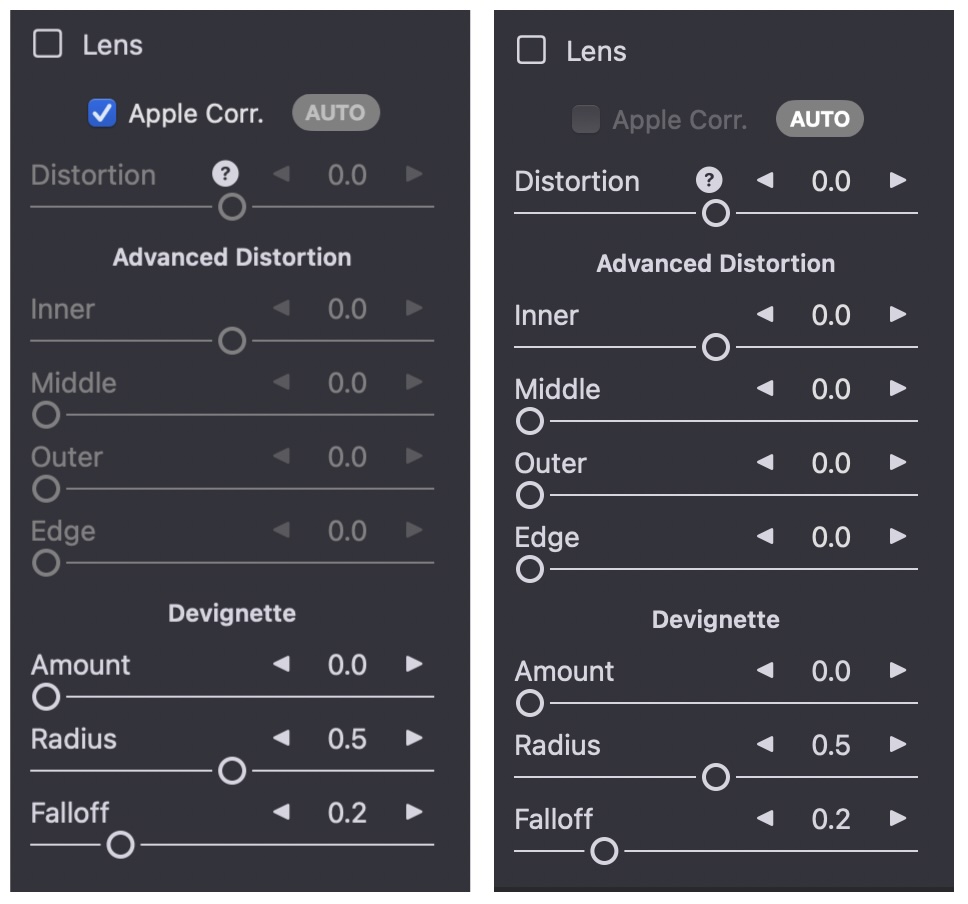
The manual correction is better described as "semi-automatic." The best way to correct a lens is to take a number of pictures of a grid with that camera and lens combination at a range of aperture values and focal lengths. Then it is straightforward to correct the distortion and shading. The lens correction is semi-automatic because Nitro will learn how to correct the lens automatically using your manual corrections. In short order, Nitro can correct the lens on its own. The AUTO button at the top can be used to correct the lens automatically once there is sufficient information in Nitro's lens correction database. There are also preferences in the app that controls whether this semi-automatic correction engages without your having to click the Auto Button. That is described in more detail in the Settings section.
To learn more about how to correct a lens with Nitro and to build up its correction database, please watch this video (it covers the RAW Power app, but the technique is identical):
Channel Mixer
A channel mixer is a very powerful tool for tinting images or completely changing the look of your image. You can even swap channels (exchanging blue for red, for example).
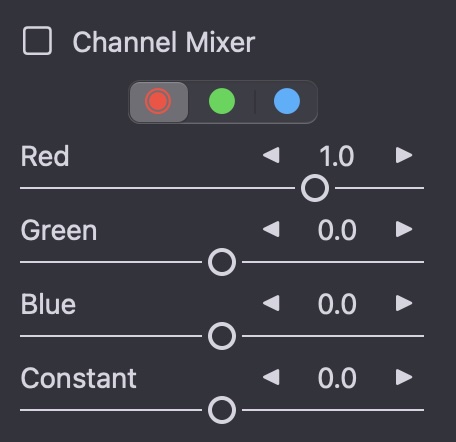
Click on the three-color control to choose the color channel to manipulate. Then determine the amount of red, green, and blue data to copy into that channel. The Constant slider simply adds red, green, or blue to the image for a quick tinting effect.
Vignette
Vignette darkens (or lightens) the edges of an image. When darkening an image, it draws the eye to the lighter part of the image (typically the center, or the subject of the image). Vignettes in most photo applications are center-based, making them poor choices if the subject is not in the center of image (as is often the case).

The Vignette in Nitro allows you to specify the center point. To do this click the targeting control next to the reset button and then click and drag on the image. You might want to increase the intensity of the effect before changing the center point to make it easier to see what will happen. Vignette applies its effect after crop, so if you want to lighten the edges of an image before crop is applied to counteract lens shading, then use the Devignette tool in the Lens adjustment.
Masking
Masking is a very powerful feature of Nitro. It allows you to work selectively on regions of an image, applying adjustments just to the area you are interested in. For example, you might want to sharpen the eyes of a person in a portrait without sharpening their skin. Or apply a black and white treatment to the background of an image while leaving the foreground in color. Or a selective adjustment like HSL might allow you to make the sky more blue, but you don't want it to affect a person's blue shirt elsewhere in the image. Linear gradients are ideal for working with skies while radial gradients help with making natural lighting effects.
Note: Nitro uses the term "mask" in the opposite manner of a traditional darkroom. In a darkroom, the mask is the area that is not affected, while in Nitro, the mask is the area that is affected.
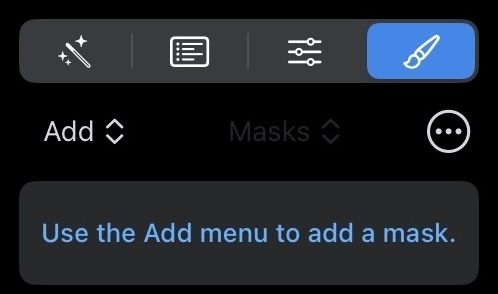
You access the masking interface by picking the last of the four main editing modules:
Mask Types
Start by adding a mask. There are several types:
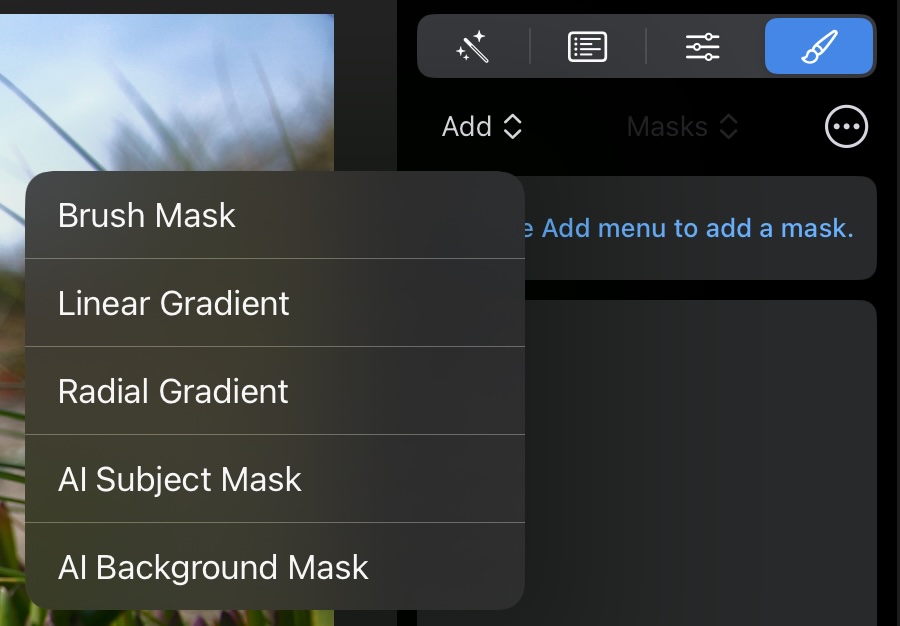
- Brush Mask: use painting tools to define the area of the image you want to work on.
- Linear Gradient: a smooth rectangular area which can be rotated, inverted, or flipped.
- Radial Gradient: a circular mask with a gradient inside of it. You can rotate, resize, or stretch it into an ellipse.
- AI Subject Mask: makes a mask of the foreground subject using a machine learning model.
- AI Background Mask: makes a mask of the background using a machine learning model.
Once you have created a mask, you can modify it, and you can also apply adjustments to it. Each mask can have a large number of adjustments applied to it. Most Nitro adjustments can be applied to a mask. For example, you can create two masks and apply different White Balance corrections to adjust for a mixed lighting situation.
Depending on the type of mask you create, Nitro will provide you with mask editing tools. For a brush mask or an AI mask, Nitro will enable the painting tools. For a linear or radial gradient, Nitro will show the gradient on-screen tools to move or rotate the gradient.

Please note that you can brush any mask in Nitro, including AI masks and gradients. This is an extremely powerful way to tune an AI mask or gradient to be exactly what you want with a minimum of effort.
Brushing
As mentioned above, you can brush any mask in Nitro. The brushing tools appear below the mask menu:
The first tool, paint, lets you add to a mask. The erase tool removes from a mask. The third tool provides ways to control the mask by color, brightness, or intensity.
Painting and Erasing
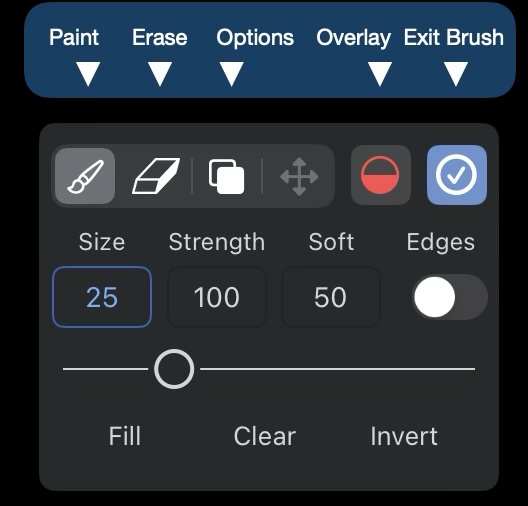
To paint, start by selecting the paint brush. These are the brush parameters:
- Size - how big the outer edge of the brush is (all brushes are circular)
- Strength - how much paint is applied (this can be also be considered opacity)
- Softness - brushes have a solid interior which gradually fades toward the outer edge. The softness controls how much of the brush is solid. Nitro shows the brush as two concentric circles so you can see how softness works.
To change any of these parameters, tap or click on the numeric value (in the image, tap on the 25, 100, or 50). That will enable the slider below the numbers. The brush cursor will update in real time to show you how the brush will change.
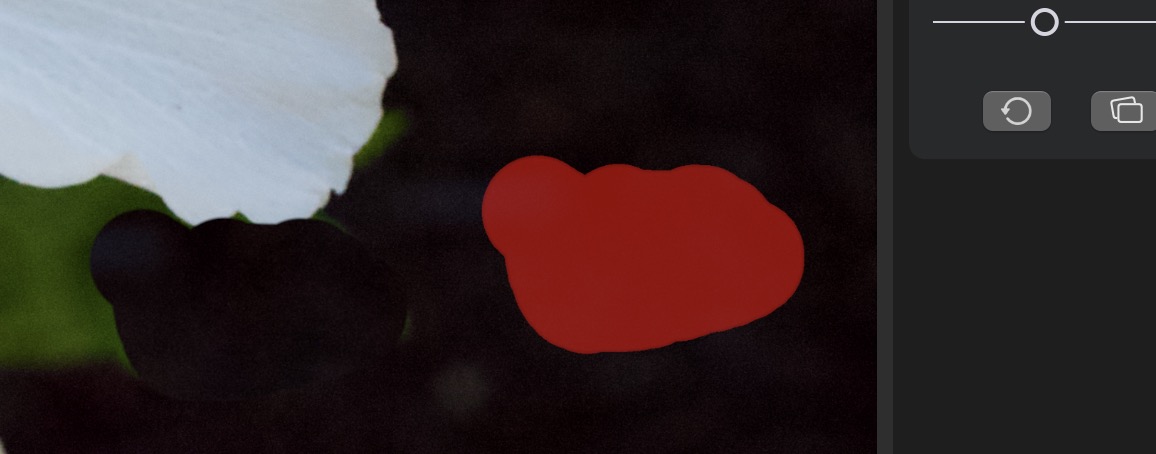
The last control is Edges. This enables an “edge aware” or “contour following” brush mode. When you turn on Edges, Nitro’s brush will paint only on one side of an edge, allowing you to follow contours. It can take a little practice but it’s extremely powerful. However, you will want to use the brush in both Edge On and Edge Off modes for best results.
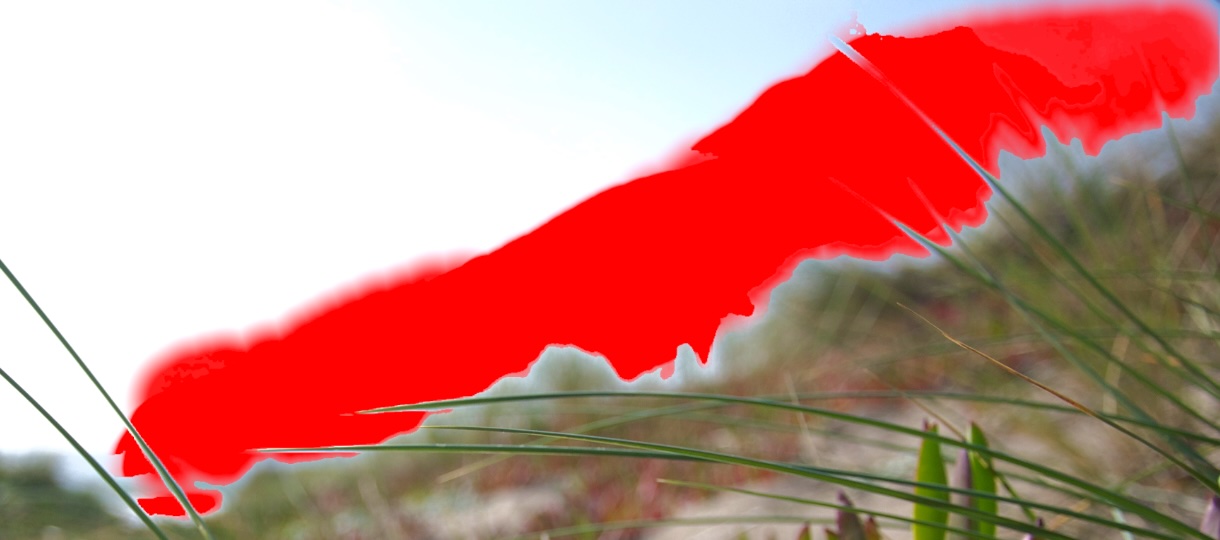
You can see the effectiveness of the edge aware brush in the below image, where the red area is the brushed area.
Below the brush size slider are a few quick actions:
- Fill will completely fill the mask. The next step is usually to use the eraser to remove portions of the mask. This is useful if you want to apply an effect to most of the image.
- Clear makes the mask empty so you can start over again.
- Invert reverses the mask. This can be useful if you want to work on the opposite area that you painted (for example, the area is very large, so you paint on the small area you don’t want to affect, and then invert).
When you are done painting, tap the blue checkmark to exit the painting mode.
Mask Options
Also in the painting interface are mask options, as shown below.
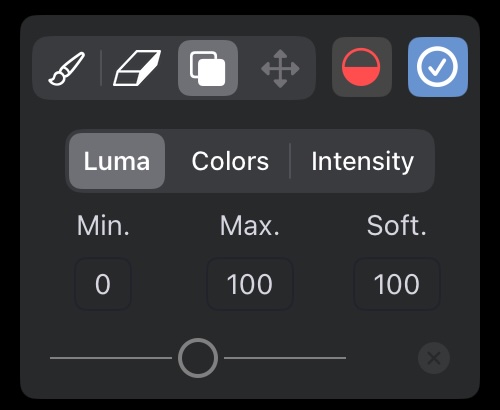
- Luminance lets you set a range of luminance values. Outside of that range the mask has no effect. This is helpful when targeting only bright or dark areas.
- Color Range lets you establish a range of colors to affect.
- Intensity lets you dial up or down the amount of the masked effect (like the opacity of a layer).
Each mask can have its own mask options.
Mask Overlays
Next to the paint tools is a half circle which represents the Mask Overlay options which control a visual overlay of the mask itself.
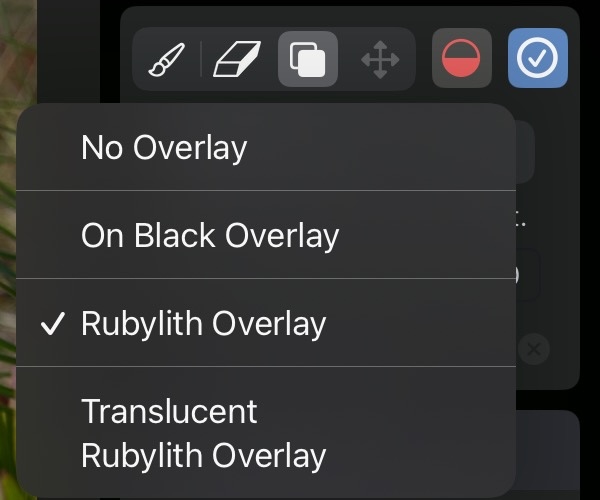
- No Overlay: the mask is not visible, other than through the adjustments applied.
- On Black Overlay: the mask is drawn, but the image is not drawn.
- Rubylith Overlay: a red overlay appears.
- Translucent Rubylith: same as the rubylith, but it has some transparency to help you see the image behind it.
Moving a Gradient Mask
Linear and Radial Gradients can be repositioned. Because you can also brush on a gradient mask, to move a gradient select the last of the four tools which looks like a four directional arrow. On screen controls appear to let you move or resize the gradient.
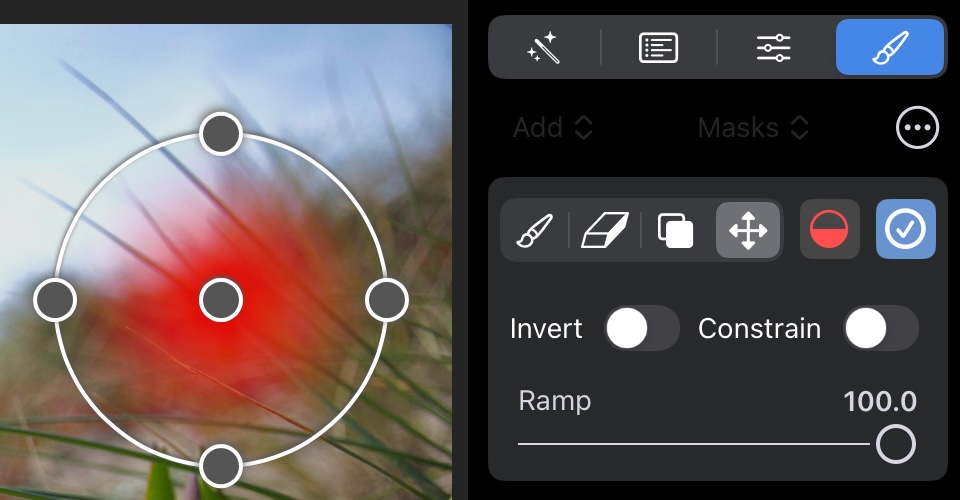
- Invert: this switch lets you reverse the gradient’s effective area.
- Constrain: this switch limits a radial gradient to a circle and linear gradient to 45 degree angles.
- Ramp: this slider lets you control how the gradient falls off from maximum to minimum.
Switching Masks and the Mask Menu
Switch between masks by first tapping the blue checkmark. Then use the Mask popup menu to choose a different mask (or use the Add popup menu to create a new mask)
Next to the Add and Mask popup menus is the Mask Options button. This brings up a menu with more commands.
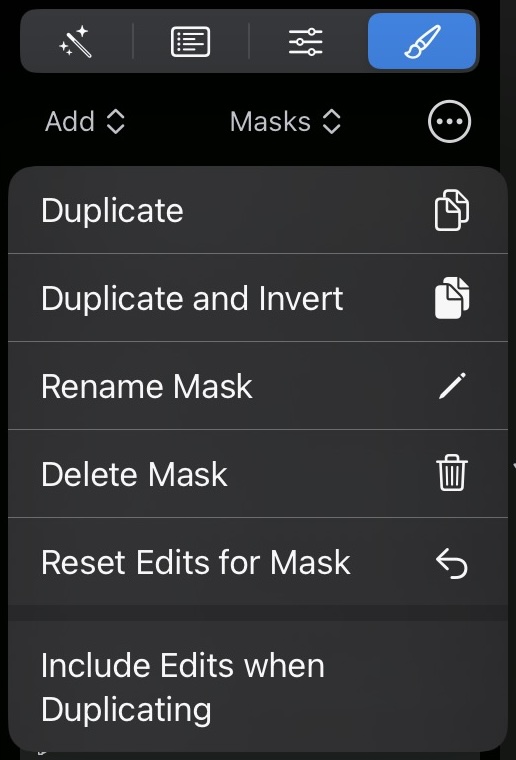
- Duplicate: creates a duplicate of the current mask. You can rename the mask.
- Duplicate and Invert: creates a duplicate mask but inverts the contents.
- Rename Mask: allows you to rename a mask to be more descriptive
- Delete Mask: removes the mask from the image
- Reset Edits for Mask: removes the edits from the mask
- Include Edits when Duplicating: If checked, then the Duplicate and Duplicate and Invert commands will also copy the edits to the duplicate mask.
Note: the Duplicate commands are in Nitro version 2025.1 and are not available in earlier versions.
RAW + JPEG Editing in Photos
When browsing the Photo library, RAW + JPEG image pairs are represented by a single thumbnail. The thumbnail shown is the one made by Photos, or is the result of editing either the RAW or the JPEG. Photos defaults to editing the JPEG, while Nitro defaults to editing the RAW. There are a few different ways to control which one is edited. While in Edit, if you have an R+J image, you can switch between the two with the R+J button. It is located next to the 4-way control as shown here:
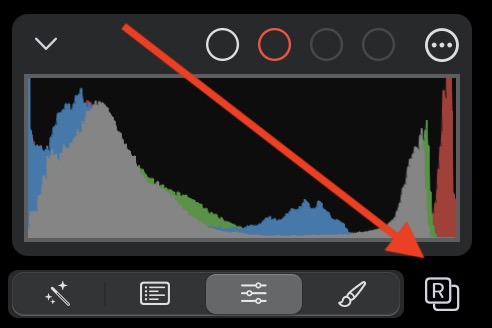
Click that button to switch between the two images. If you switch to the JPEG, adjustments that are RAW-only will disappear, and vice-versa. In addition, on the Mac, you can right-click on the Viewer to switch, or use the Image menu. Finally, in Settings, you can choose whether the RAW or the JPEG is the default.
Editing on iPhones
Nitro has a different user interface on iPhones, due to the tall and narrow shape of the device. Most controls are on the bottom of the screen and more menu choices are in the “...” menu at the upper left. The app opens into the last album or folder you viewed. To access the other folders / albums, tap the Library button in the upper left. Below are some screenshots of the interface:
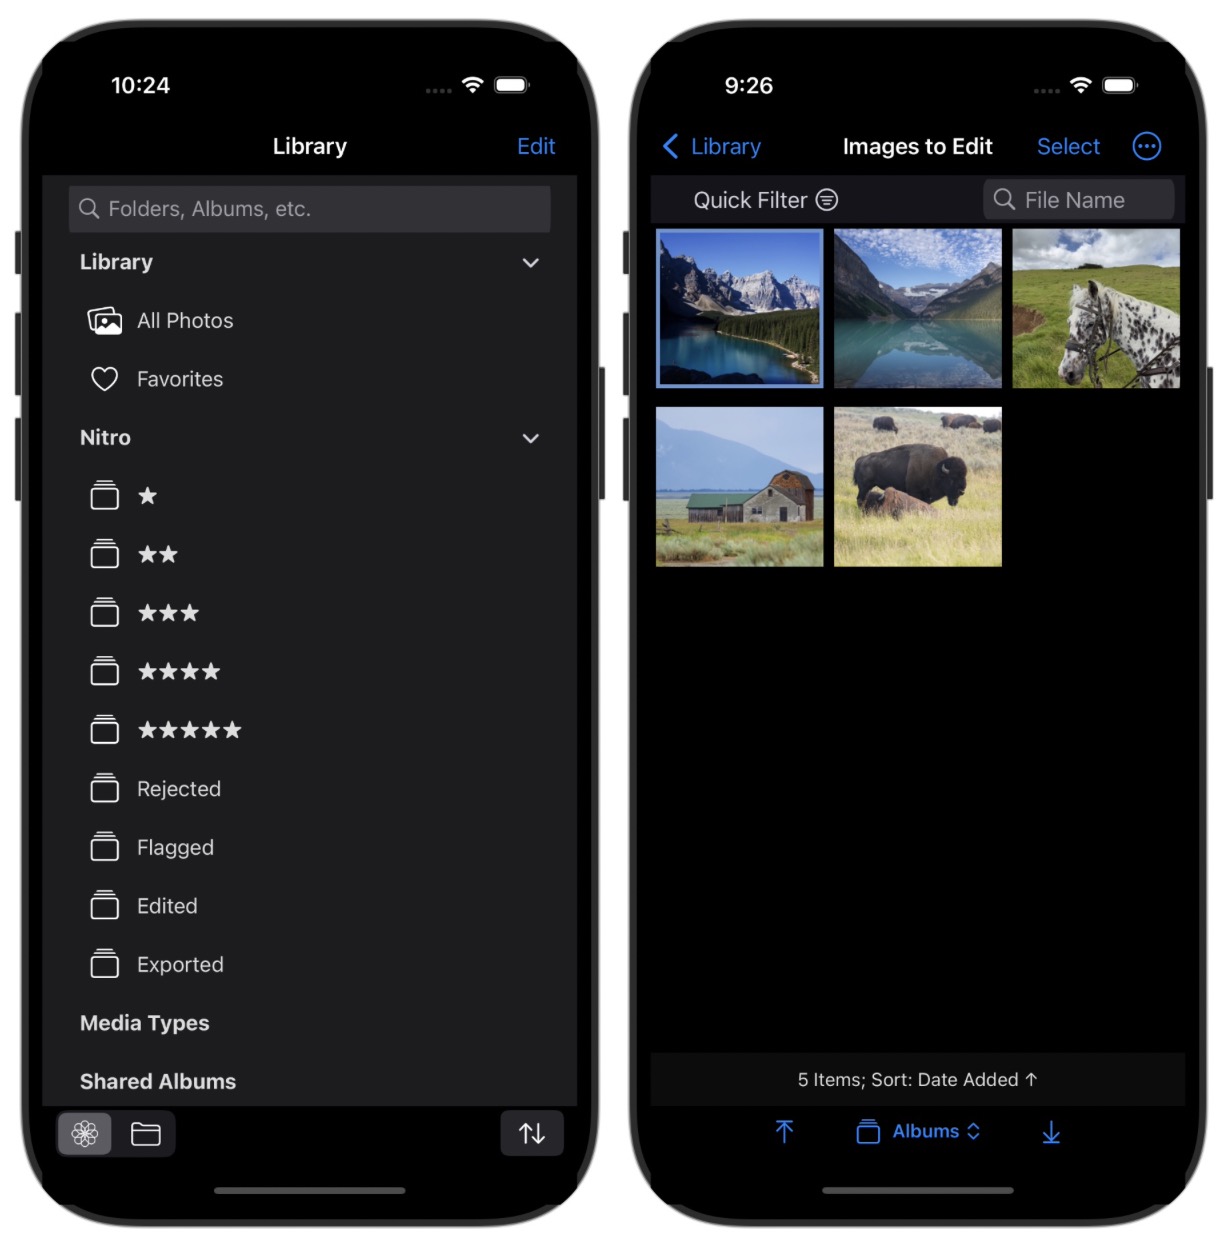
The library view on iPhones is the same as found on iPads, with the same controls and switcher to go between the Photo Library and the Files.app view. If you are using the Photo Library, you can also use the Album picker at the bottom to jump between some commonly accessed albums. The bottom of the grid view also has two arrow buttons to jump to the top or bottom of the thumbnail view. The Select button remains in the grid view, which you can use to share, delete, or run batch operations. However, many other commands have been moved to the “...” menu in the upper right as shown below.
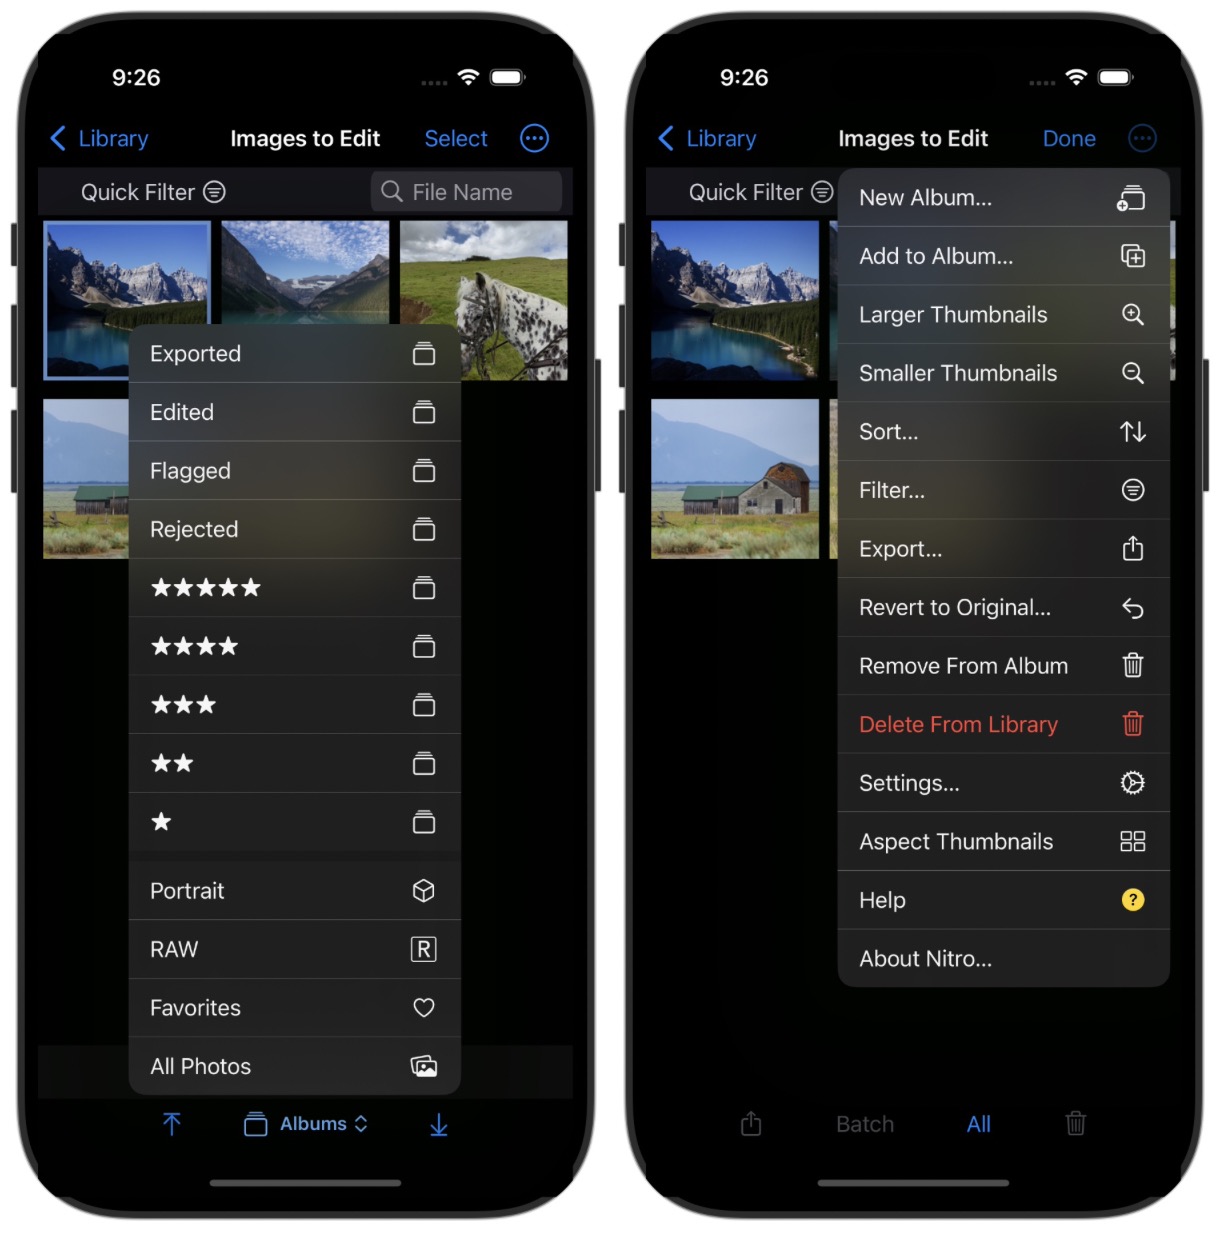
If you rotate your iPhone to landscape orientation, the interface will adapt to a more-iPad like design, though the app is optimized for use in portrait screen orientation. Tap on a thumbnail to go to the Viewer.
One Up (Viewer)
The viewer is similar to the one on iPads, except all the controls have moved to the bottom of the screen.
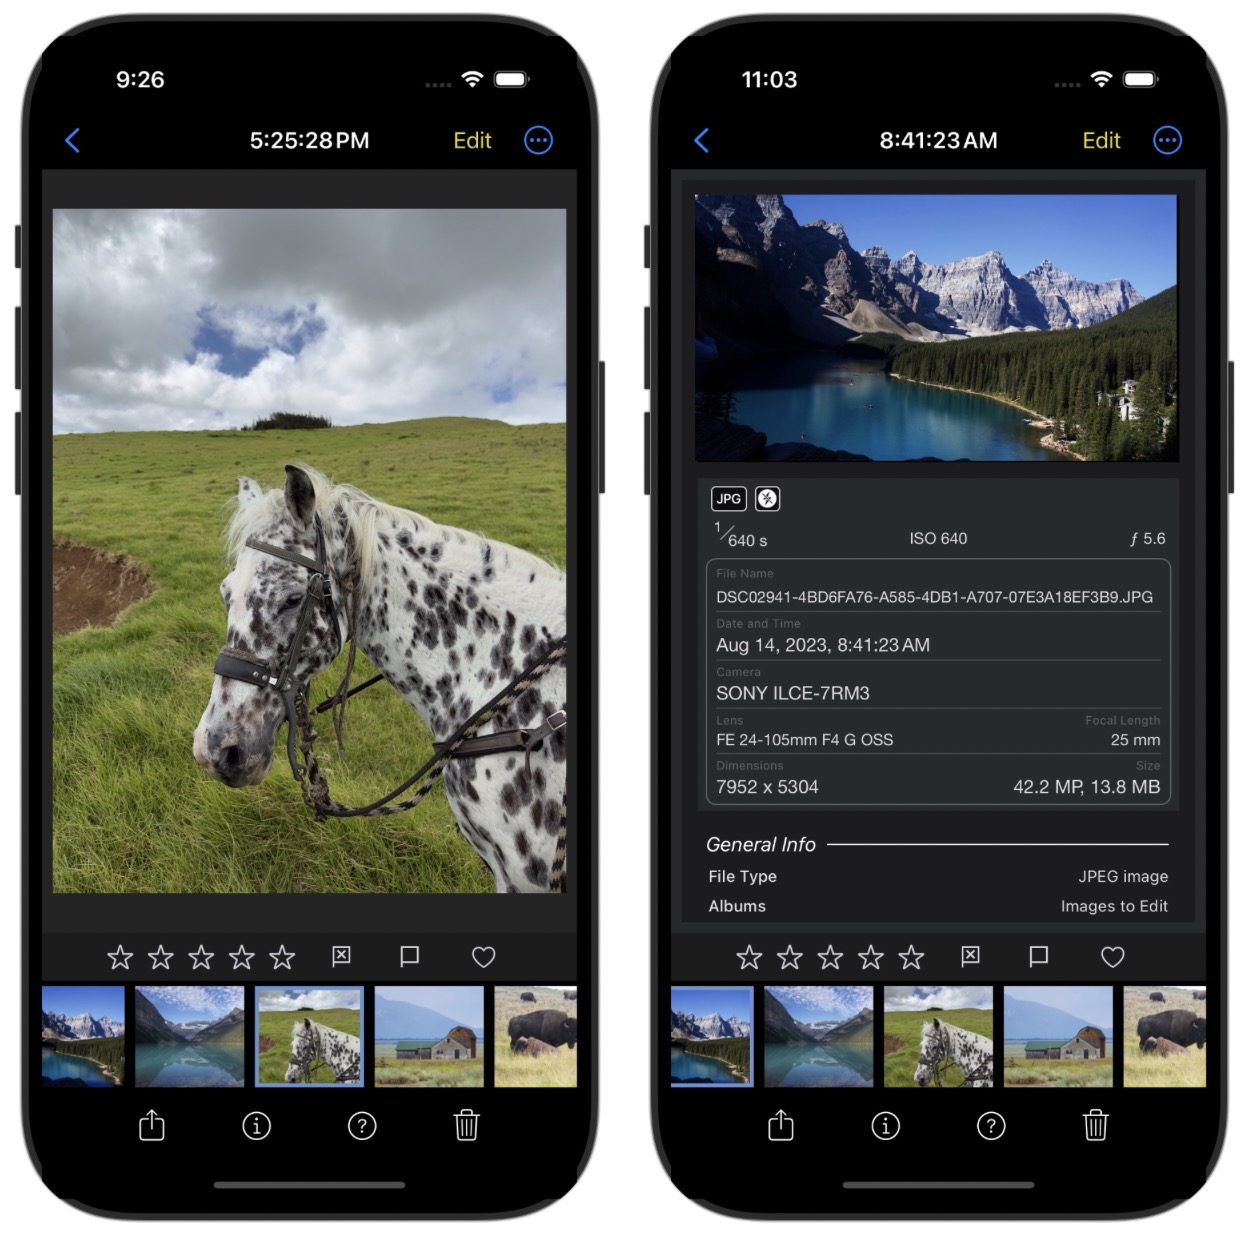
Here, you can rate, flag, and mark images as favorites. There is also a bottom toolbar with share, info, help, and trash. The info button uses the “flip tiles” method of showing metadata, which will show a map if the image has location information.
You can tap the share button to bring up an export panel. To adjust the export settings, tap the Change button; a summary of the export settings appears at the bottom of the panel. To enter Edit, tap the Edit button in the upper right.

The most obvious difference with Edit is that the controls are on the bottom of the screen.
Edit Basics
On iPhones, Edit is laid out vertically. At the top of the screen is an Info button which will display a reduced set of metadata as shown below. Right below the image is a toolbar. The final button contains some configuration options.
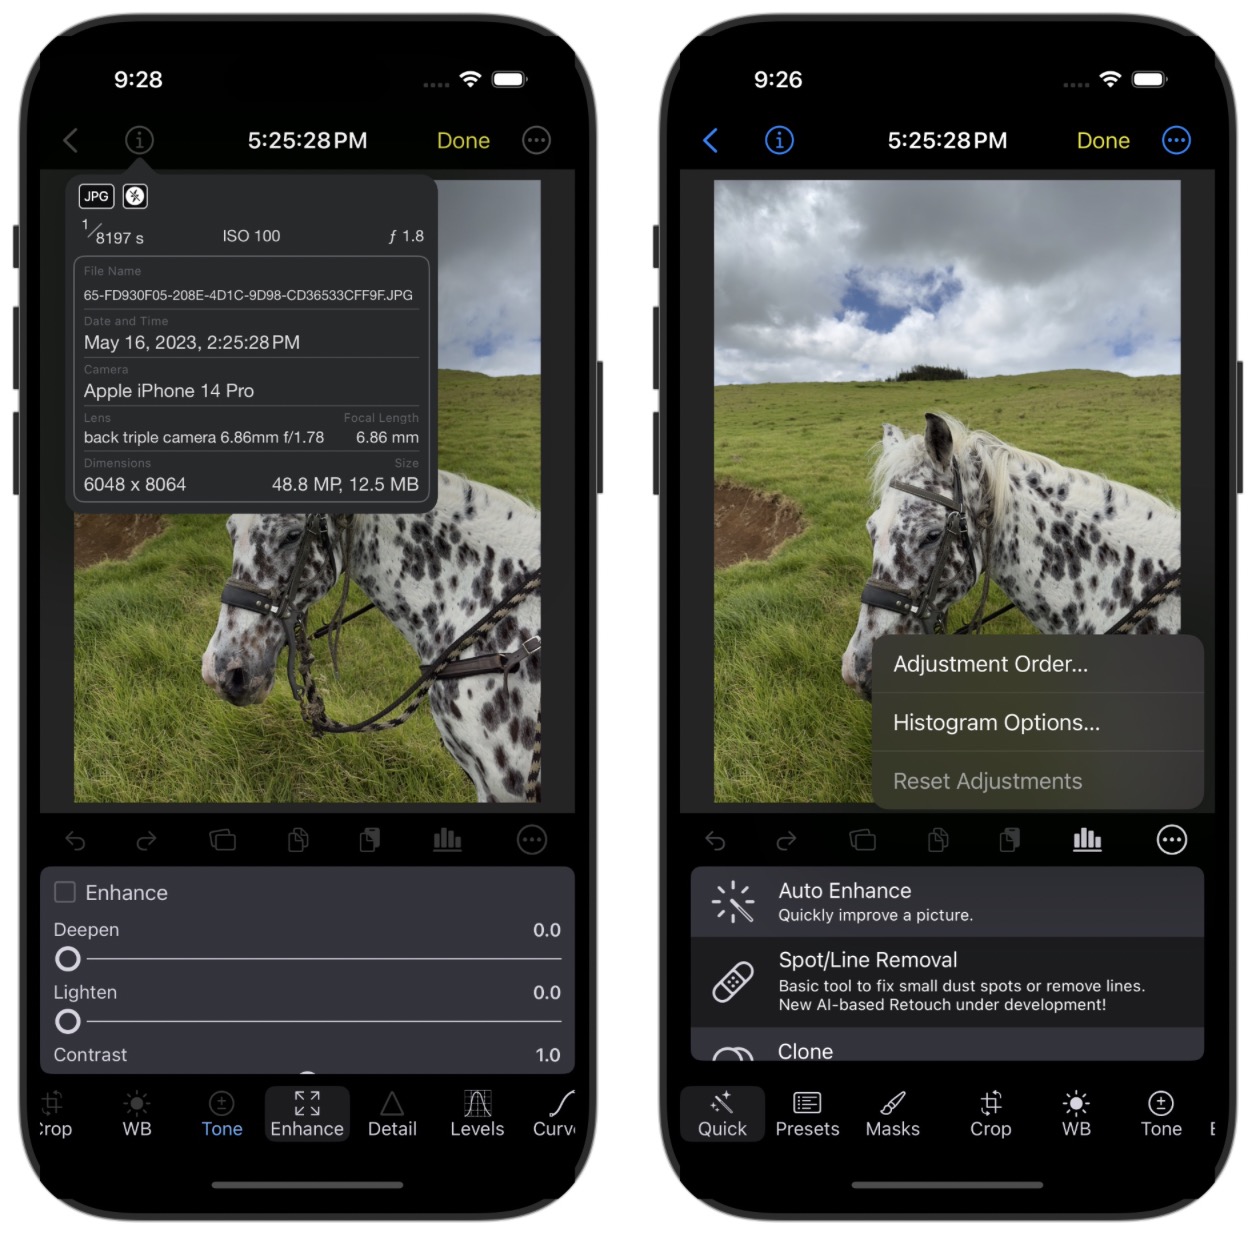
Tap the info button again to hide the shot information. The buttons below the image are as follows:
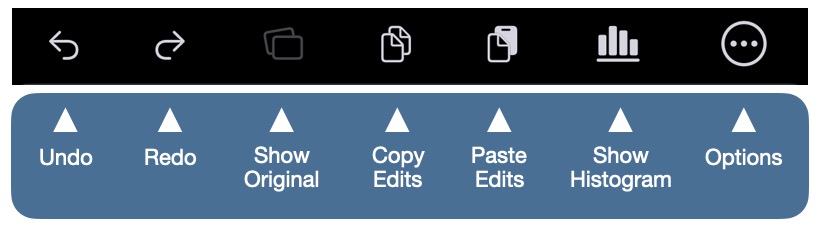
The histogram on iPhones works very differently from the one on iPads and Macs. It floats above the image.
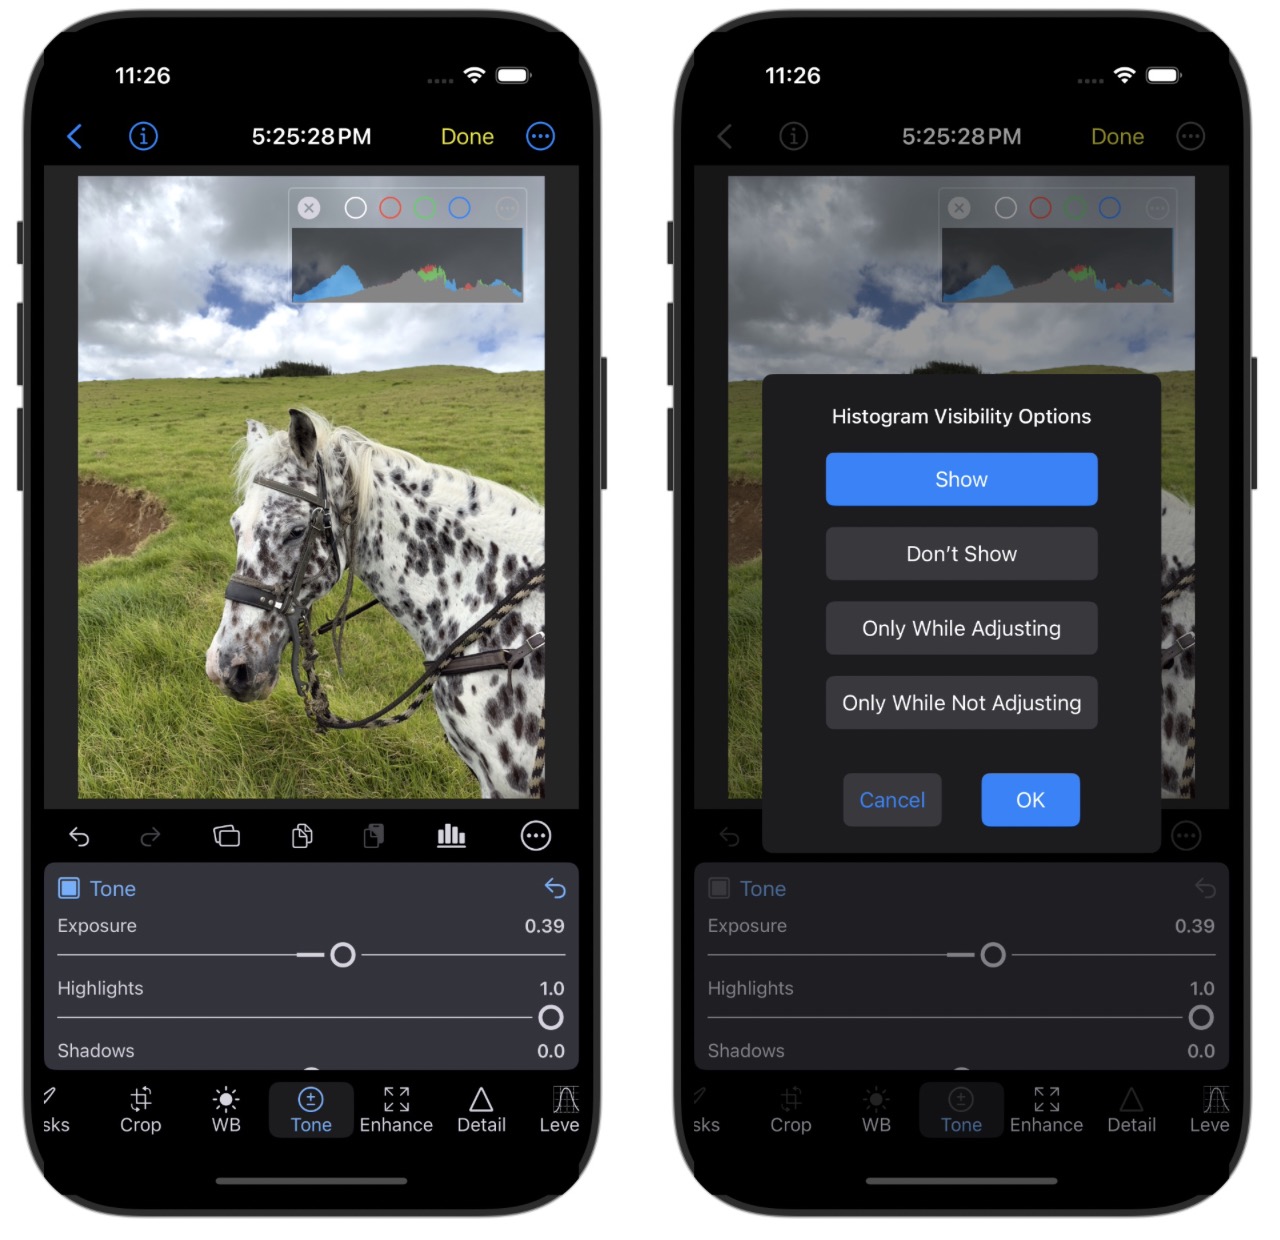
Clipping indicators are present at the top, along with a “...” menu to set the top-most channel.. You can drag the histogram to place it where you like. In the toolbar below the image, you can Nitro’s unique histogram options (only for the iPhone). The four options work as follows:
- Show: always shows the histogram
- Don’t Show: always hides the histogram
- Only While Adjusting: displays the histogram when you are moving a slider or a curve / level control. This lets you adjust with the histogram visible without it interfering with the image.
- Only While Not Adjusting: displays the histogram when you are not actively moving a slider or curve / level control. This lets you see the entire image while adjusting, while displaying the histogram at other times.
Editing
As mentioned before, the editing tools are at the bottom of the screen on iPhones. There are three modes on the left: Quick Fixes, Presets and LUTs and Masks. After those are the slider adjustments.
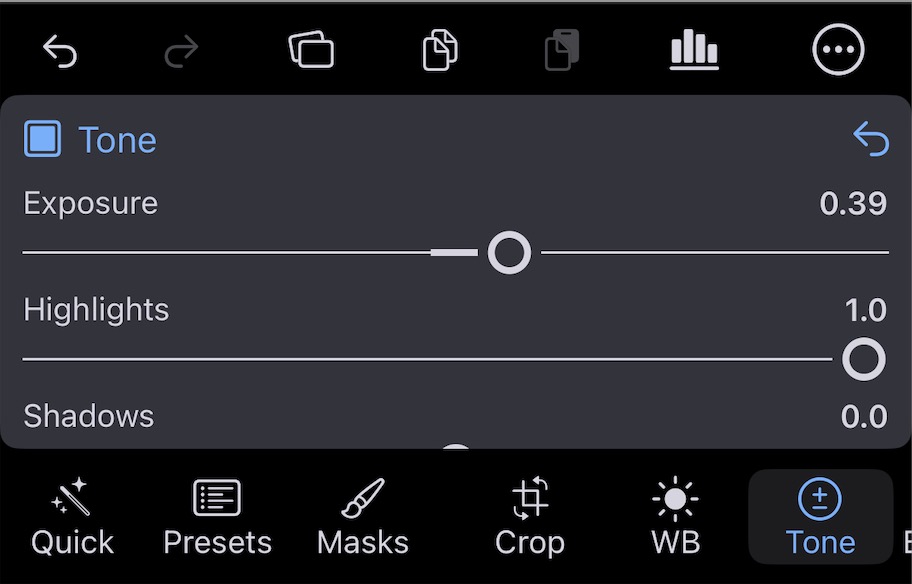
Tap any icon to view that adjustment or mode. When you change an adjustment, or add a mask, the icon turns blue, as shown above for the Tone adjustment. You can tap on the numbers above sliders to display an onscreen numeric keypad.
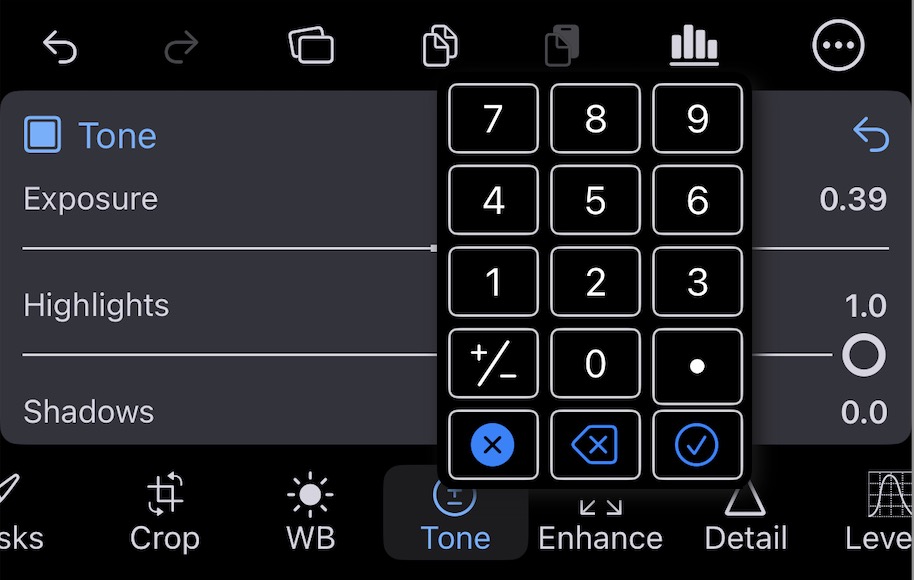
Most adjustments look similar on iPhones as on iPads. The biggest differences are the need to scroll to see all the sliders, and a specific mode for Curves. This is the default view for Curves. If you tap the “Large” button, the curve appears on top of the image and you can interact with it there (and the Curve interface area gets shorter to give you more space).
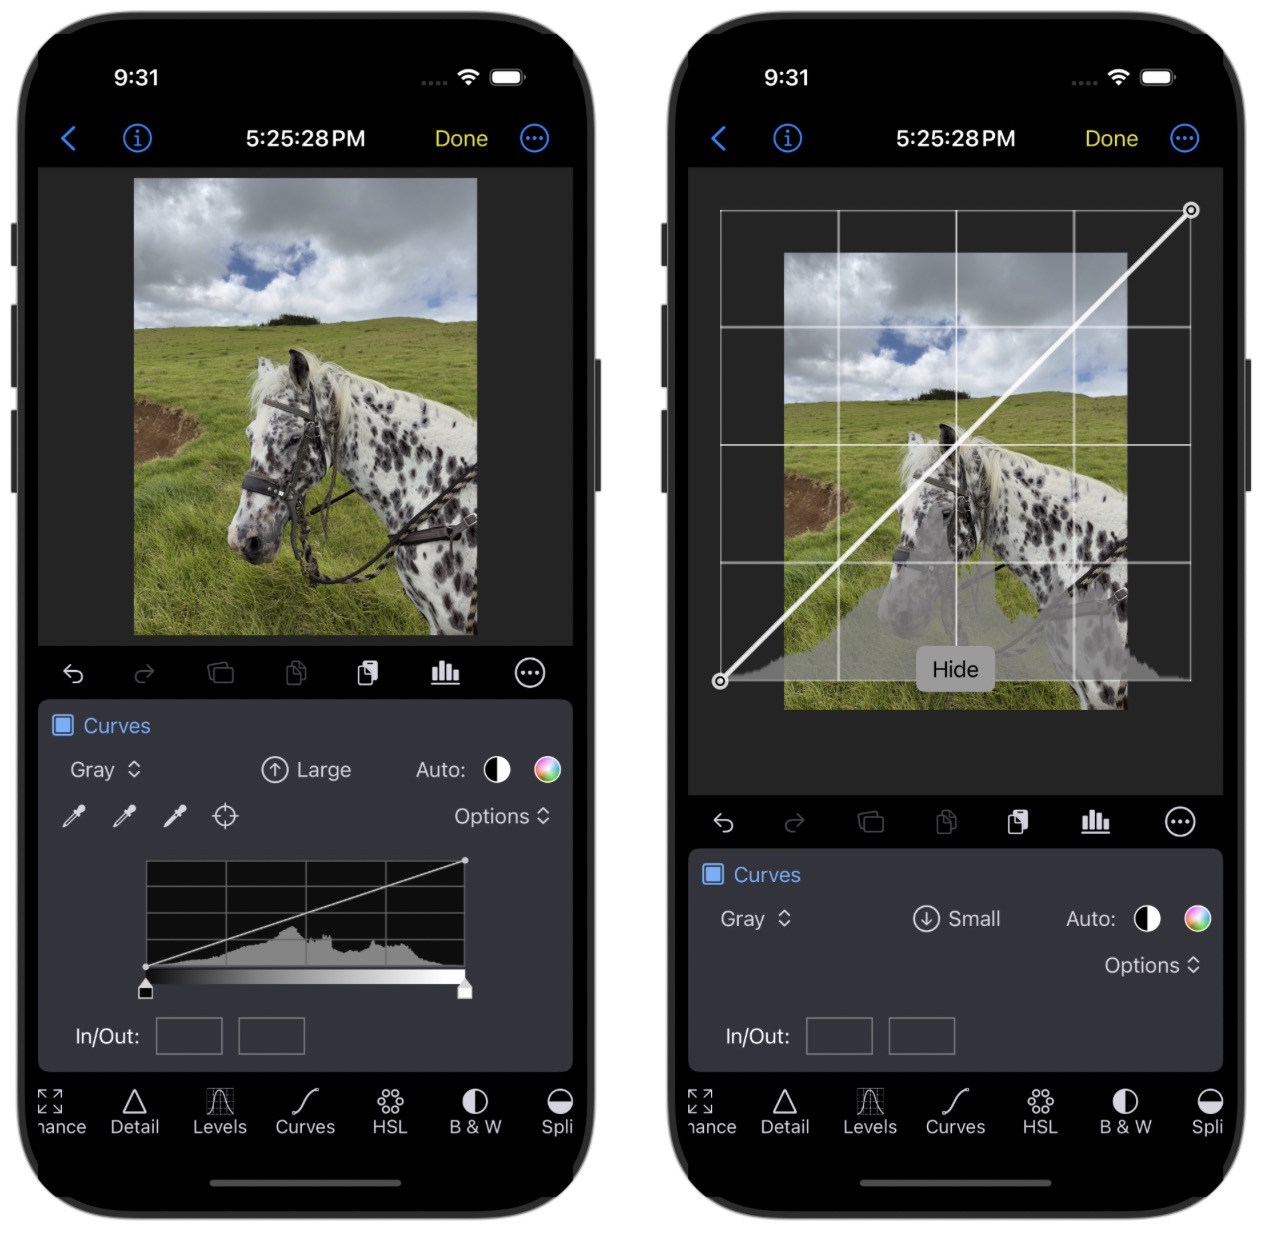
Which to use is personal preference, though one could also use the default view for simple adjustments (like black and white point) and the overlay view for detailed work.
Masking
Masking is also different on iPhones. The basic controls are the same, but there are a few additional things to keep in mind.
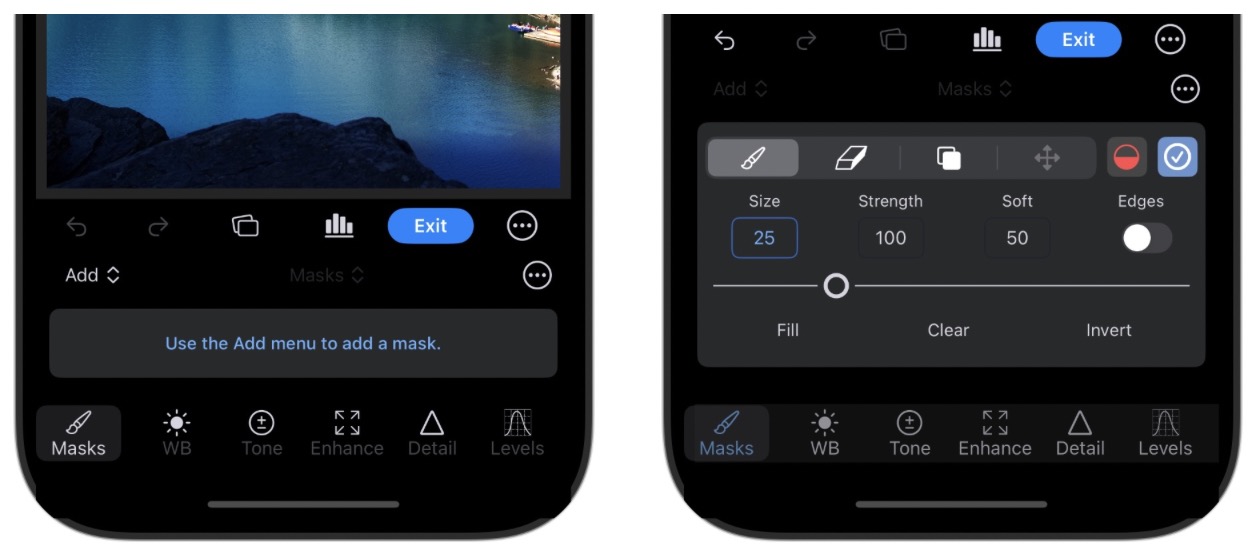
To enter masking, tap the Masks button at the bottom. You will see a display like the one shown above on the left. Tap the Add menu button to add a mask - the same types of masks are available on iPhones as on Macs and iPads. Also note the blue Exit button above that area. That is the way you exit masking. An exit button is needed because the same adjustment icons are available for masking as for regular editing, so a mode is required so it’s clear whether you are editing the entire image, or the adjustments for a particular mask. Once you create (or choose a previously-created mask), the brushing tools appear, with the same options and controls as iPads and Macs have.
Metadata and ExifTool
Nitro shows metadata in multiple ways. The primary way is via the Info button in the right side panel. This image shows the various controls available on either side of the main viewer window:
If you pick the Info button, then you will get three sections of metadata. The first is shot information, as shown here:
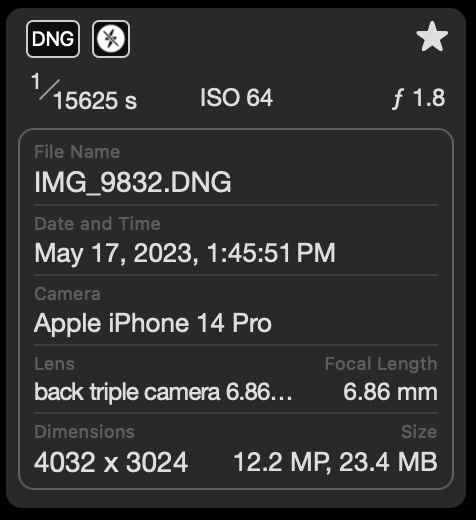
This information is also visible when in the Edit interface, though you can also collapse it to get more working space vertically.
The second section contains a map with location information, if there is GPS data in the image.
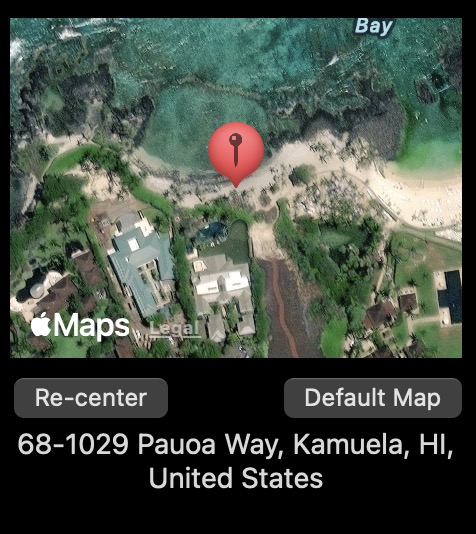
You can drag the map to move it and there are also different view options (Satellite and Road).
The last section contains miscellaneous metadata that varies from camera to camera:
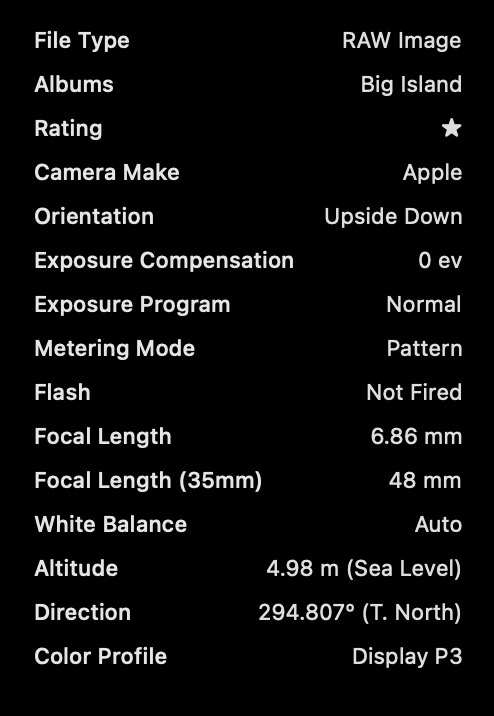
This information is not editable.
On the Mac, you can also access much more extensive metadata with Nitro's Exiftool integration. To access ExifTool, click the EXIF button in the right side panel.
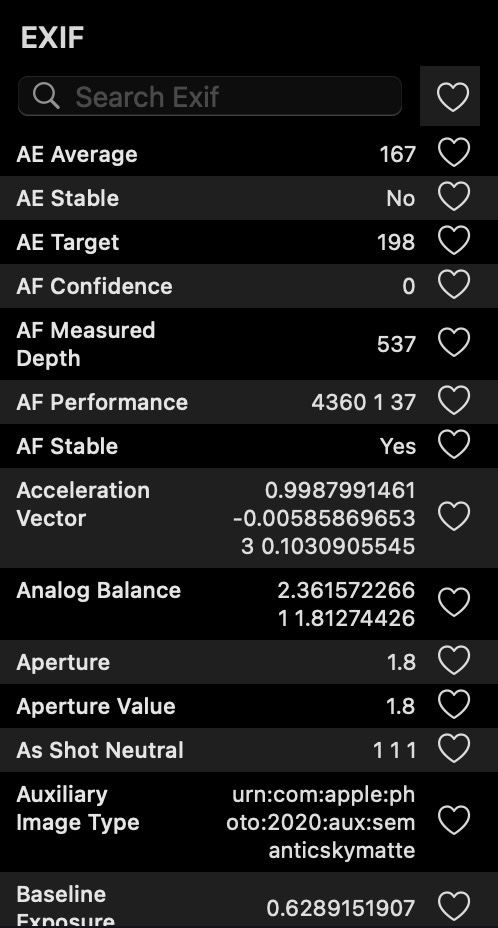
You can filter to show specific Exif keys and you can also click the "heart" icon to establish favorites. If you click the "heart" at the top (next to the search field), then Nitro will only show your favorites.
The last way that metadata is presented is via Info "tiles", also called the "Flip View". To access that mode, pick the icon below the main Info button. That will display metadata inside the viewer itself. This is an example with a single image:
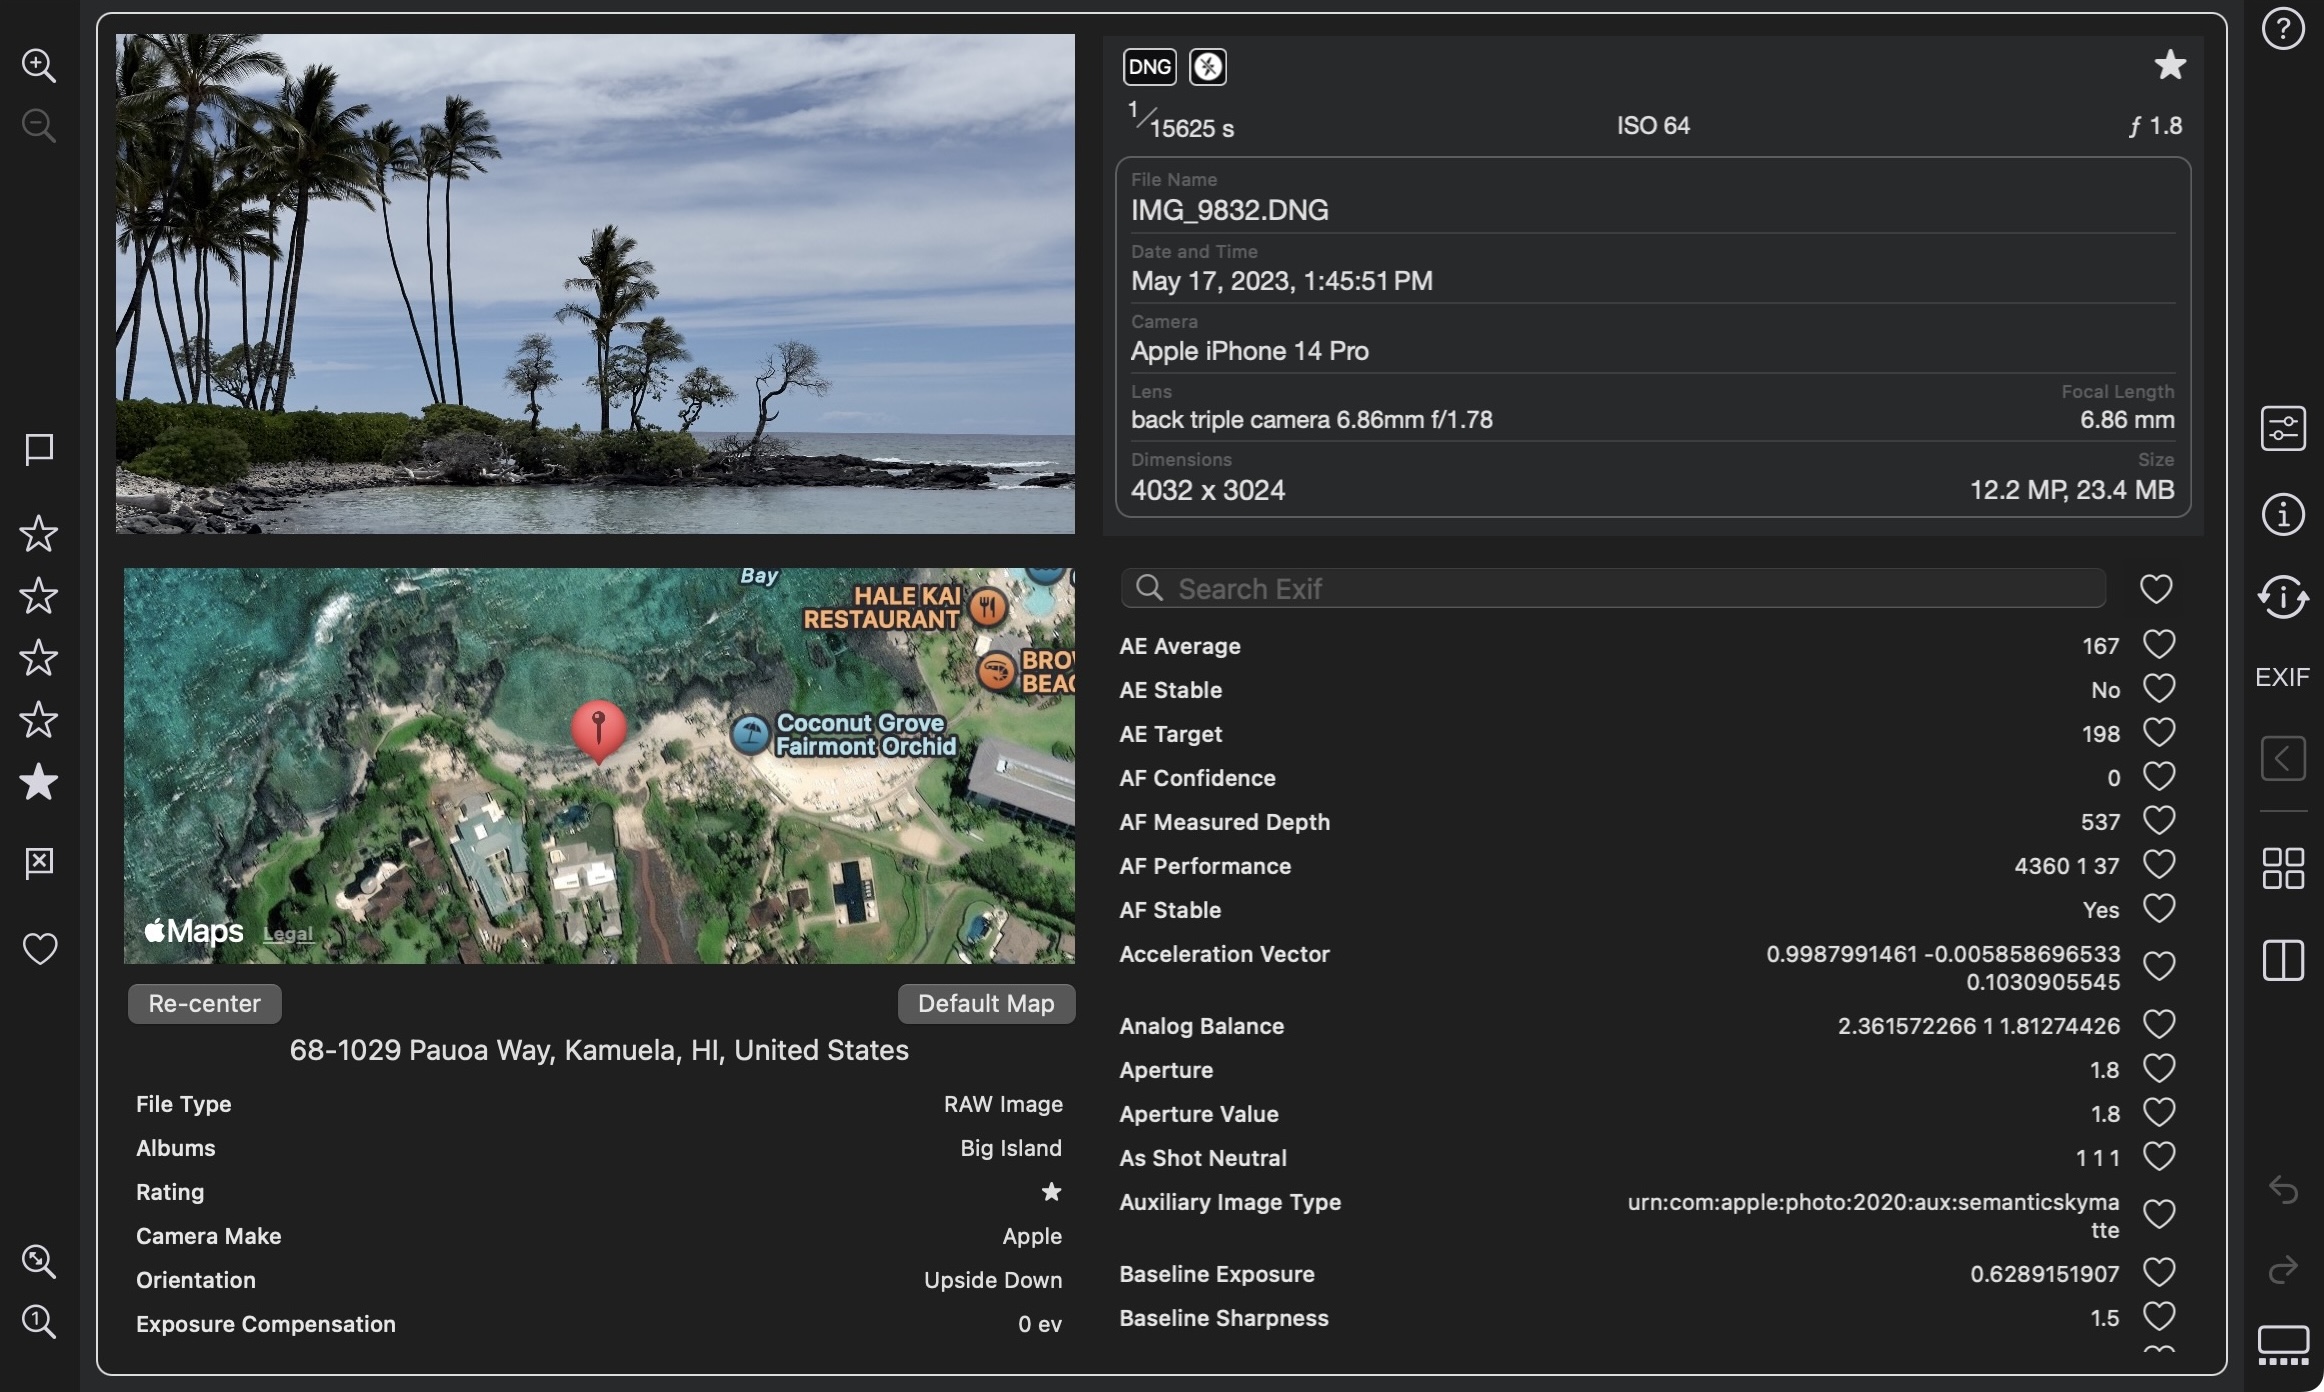
On the Mac, you have access to ExifTool directly, so you can search for metadata.
Because metadata is shown in the viewer itself, Flip View is able to show metadata for multiple images at once. To do that, enter either Compare Mode or N-Up Mode. If you then select multiple images and pick Flip View, you will see metadata side by side as shown below.
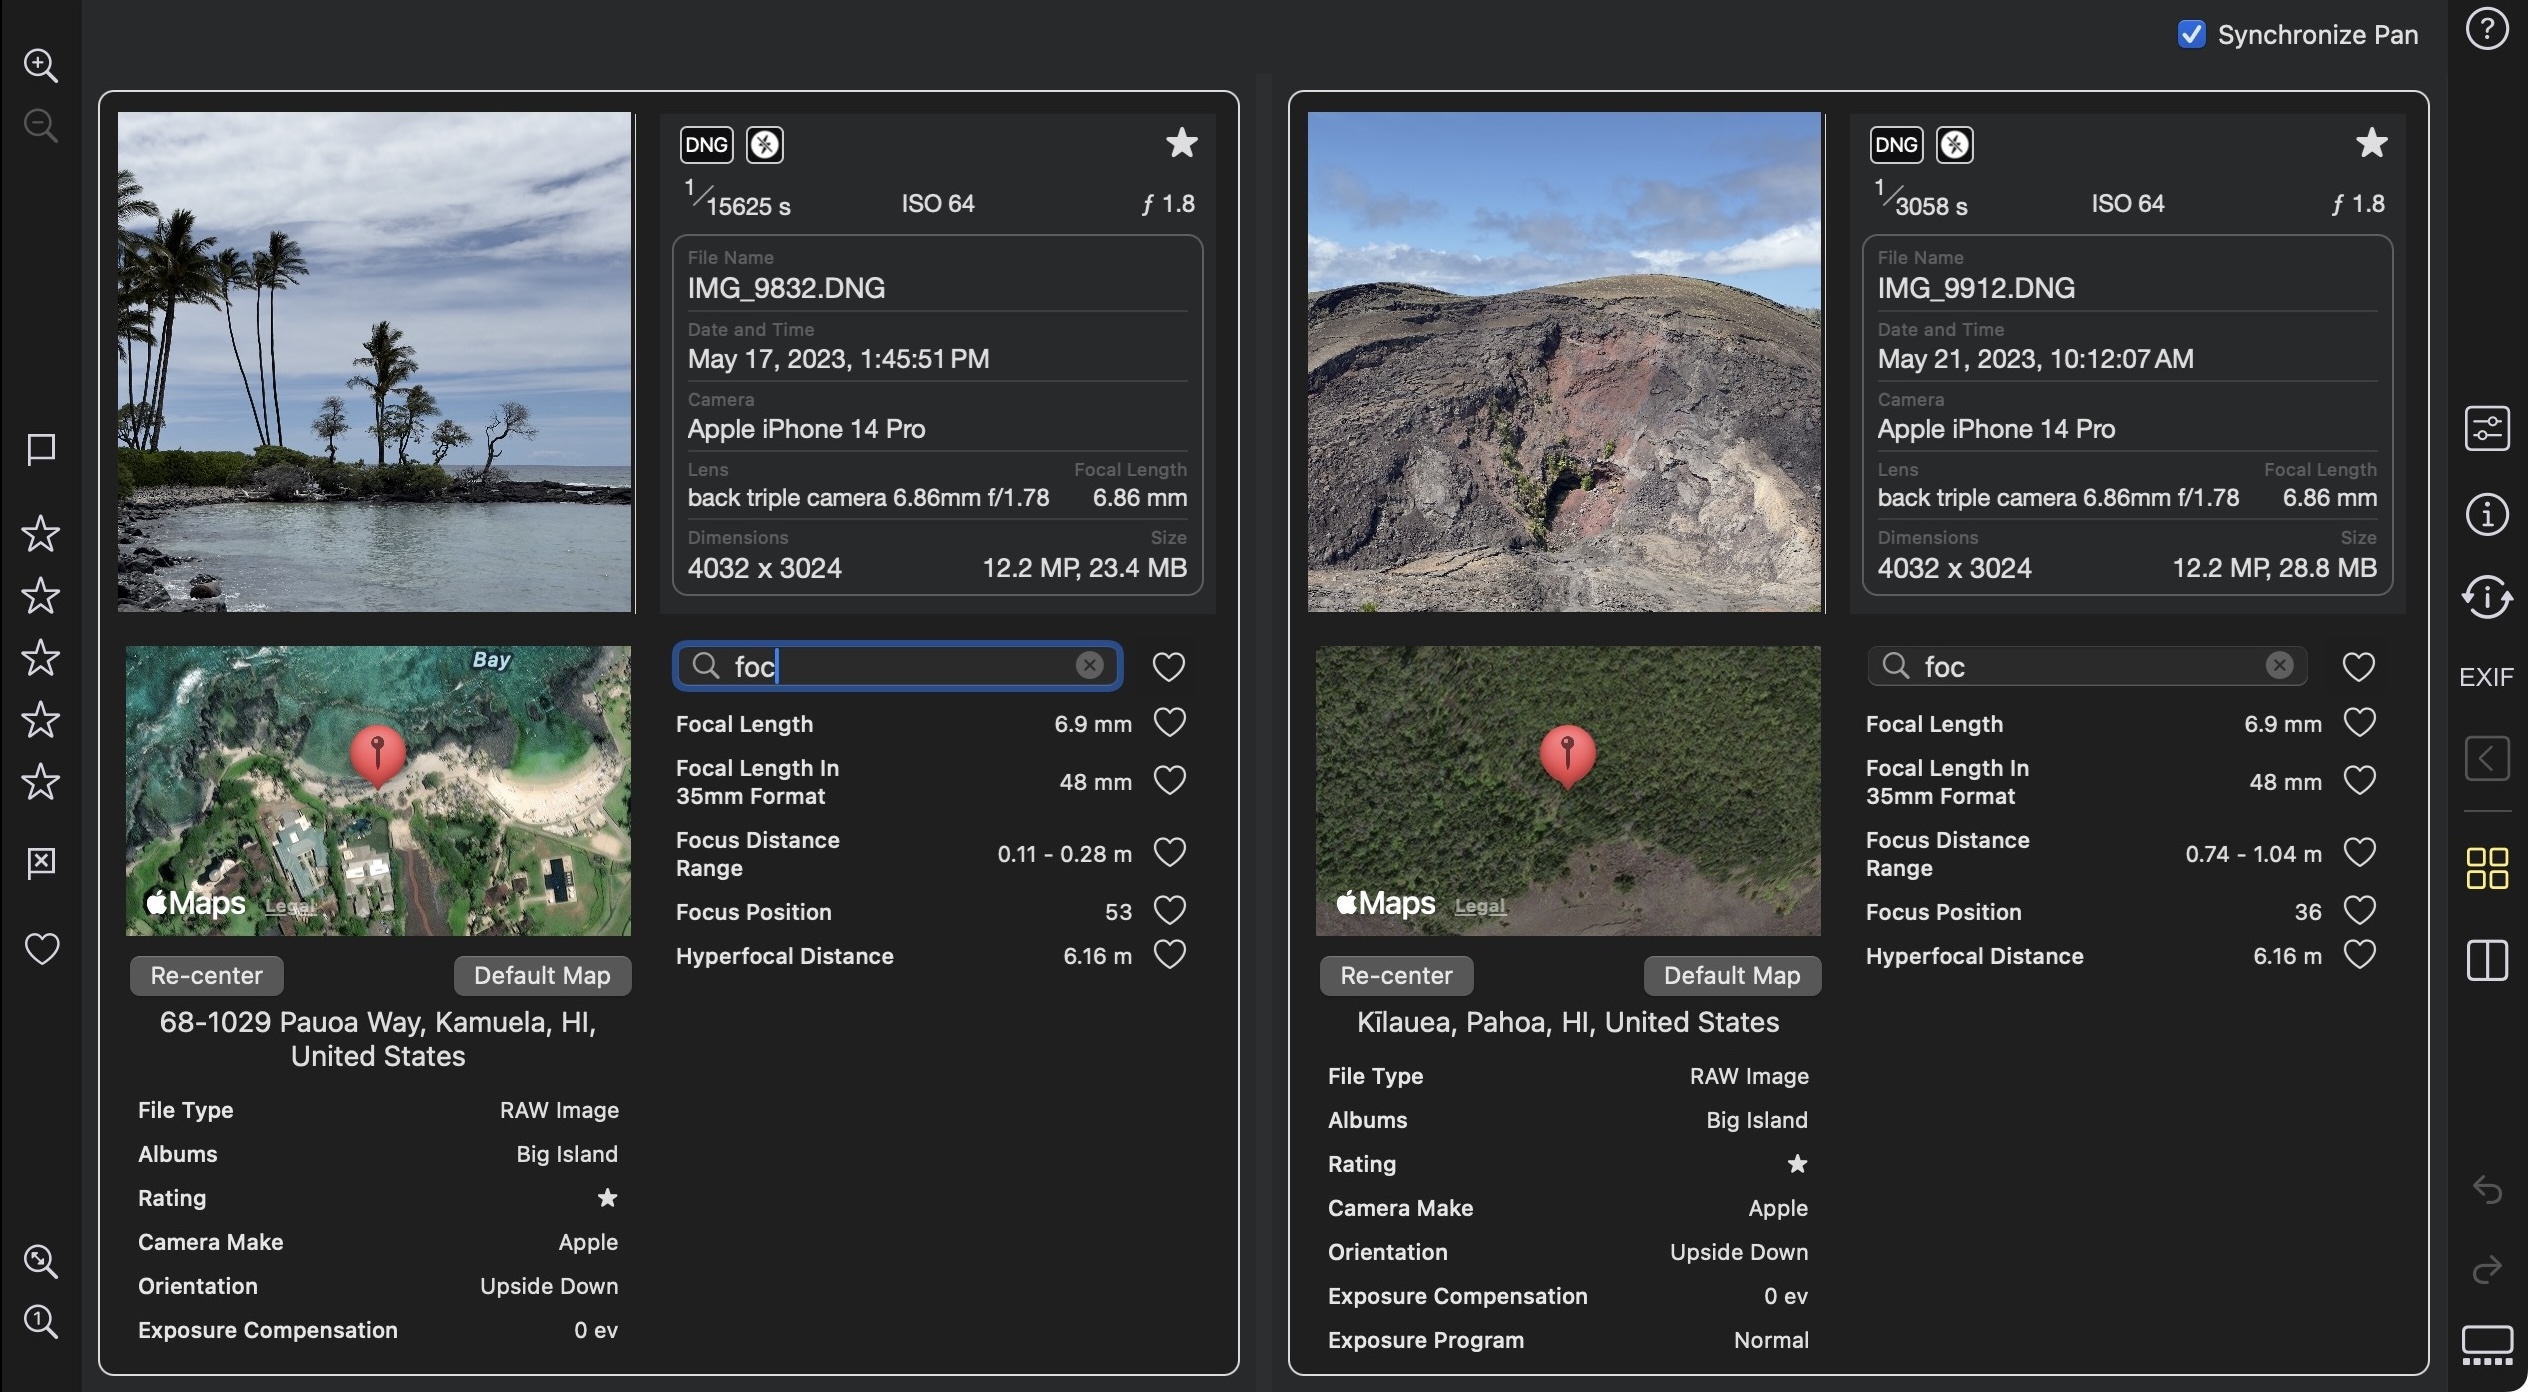
If you search in the ExifTool area, Nitro will filter all images by the same string.
On iPhone, this flip view is the primary way that metadata is displayed, due to the smaller screen. In Edit, you can access shot information by tapping the Info button at the top of the screen as shown below.
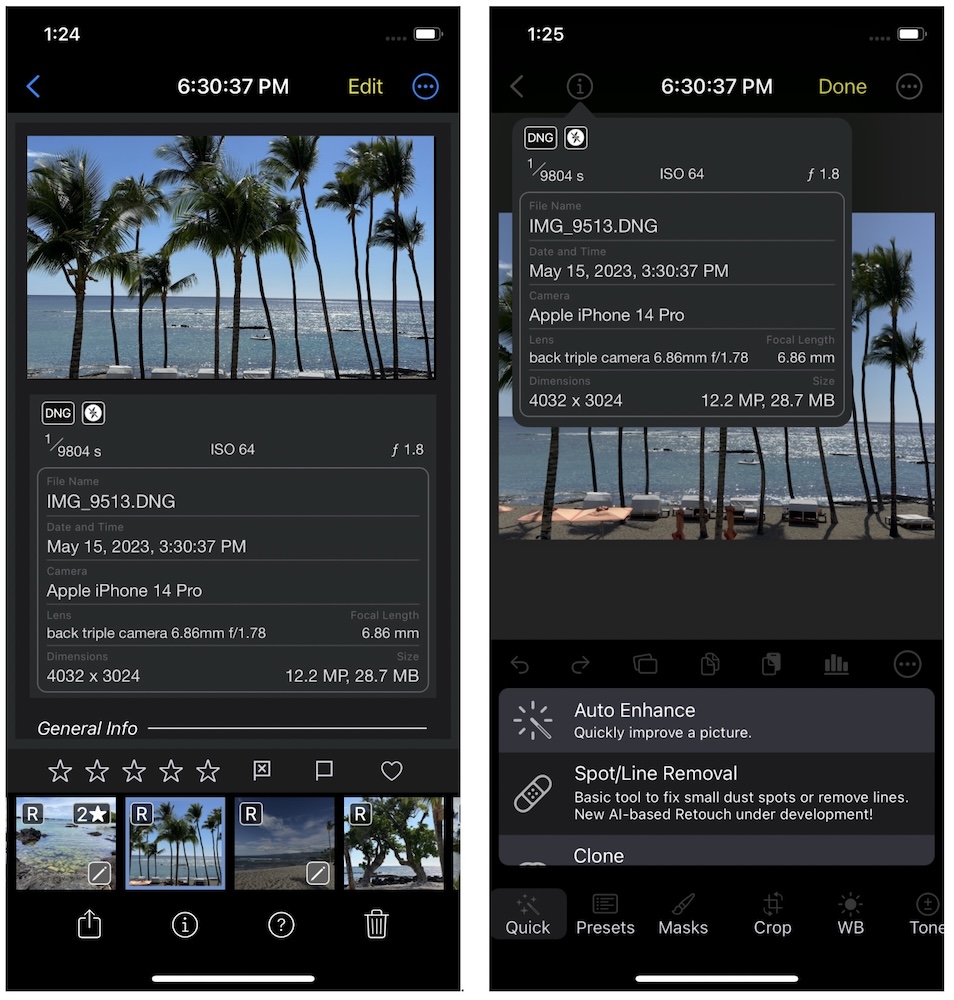
External Editing (Mac)
External Editing is a Mac-only feature that integrates Nitro with other apps on your Mac. You can select an image in the Nitro grid and then send it to an external editor app. The list of apps is built automatically by Nitro by querying macOS for apps that announce that they can edit images. Then macOS returns a set of apps satisfying that requirement and Nitro then builds the menu. When you select an app, Nitro will also ask which type of file you want to send to the other app.
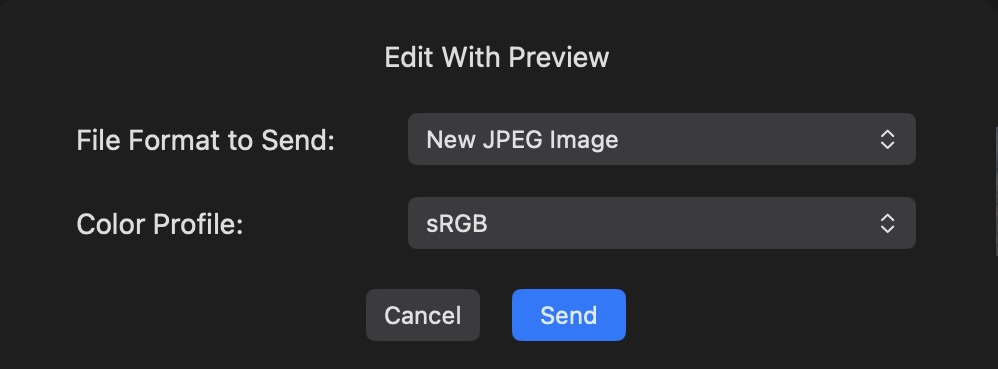
The choices for file format are as follows:
- Original Image
- JPEG
- TIFF 8 bit
- TIFF 16 bit
You also have choices for color profile:
- sRGB
- AdobeRGB
- Display P3
- ProPhoto RGB
- BT 2020
If you request the original file, then the color profile is disabled and has no effect. Otherwise, Nitro will render a new file and send it to the other app. The image will be stored next to the original (again unless you are sending the original, in which case no extra file is made).
This feature is only available when using Finder folders. That is because Photos is responsible for managing images in the library. It is unsafe to manage files outside of Photos’ control. Further, Apple does not provide a way for 3rd parties to import images into the Photo library by reference, so if the feature existed for the Photo Library, it would fail for referenced images (or it would put the externally edited image inside the library folder.
Batch Processing
You use batch processing to work with multiple files together, rather than at the same time. The most common example of batch processing is probably batch export, where multiple images are exported with a common set of export parameters.
On iPads and iPhones, you trigger batch processing by using the Select button to choose the images, and then tapping the Batch button. A collection of operations appears, which are described below:
- Export
- Paste Most Recent Edit
- Auto Enhance… (version 2025.1 and later)
- Apply Preset…
- Rotate left and right
- Revert to Original
- Flag / Reject / Remove Flag (version 2025.1 and later)
You can also press the Trash Can icon after using Select to batch-delete files. On the Mac, you can select images and use the trash can or Cmd-Delete.
In addition there are three other advanced operations:
- Build Thumbnails: this makes a new thumbnail from the image(s). This is useful when the thumbnail in your image is poor quality or has incorrect orientation.
- Reindex Images: this is useful when the database is out of date for some reason but it’s best to only use that in conjunction with a conversation with support@gentlemencoders.com
- Reconnect XMP Sidecars: If you pick it, the app will look for all the sidecars and rename them to have a lower-case extension. This is a rarely used feature, but if you find that the app is unexpectedly not processing your sidecars, check the file extension and use this feature to fix them. There is more information in the section on XMP.
On the Mac, these operations are available either through the main menu (usually in the Image menu) or via the contextual menu when you right-click on an image.
Restrictions in Edit
Nitro reduces the set of batch operations while you are in Edit. In general, you cannot perform most of these actions using the Batch menu (or the Image menu on Mac) on the image currently being edited. That restriction may be removed in the future, but for now, simply use the analogous button in the Edit interface. For example, rather than use Apply Preset from the menus, go to the Preset interface in Edit. Export and Flagging are exceptions - those work on images in Edit as they do not affect the editing data itself.
Note: If you want to apply a batch operation to both the currently edited image and other images not being edited, then exit Edit and then apply the action. That way, the edits are saved, and the operation can run. The simplest way is to click on the edit button on the right side panel which closes the edit panel and saves the edits.
Export
Export is the primary way to get images out of Nitro. The options for export vary depending on the platform you are using and where you are using the Photo Library or not.
Export Operations
On iOS, there are the following export options.
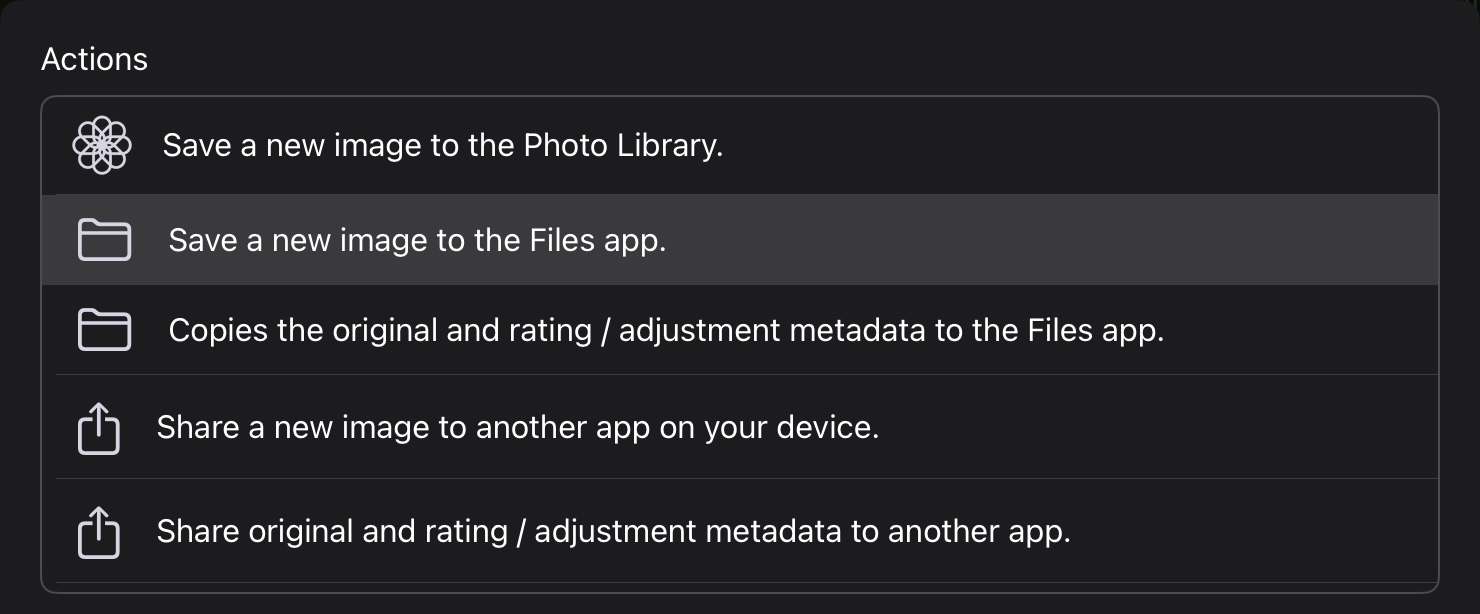
The following table describes when those options are available. Yes means it is always available. No means it is never available. Otherwise, the notation indicates whether it’s available when using the Photo Library or File System (Finder / Files.app).
| Action | iOS | Mac |
|---|---|---|
| Save a new image to the File System | Yes | Yes |
| Save a new image to the Photo Library | Yes | Yes |
| Copy original and rating / adjustment metadata to Photo Library | Files.app | Finder |
| Copy original and rating / adjustment metadata to File System | Photo Library | Photo Library |
| Share a new image to another app | Yes | No |
| Share original and rating / adjustment metadata to another app | Yes | No |
| Share original (only) to another app | Yes | No |
| Update image in Photo Library* | iOS 16 | macOS 13 |
The last item requires extra discussion. In iOS 16 / macOS 13 and earlier, any time a 3rd party app edited an image in the Photo Library, Photos would display a confirmation dialog. This dialog could not be suppressed. It made it very difficult to edit a series of images because the dialog would appear for each image. This was finally removed in iOS 17 and macOS 14 (Sonoma). To make the dialog less of an obstacle to smooth editing, Nitro has two modes of operation, and the default varies depending on OS version.
- On iOS 17 / macOS 14 and later: Nitro will commit edits to the library when saving them.
- On iOS 16 / macOS 13: Nitro will save edits locally rather than committing them to the Photo Library. You would then use Export to commit the edits to the library. The app will remind you to do that periodically. There are preferences to control this behavior, which are discussed in more detail in that section of this manual.
Export Settings
In addition to the operation, you can choose how the image is generated.

- Name: lets you set a custom name (see Batch Export for details on setting names for multiple files)
- Format: Choices include JPEG, TIFF (8 and 16 bit), HEIF (8 and 10 bit), and PNG (8 and 16 bit).
- Compression: compression quality, including lossless for TIFF and PNG.
- DPI / PPI: sets a metadata tag for the dots / pixels per inch. This has no effect on the image rendered, but can be helpful for printers and similar devices.
- Color Profile: choices include sRGB, AdobeRGB, Display P3, ProPhoto RGB and BT.2020. To avoid banding when using a wide-gamut format like AdobeRGB, Display P3, ProPhoto RGB and BT 2020, I recommend selecting either 10 or 16 bits for the format.
- Output Size: you can export to full size, a set of specific sizes (like 1024 pixels), or custom sizes. Note: Nitro does not upscale images at this time.
- Fit to Longer Edge will take a single number and size the image so that the longer edge is the desired size (while ensuring the image retains its same aspect ratio)
- Fit to Shorter Edge will take a single number and size the image so that the shorter edge is the desired size (while ensuring the image retains its same aspect ratio).
- Fit to Width and Height sizes the image to fit within a rectangle defined by the custom size values.
- Metadata: choices for including different metadata in the file.
- Watermark: you can apply a watermark to exported image. That is described more in the Watermark section below.
- Border: you can apply a border to exported image. That is described more in the Borders section below.
- Copyright: you can enter a copyright to store in the IPTC copyright field.
- On the Mac, there are also After Export Actions, which are described below.
In addition, ratings and keywords are stored into the exported file automatically (unless you choose not to export IPTC metadata).
Note: export on iPhone looks and works a little different. See the section Editing on iPhones for more information.
Batch Export
If you want to export or share multiple files at once, use Batch Export. On iOS, start by tapping the Select button and choosing the images. Then tap the Batch button. On macOS, select images as you would normally and then use File > Export…
The basic export interface is similar for batch export, except for file naming:
When exporting multiple files, you can specify custom names as follows. For all examples below, the original file name is “IMG_8625”.
- Original Name: outputs “IMG_8625” with the desired file extension for the output format.
- Original Name + Date: uses a YYYY-MM-DD format, as in “IMG_8625-2025-01-24”
- Original Name + Suffix: you specify a number or a number with a character, as in “-1”, so you might see “IMG_8625-1”
- Custom Name + Sequence: You specify the name and a starting number. There is an optional padding field as well. So, if you entered a custom name of Vacation and a starting number of 100 and a padding of zero, you would see “Vacation-100.JPG”.
- Custom Name + Date + Sequence: includes the date, resulting in “Vacation-2025-01-24-100”
Export Actions
After Export Actions are a Mac-specific feature that lets you open another app after export completes. This works for a single image export or a batch export. The list of apps displayed are all apps that announce to macOS that they can view a JPEG (some apps can view images, but not edit them, so this list is longer than the list of editors).
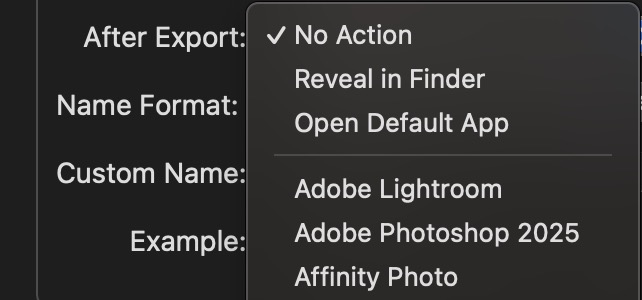
In addition to viewer apps, Nitro includes Reveal in Finder and the “Default App” which is whatever app you have chosen to open image files with the file format you are exporting.
Watermarking
Watermarking is the process of applying a partially transparent image or block of text to an image. This is usually done to protect the rights to an image or intellectual property. Nitro has a powerful watermarking feature that you set up in the Export interface (on the Mac, there is also a menu item: Nitro > Watermark Setup…
Below is the watermark interface for text:
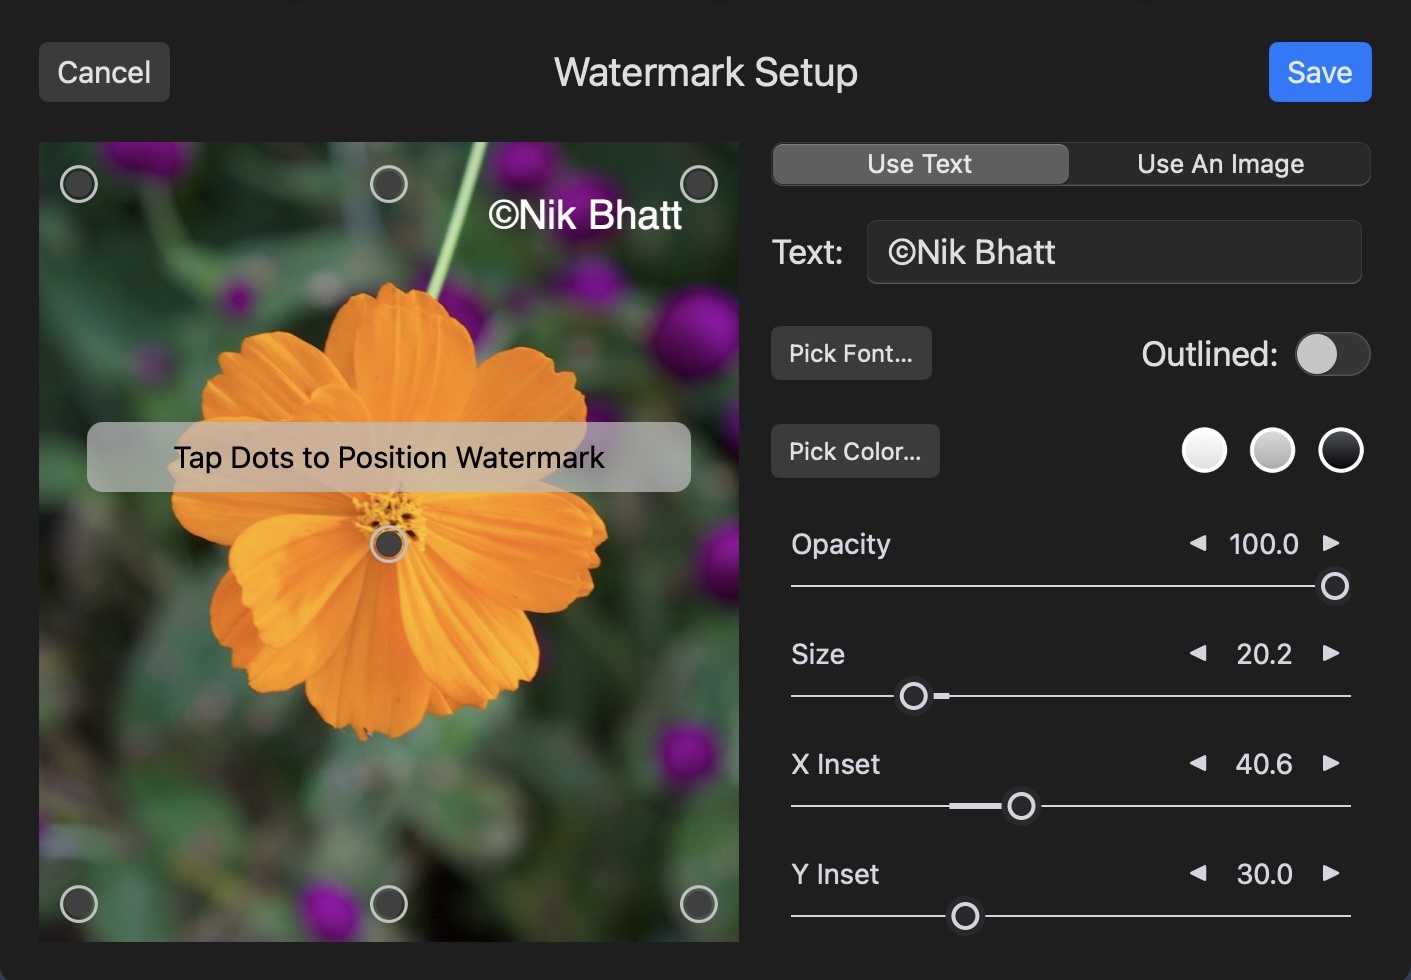
For any watermark, you can position it in any of six locations by clicking or tapping on the appropriate dot (left side of the dialog).
You can also specify opacity, the size of the watermark, and the inset from the dot. The X inset moves the watermark left or right and the Y inset moves it up and down.
For a text watermark, you type in custom text, with a choice of font and color. Some default colors are also offered. In addition you can use an outlined-treatment for the text which makes look a bit more subtle on the image.
For image watermarks, tap the “Use an Image” control, which displays this interface:

You can choose images from the photo library or the file system (Finder / Files.app). The same controls for opacity, size, and position are offered.
Nitro currently only supports a single watermark, though there are plans to allow multiple watermarks and choose them at export time.
Borders
Nitro allows you to add a border to an image during export. The border rests on top of the image, so if the border is too wide, it can cover portions of your image. You set up borders in the Export dialog. Press the Setup button next to the Border popup to get started. You can create multiple borders and choose between them in the Export dialog.
Below is the interface to set up and manage borders:
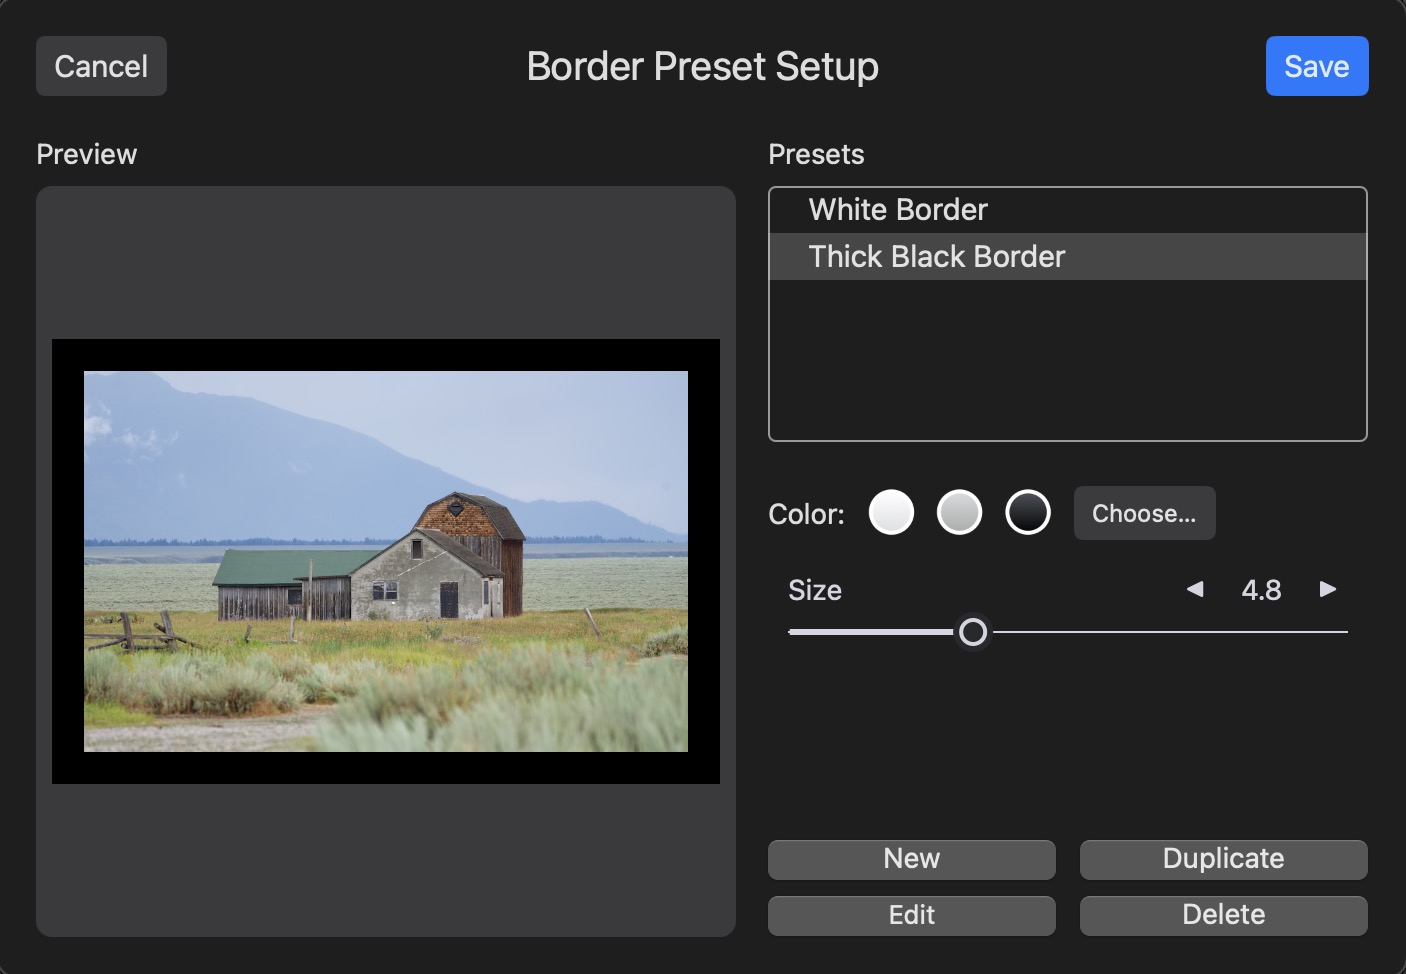
In the example above, you can see two borders have been created, with different colors and thicknesses. Start by pressing the New button to add a border and configure it using controls. There are also buttons to edit, duplicate, or delete borders. You can use standard swipe gestures to delete a border from the list. For a custom color, press the “Choose” button in the row labeled “Color”.
Press the Save button to save the borders. Then in export, select the border you want to use (or No Border if you do not want a border applied).
Display Modes
Nitro has three display modes for the Viewer. A single image (sometimes called One-Up), multiple images (N-Up Mode), and a dedicated comparison mode (Compare Mode). Both Compare Mode and N-Up Mode are entered by clicking or tapping an icon on the right side panel.
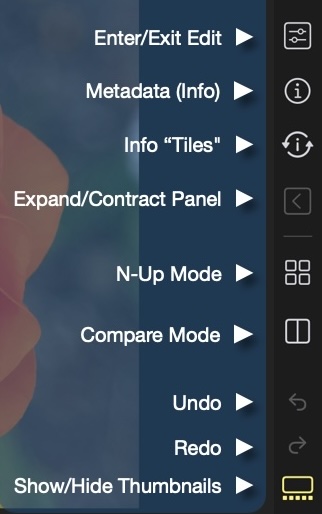
One-Up is entered initially when exiting the grid, and also by exiting Compare Mode or N-Up (in other words, it’s the default display mode). Neither N-Up nor Compare Mode are available on iPhones due to the limited screen space. One-Up is described earlier in this manual, so this section will focus on the other two modes.
N-Up and Compare Mode are quite similar, but there are a few key differences, which will be noted.
N-Up
N-Up allows you to see images larger than in the grid, and to edit multiple images as well. When in N-up, the file name is displayed at the bottom of the image. There is one image that receives an outlined border; that is the primary selection and is the one that receives editing, rating and other commands. To change the primary selection, click or tap on one of the other images. To add or remove items from the displayed images:
- macOS: use the command or shift key while selecting images
- iOS: tap on a selected image to deselect, and tap on a deselected image to add it.

A key control is visible above the images: Synchronize Pan (and Zoom). When checked, zooming one image will zoom all of them. Panning one image will pan all of them. However, when it is unchecked, only one image will be affected. If you use the keyboard shortcuts or buttons to zoom, then the primary selection is affected. Otherwise, if you are using a trackpad or pinch gestures, then the affected image is the one you are interacting with.
In addition, the Info Flip (or Metadata Tiles) view changes behavior in N-Up and Compare mode. All images will flip to reveal metadata, as shown below.
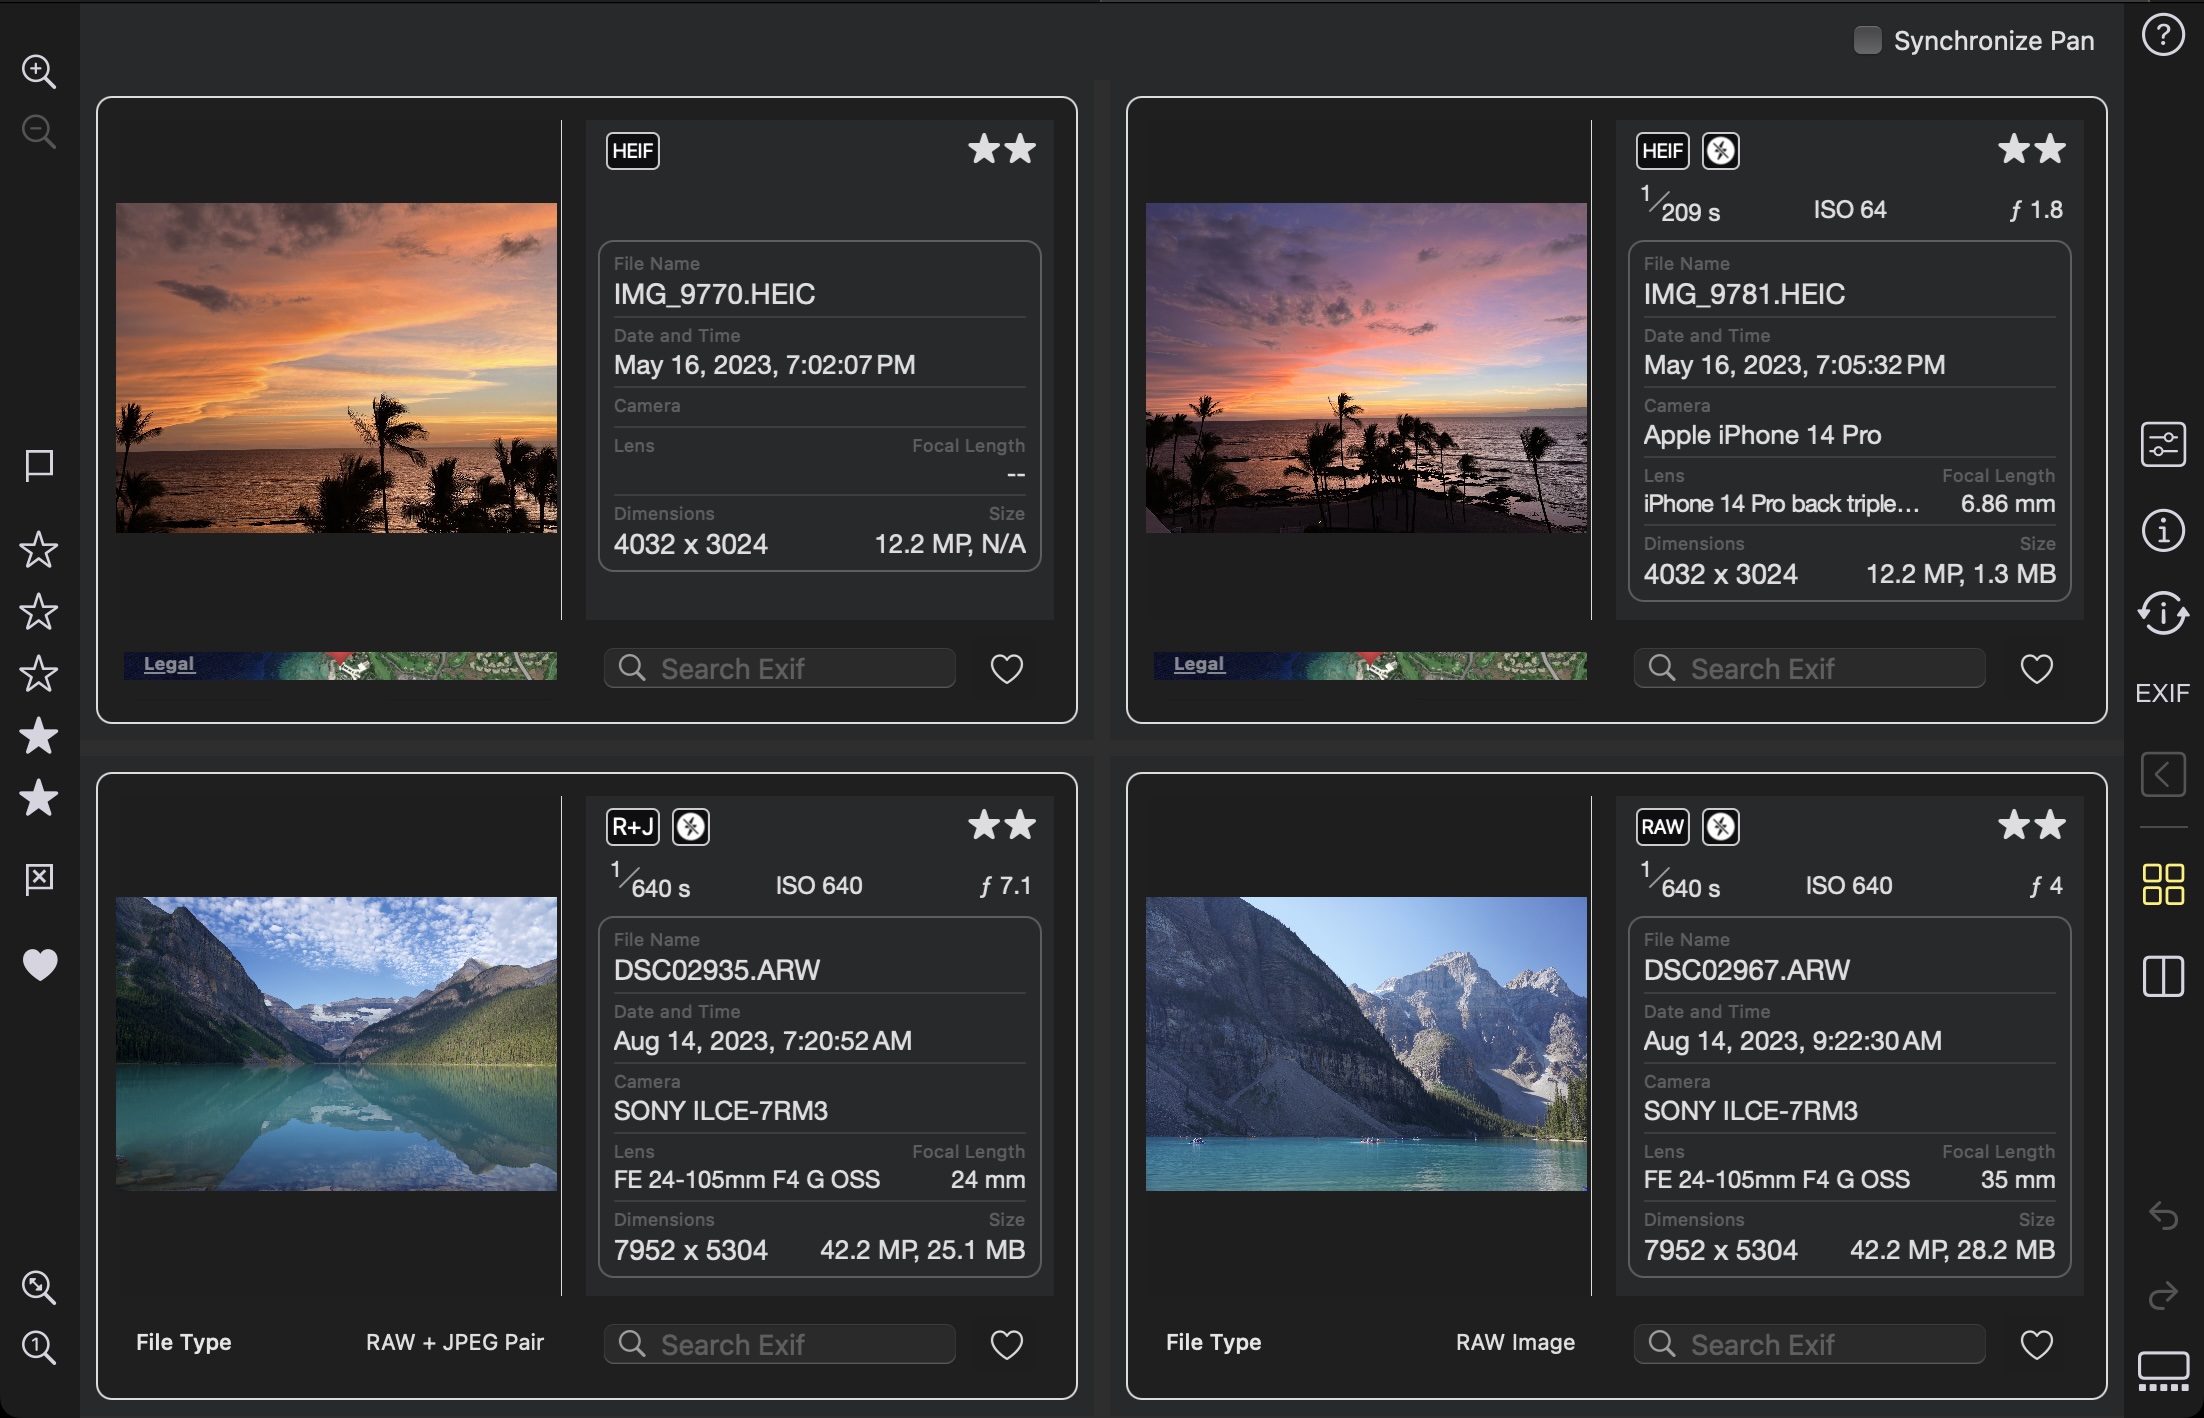
On macOS, when searching for EXIF metadata, all of the tiles will update simultaneously as shown below:
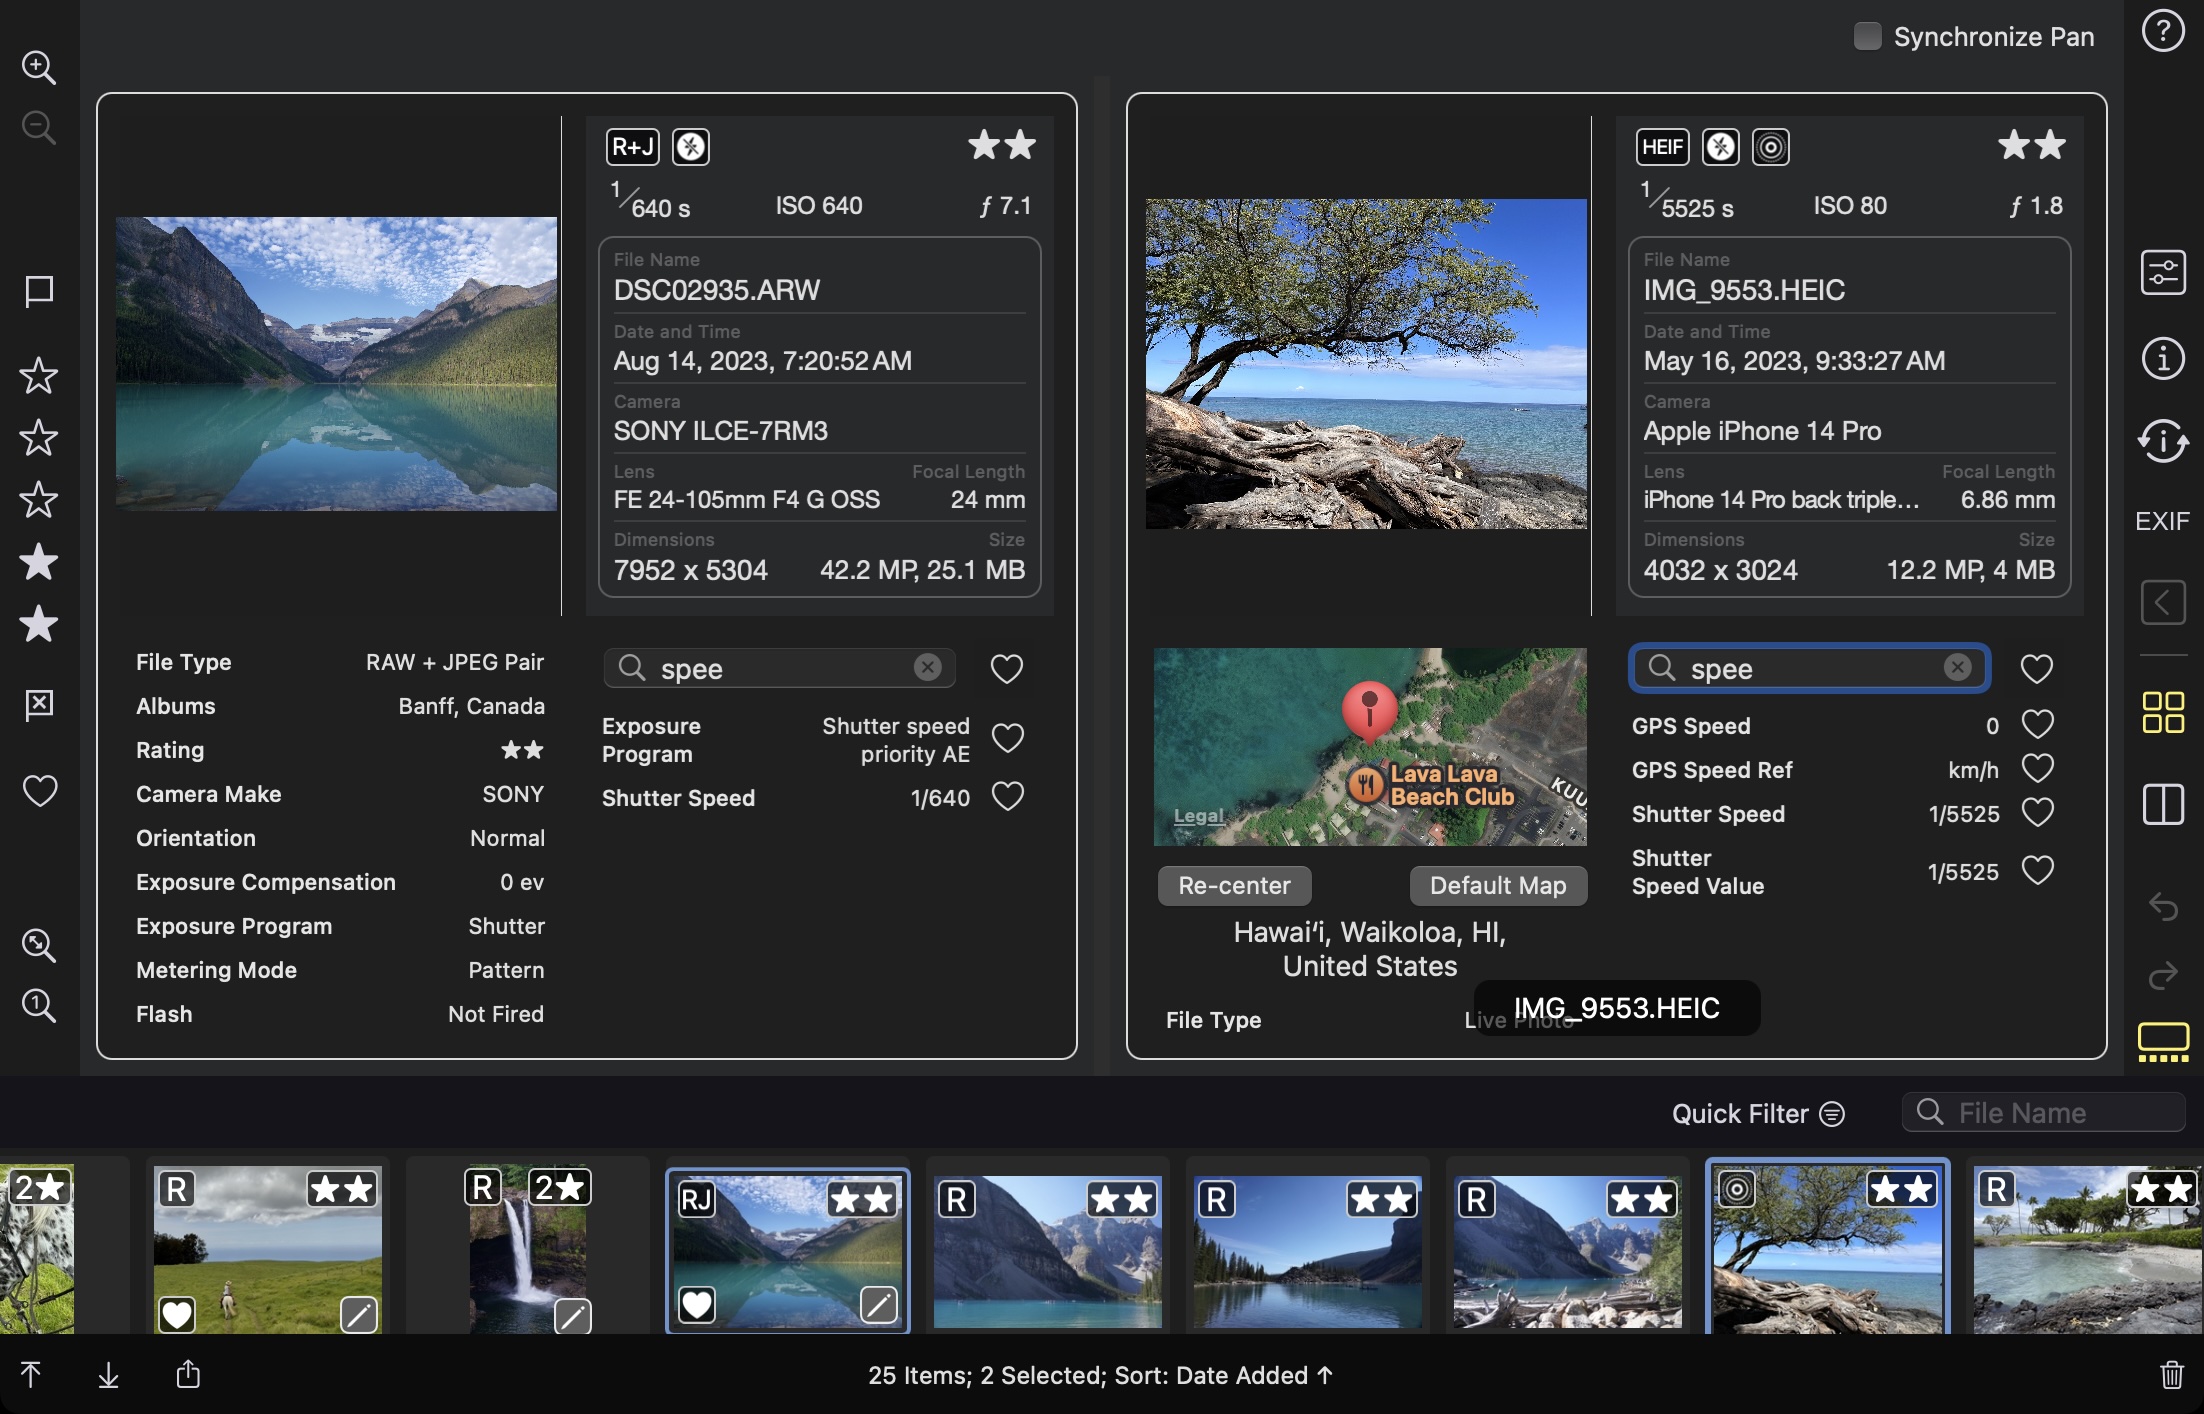
N-Up is limited to four images on iPads and sixteen images on Macs. You exit N-Up Mode by clicking or tapping on the N-Up Mode icon.
Compare
Compare Mode is very similar to N-Up, in terms of zoom, panning and metadata. However, there is a key difference in terms of selection and purpose. The purpose of Compare Mode is to make it easier to compare similar images and to then select the best of them. It works by “pinning” one image on the left of the display and then letting you cycle through other images with the arrow key or by tapping / clicking. Only two images are ever displayed in Compare Mode. The left image does not change as you add or remove items from the selection. Further, it is not the “primary selection” - instead the image on the right is the primary selection. There are two buttons on the top of the display area.
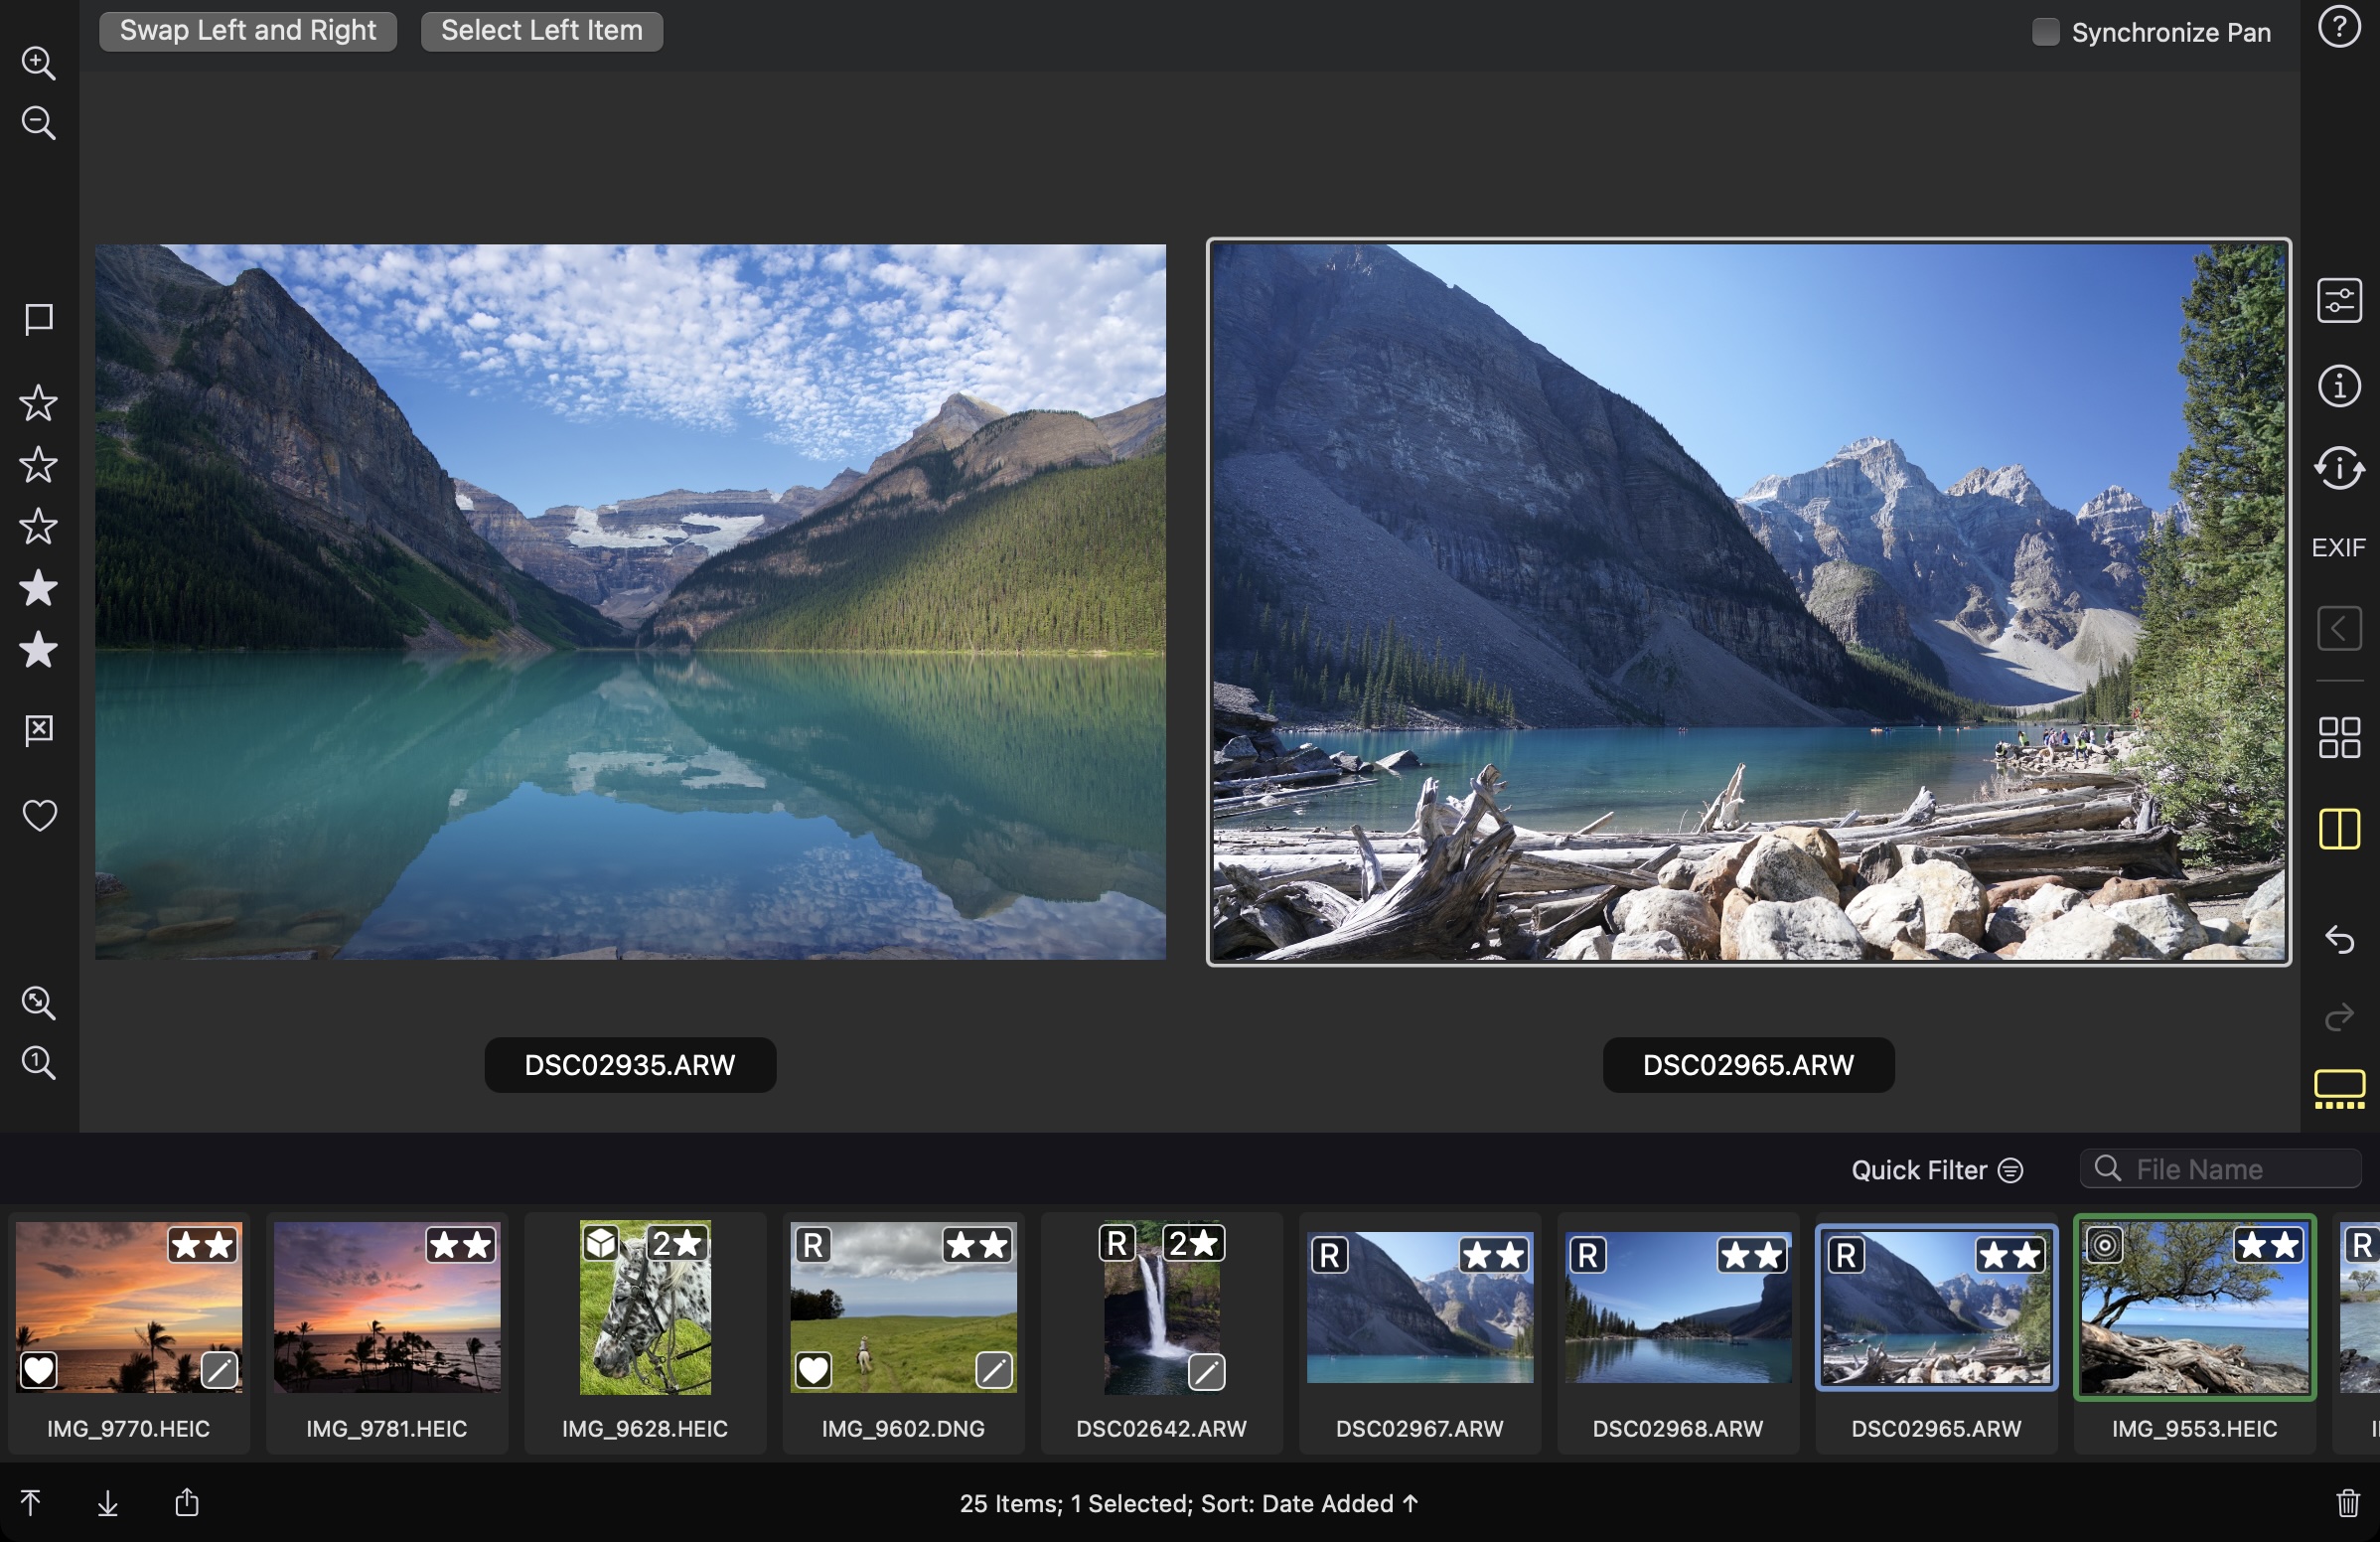
The first button swaps the two images, making the right image the “pick.” The second image selects the pick and exits Compare Mode. You can also exit Compare Mode by clicking or tapping on the Compare Mode icon.
Single File Editor
Nitro normally operates by showing the contents of folders on your device, or browsing the Photo Library. However, on Macs, there is a third option, called the Single File Editor (SFE). This is a way to edit a single file on your computer using Nitro. There are four ways to access the SFE:
- File > Open (or Open Recent)
- Drag a file to the app icon
- Use the Finder’s Open With command
- Use an app that can send files to Nitro
You can have as many SFE windows / tabs as you want, but each one can only edit that one file.
Depending on where the file is located, you may see a privileges alert that looks like this:
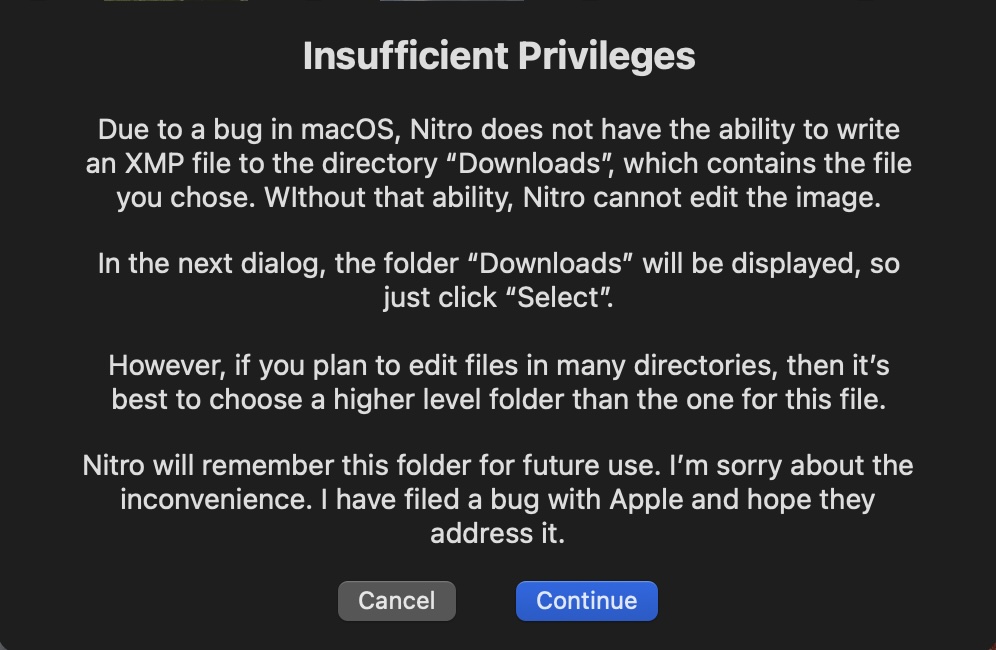
There is a bug in macOS where sometimes Nitro cannot store editing information into the XMP file. Nitro will display this alert and then show an Open panel that you can use to resolve the issue. If you want to use the SFE for a large number of directories, you can pick a higher level (parent) folder or give Nitro full disk access in System Settings.
After the file is opened, the interface mostly resembles the regular Nitro edit environment with some key differences. First, the toolbar is different:

The tools are editing-focused, along with Save and Export buttons. The editing environment is the same, except that a) the sidebar is not visible and b) the right side panel removes functions that are not applicable (such as viewing thumbnails or Compare Moe). However, Copy Edits and Paste Edits are still available, which makes it easy to copy edits between SFE windows.
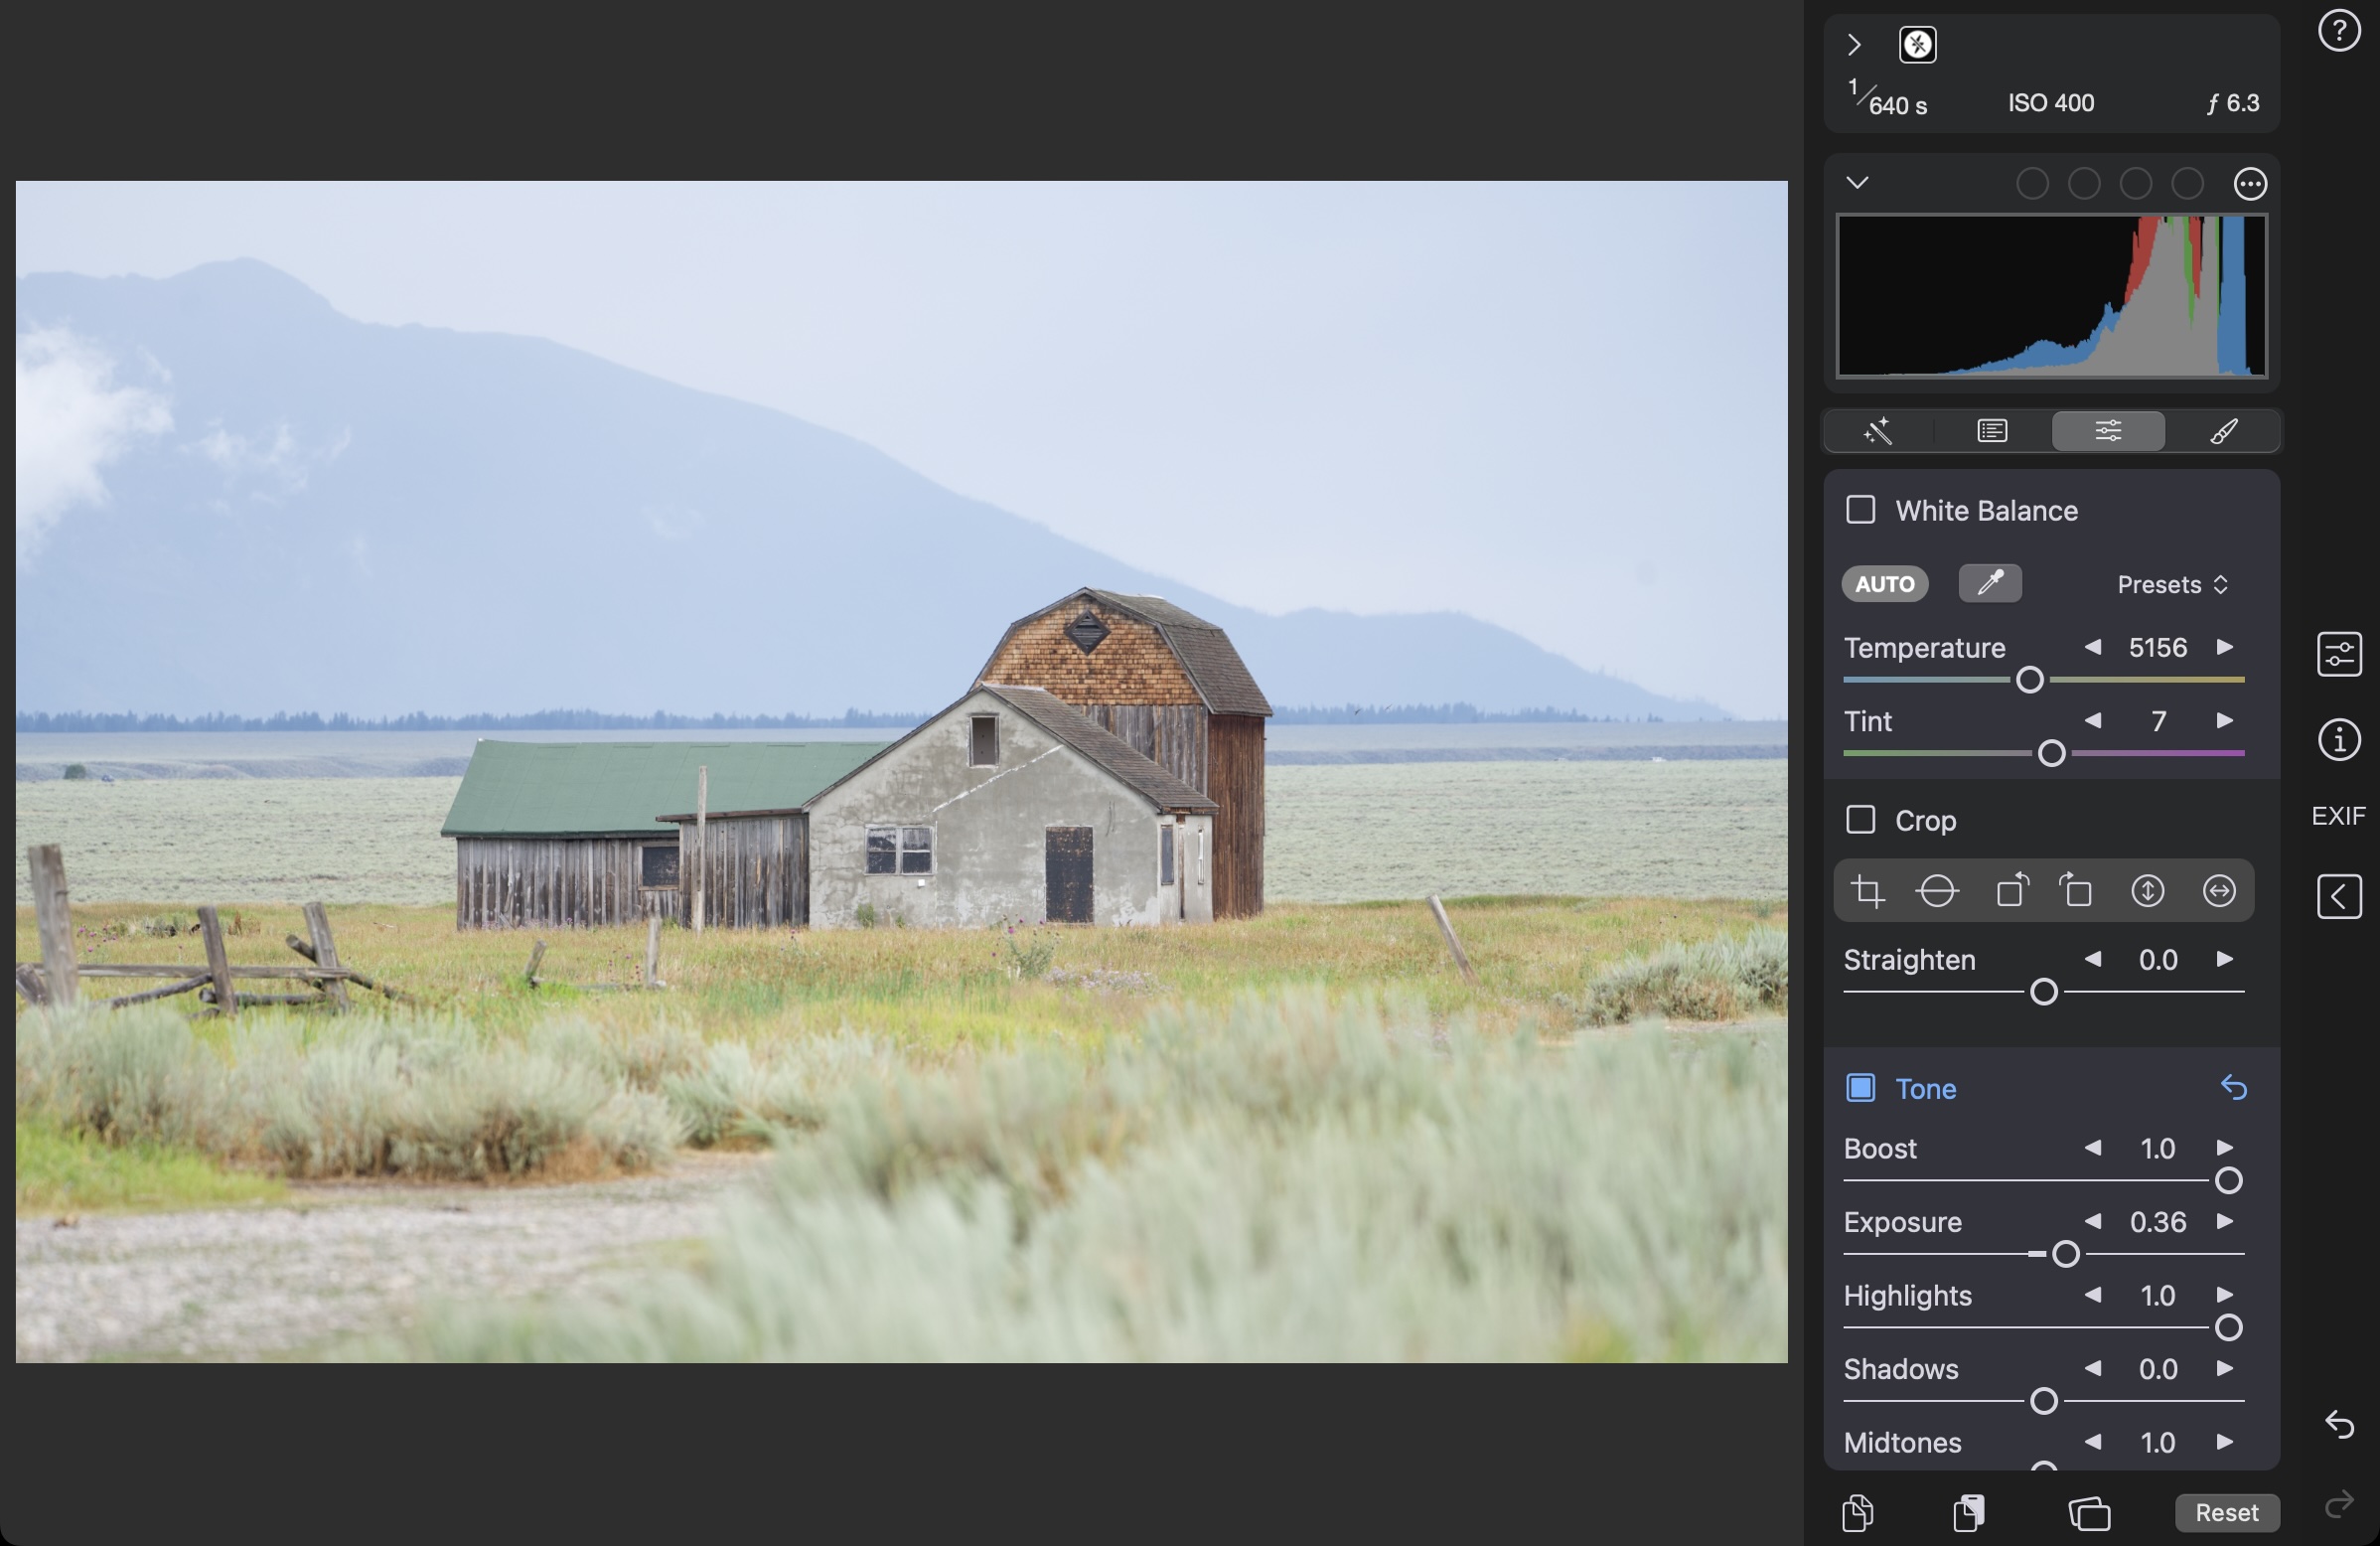
While there is a Save button, explicitly saving is not necessary. Closing the SFE window or tab is sufficient to save your edits.
Enhanced RAW Support
Nitro relies on Apple’s RAW camera support to decode RAW images for display and editing. Apple’s decoder has been part of iOS, iPadOS, and macOS for years, and produces very good images. Apple also includes support for hundreds of cameras and formats. However, despite these strengths, Apple has been slow to add support for cameras, and recently support has reached glacial rates. This leaves many photographers unable to view or edit images from newer cameras in Apple’s Preview or Photos apps, and other apps that use Apple’s RAW support are similarly hampered.
To alleviate this increasingly severe problem, both RAW Power and Nitro include Enhanced RAW Support, which adds support for a large number of cameras and formats that Apple has not chosen to support. Nitro and RAW Power add this support in a unique way that extends Apple’s decoding capabilities. All of the same RAW editing controls are available for Enhanced RAW - so you are getting the quality decode and editing features. New cameras are added all the time. A few highlights of this support:
- Fujifilm Compressed Format
- Nikon HE and HE* formats
- GoPro RAW files
- High resolution modes for Olympus and other camera companies
One missing aspect to this support, however, is lens correction. Images that are processed through Enhanced RAW Support do not receive automatic lens correction through Apple’s decoder. Instead, you will need to use the manual Lens Correction Adjustment, which is described here. The best part about Enhanced RAW Support is that it is transparent to you. Images simply work.
RAW images that are not supported by Apple will appear blank in Photos. However, once you edit them in Nitro, then Nitro will create a full-size JPEG (or HEIF) and store that in the Photo Library. After that, you can view the image in Photos. However, if you revert to original (either in Nitro or Photos), the image will be blank again in Photos.
When using the Nitro Photo Extension, you can still benefit from Enhanced RAW Support, though the image will look blank in Photos. However, when you open it in the Photo Extension, the image will be decoded and will be editable. Like the Nitro standalone app, when saving the edits, the edited image will be visible in Photos.
The camera support list is maintained on the website, and it varies across operating system versions. The latest version can be found here.
Another solution to the lack of camera support is to convert images to DNG format. That will preserve lens correction (when possible). There are pros and cons to converting to DNG which are beyond the scope of this document.
Settings (esp. Standard RAW Development and such)
Nitro has a large collection of preferences, or settings. They are described below. Some of the items have help strings and so they are not included here.
Appearance
- Always Use Dark Mode: Nitro defaults to running in dark mode. If you want to use the system setting for dark mode, then turn this off.
- Viewer Background: You can set the background for images in the Viewer here. The default is 18% gray which is a neutral gray to the human eye.
Interface
- Use Command Keys for Rating: this switches the rating keys from single keystrokes (1, 2, 3, 4, 5) to Cmd-1 through Cmd-5.
- Automatically Advance when Flagging / Rating: you can enable these settings to advance to the next image when rating or flagging. This only works when displaying the viewer, not in the grid view.
- Place Info & Edit on the Left Side: you can swap the controls so that Info and Edit are on the left side of the interface.
- Always Make Tabbed Windows (macOS only): when you make a new browser, turn this on to get tabs rather than separate windows.
- Double Click to Zoom Image: if you enable this, then double-click will zoom the image rather than return to the grid.
- Tighter zoom levels below 100%: Zoom In / Out changes by 10% rather than 25%.
- Increased Precision for Some Exif Keys: increases the number of decimal points shown in ExifTool output.
- Do Not Hide Sidebar Automatically: keeps the sidebar visible when displaying the One Up Viewer.
- Snap Sliders near Default Values: when editing, if the slider value is near its default value, the app will snap it there. However, if you do not like this behavior, you can turn it off here.
Editing
- Calculate Histogram with Display P3: this will switch the histogram from sRGB to Display P3, which is useful if you plan to export files to the Display P3 color profile.
- Configure Editing Options: this lets you reorder adjustments in the Edit interface as well as control whether adjustments automatically collapse to save space.
- RAW + JPEG: Edit JPEG By Default: this switches the default for RAW+JPEG from editing the RAW to editing the JPEG.
Photo Library Editing
- Update Photo Library Automatically: if this is on, then edits in Nitro will be saved to the Photo Library immediately upon the edit finishing. On macOS Ventura and iOS 16, Photos will display a confirmation dialog. If this is off, then you will need to use the Export interface to update the photo library (see the Export section for more information).
- File Format: when edits are saved to the Photo Library, the list of edit parameters are stored, as well as a rendered full-size image that includes those edits. Here, you can choose the file format for those full-size images. Apple only permits JPEG and HEIF file formats for full-size rendered images in the library. Changes to this settings, and the remaining two in this section, affect all future edits, but not previously saved ones.
- Color Profile: lets you set the color profile for full size images stored in the Photo Library. If you use a wide gamut profile like Display P3, it’s best to also use HEIF-10 rather than HEIF-8 or JPEG to avoid banding.
- Image Quality: set the compression ratio for full-size images.
Auto Lens Correction
- Apply Lens Correction When Possible: you can let Nitro automatically correct images when it can determine a good correction based on previous corrections you made manually (see Lens Correction for more details).
- Only Apply Auto Lens Correction to RAWs: Camera-generated JPEGs usually have lens correction already applied, so this usually should be set to ON to avoid applying a duplicate correction. However, if the camera doesn’t apply correction, or an insufficient one, then turning this on can make sense.
Purchase Status
This section lets you view your current active purchase(s) of Nitro. In addition, you can manage any Nitro subscription you have (displaying Apple’s interface for this). If you have a lifetime purchase or are using the trial, then the Manage Subscription button will be disabled. The View Prices button lets you display the paywall in case you want to switch to a different plan (for example, purchase the lifetime option while on subscription, or if you want to buy something while still on the trial).
Power tips
This is an evolving section.
Keyboard Shortcuts
This does not include every shortcut that is visible in the menus on macOS. The ⌥ is the Option key; the ^ is the Control key, and ⇧ is the Shift key. On iPads with a keyboard, you can press and hold the Command key (⌘) to see the shortcuts.
| Command | Shortcut |
|---|---|
| Export | ⌘E |
| Larger Thumbnails | ⌥⌘+ |
| Smaller Thumbnails | ⌥⌘- |
| Show / Hide Sidebar | ^⌘S |
| Filter… | ⌥⌘F |
| Filter: Show Unrated or Better | ⌥⌘0 |
| Filter: Show ★ or Better | ⌥⌘1 |
| Filter: Show ★★ or Better | ⌥⌘2 |
| Filter: Show ★★★ or Better | ⌥⌘3 |
| Filter: Show ★★★★ or Better | ⌥⌘4 |
| Filter: Show ★★★★★ | ⌥⌘5 |
| Filter: Show Flagged | ⌥⌘ \ |
| Filter: Show Rejected | ⌥⌘X |
| Filter: Show Favorites | ⌥⌘8 |
| Rate ★ | 1 |
| Rate ★★ | 2 |
| Rate ★★★ | 3 |
| Rate ★★★★ | 4 |
| Rate ★★★★★ | 5 |
| Flag Image | \ |
| Reject Image | X |
| Remove Flag | ] |
| Mark Favorite | . |
| Copy Edits | ⌥⌘C |
| Paste Edits | ⌥⌘V |
| Rotate Left | ⇧⌘L |
| Rotate Right | ⇧⌘R |
| Highlight Hot and Cold Pixels | ⌥⇧⌘H |
| Delete From Library | ⌘⌫ |
| Build Thumbnails | ⌥⇧⌘T |
| One-Up Mode | ⌥P |
| N-Up Mode | ⌥N |
| Compare Mode | ⌥C |
| Show / Hide Viewer | V |
| Show ExifTool Info | ⌥⇧⌘I |
| Enter Edit | Return Key |
These commands are enabled when you are in Edit:
| Edit Command | Shortcut |
|---|---|
| Show Unedited Image | M |
| Exit Edit | Return Key |
These commands are enabled when you are in Edit and have the Sliders view open:
| Edit Command | Shortcut |
|---|---|
| Add Black and White | B |
| Enter / Exit Crop Tool | C |
| Enter / Exit Straighten Tool | G |
| Rotate Left | [ |
| Rotate Right | ] |
| Flip Horizontal | ⌥⇧H |
| Flip Vertical | ⌥⇧V |
| Add Vignette | ^V |
| Enter / Exit White Balance Sampler | W |
Modification History
- 2025-03-12: Update manual for version 2025.3 improvements.
- 2025-01-26: Add information about batch delete.
- 2025-01-26: Single File Editor
- 2025-01-25: Display Modes, Enhanced RAW Support, Non-Destructive Editing, Settings, Shortcut Keys
- 2025-01-24: External Editing, Batch Processing, Export, Watermarking
- 2025-01-21: Editing on iPhones
- 2025-01-20: Quick Fixes, Presets, LUTs, Masking, and RAW+JPEG Editing
- 2025-01-20: Photo Library limitations and table of contents
- 2025-01-14: Add metadata and ExifTool documentation
- 2025-01-13: Add remaining adjustments
- 2024-10-17: Fix URLs for YouTube
- 2024-08-12: Sliders
- 2024-07-16: More adjustments
- 2024-07-15: Initial draft of manual
Questions? Comments? Suggestions for topic areas? Email support@gentlemencoders.com